
It’s a very basic concept: When you save a project file, you’re ensuring that it will be there when you need to open and work on it again. In a nutshell, managing project files involves saving and opening your project files. In addition to saving and opening project files for Microsoft Office Project 2007, you might need to search for a file you have misplaced. You might want to work with files that were created in earlier versions of Office Project 2007 or even files that were created in other applications.
You also want to guard against data loss in the event of a system crash by saving your file often enough and having a recent backup file handy. Another safeguard is password protection and security settings. These are all aspects of sound file management, which are covered in this chapter.
After you save a project, you can open it again and continue working. You can open a file stored on your own computer or on a network drive. If you’re working in an enterprise environment, you can open your project file from the Microsoft Office Project Server 2007.
You can open many different types of files in Microsoft Project, including spreadsheet, text, and database files.
You can open files from your local machine as well as from a network drive. If you’re running Microsoft Office Project Professional 2007, you can also open a project file from a project stored in the Office Project Server 2007 database.
To open a project from your local computer or a network drive, do the following:
On the Standard toolbar, click Open.
The Open dialog box appears with your default folder selected (see Figure 29-1). You can also click File, Open to display the Open dialog box.
In the Folders or the Look In box, click the drive or folder where the project file resides.
If necessary, double-click the folder that contains the project file.
Double-click the project file you want to open. You can also click the project and then click Open.

To open an enterprise project file, Office Project Professional 2007 must be connected to your project server.
Note
This section applies only if you’re working with Project Professional 2007 set up for an enterprise environment.
To open an enterprise project stored in your project server database, follow these steps:
Start Microsoft Office Project Professional 2007 and connect to your project server.
If prompted, enter your user ID and password, and then click OK.
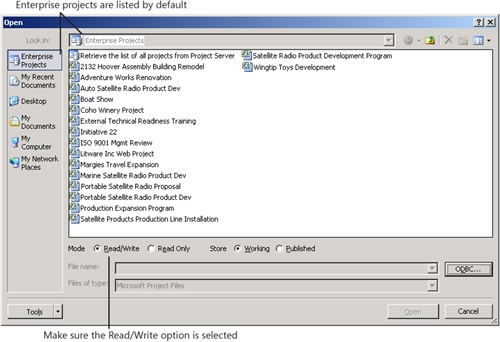
Click File, Open. The Open dialog box appears, showing the list of enterprise projects (see Figure 29-2).
By default, Enterprise Projects is selected. If you want to check out the file when you open it, make sure the Read/Write option below the list is selected. Checking out a file ensures that no one else can change the file while you are working on it. While you have the file checked out, however, others can still view the project in read-only file mode.
Double-click the name of the project you want to open.
The project file opens in Microsoft Project.
Note
For more information about working with enterprise projects, see the section titled Creating a New Enterprise Project in Chapter 22.
In Microsoft Office Project 2007, you can easily open project files created in earlier versions of Microsoft Project. If the file was created in Microsoft Office Project 2003, 2002, 2000, or Microsoft Office Project 98, it can be opened directly in Project 2007 with no additional steps required.
If the project file was created in a version of Microsoft Project earlier than Microsoft Project 98, it must first be saved as an MPX file before Microsoft Project 2007 can open it as a project file. The MPX file format is a record-based ASCII text file format available in Microsoft Project.
In addition to the MPX file format, you can open a variety of file formats other than the standard Microsoft Project Plan (MPP) file format.
Note
For more information, see the section titled Saving and Opening with Different File Formats later in this chapter.
Have you ever been unable to find a file? The search can be frustrating and painful, and it is often a big waste of time. Previous versions of Microsoft Project include a search tool in the Open dialog box. In Project 2007, that tool is gone because you can use the search tool in Windows Explorer instead to find those lost files.
To search for a file, do the following:
In Windows, click Start, All Programs, Accessories, Windows Explorer.
Start searching for the file.
If you’re working in Windows Vista, browse to the location where you want the search to begin. In the upper-right corner, type a portion of the file name you want to search for.
For example, if you know that your file name contains the word software or deployment, as in Software Deployment Project, enter one or more of these words.
As you type, results start to appear in the window. For more search options, click Search Tools on the toolbar.
If you’re working in Windows XP, click Search on the Windows Explorer toolbar. In the search pane that appears, click Documents. In the search box, type a portion of the file name you want to search for. Click any other options or links to help refine the search as you feel necessary.
You can click Use Advanced Search Options and enter a key word in the A Word Or Phrase In The Document box. Here you can type a word from the project file’s Properties dialog box, such as author, comments, company, manager, or subject. In the Look In box, you can specify the folder in which the search should be performed.
Click Search. Windows searches for your file using the criteria you set. Files found to meet your criteria are listed in the window.
All projects can be associated with a title, subject, author, manager, and other information. As soon as you create a new file, some of these fields can be automatically filled in with your user information. When you add project summary information to your project, you are adding levels of detail that can be used for reports and searches. For example, if you search for a project’s author, and the author has indeed been identified for a project, that project is returned as a result of the search.
You can also use these fields when creating customized reports. For example, if you want to create a set of reports about projects managed by a specific project manager, the Manager field needs to be completed for each project.
To add project summary information to your project, do the following:
Click File, Properties.
The Properties dialog box appears (see Figure 29-3).
If necessary, click the Summary tab.
Enter any summary information you want to maintain in the fields provided, for example, Title, Subject, Author, Manager, and Company.
Don’t feel obligated to complete every field. Just fill in the fields you think you or others in your organization would find useful, either when searching for files or when using the information to format a report.

If you include content in these fields, and the file is about to go to a wider distribution, you might want to remove that content for security and privacy purposes. To remove that content all at once, click Tools, Options and then click the Security tab. Select the Remove Information From File Properties On Save check box and then click OK. The next time you save the file, the information in the Properties dialog box is removed.