
As a project manager, you juggle time, money, resources, and tasks to carry out and complete a project successfully. Often, however, you’re juggling not only multiple elements of a single project, you’re also juggling multiple projects—each with its own associated challenges. The following are three typical scenarios involving multiple projects:
Katherine manages a large project containing many phases or components for which other project managers are responsible. In Microsoft Office Project 2007, she can set up a master project with subprojects representing those subphases. She can keep an eye on the overall picture while the project managers responsible for the individual phases have complete control over their pieces of the project.
Frank manages several unrelated projects and keeps the information for each in separate project files. Occasionally, however, he needs to see information about all of them together, perhaps to get accurate availability information about shared resources or to see whether milestone dates in the various projects are coinciding with one another. He might need to print a view or report that temporarily combines the projects. With Office Project 2007, Frank can consolidate information from multiple related or unrelated projects and can do so either temporarily or permanently.
Sarah, Dennis, and Monique are project managers in the same organization. Although they manage different projects, they use many of the same resources. Sometimes, their projects conflict with one another because of demands on the same resources at the same time. In Microsoft Project, they can create a resource pool file that contains the resources they all use. They can then link their individual project files to that resource pool. The resource availability and usage information is available through that resource pool. When one project assigns tasks to a resource in the resource pool, the resource pool is updated with that resource’s allocation information.
With Microsoft Project, you can insert one project into another. By default, inserted projects look and act like summary tasks in any task view, with their subordinate tasks readily available. You can view and change all tasks within that inserted project. The task information is changed in the source project file as well, because the two projects are linked by default.
Although you might insert projects for a variety of reasons, the most effective use of this capability is to create a master project structure with subprojects inserted within that master project. This structure is most useful when you have a large project containing a number of subcomponents, especially if those subcomponents are managed by other project managers. If you’re managing the overall project, your master project can give you the view you need into the planning and execution of all the subprojects.
Even if you’re the sole project manager, you might find the master project–subprojects structure helpful for alternating between project details and the overall project picture.
Information in the master project and subprojects are interactively linked to each other. When project managers of the subprojects make changes, by default, you see those changes reflected in your master project. The reverse is true as well—you can change subproject information in your master project, and those changes are updated in the source subproject.
Your master project can also contain regular tasks. Tasks and subprojects can be organized in relation to one another, and your inserted subprojects can be part of an outline structure and have dependencies, just like regular "native" tasks.
Note
Instead of inserting and linking projects together, you might need to just link an individual task in one project to a task in another project.
Note
For information about linking tasks between projects, see the section titled Linking Information Between Project Plans in Chapter 15.
When you want to set up a master project with subprojects, first decide where all the files are going to reside. If you’re the sole user of the projects and subprojects, the files can all be stored on your own computer. If you’re handling the master project, and other project managers are responsible for subprojects, you’ll need to store the projects on a central file server or in a shared folder to which all the managers have access.
Creating a master project is simply a matter of inserting subordinate projects into what you’re designating as the central controlling project; that is, the master project. To insert a subproject into a master project, follow these steps:
Open the project that you want to become the master project.
Display the Gantt Chart or other task sheet.
Click the row below where you want to insert the project.
You can insert the project at any level in an existing outline structure. The inserted project adopts the outline level of the task above the location where it’s inserted.
Click Insert, Project.
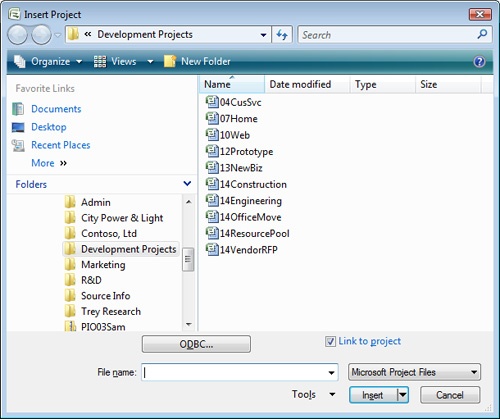
The Insert Project dialog box appears (see Figure 14-1).
Browse to the drive and folder in which the project to be inserted is stored.
Click the name of the project file that you want to become a subproject and then click the Insert button.
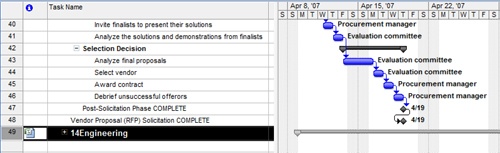
The project is inserted and its file name appears as a collapsed summary task name in the selected row. The inserted project icon appears in the Indicators field (see Figure 14-2).
To see the tasks in the inserted project, click the plus sign next to the project name in the Task Name field.
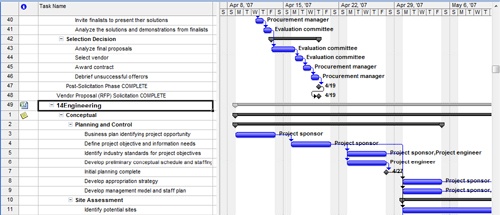
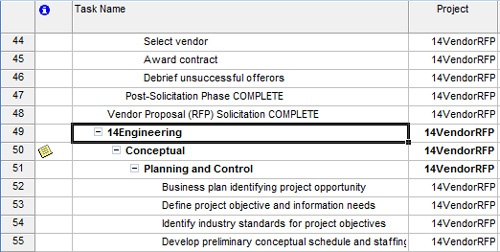
The subproject expands to show all tasks (see Figure 14-3). They look and behave exactly as if you created them in this project.
Figure 14-3. You can view and edit the tasks of an inserted project in the same way as those that were originally created in the master project.
To hide the tasks in the inserted project, click the minus sign next to the project name.
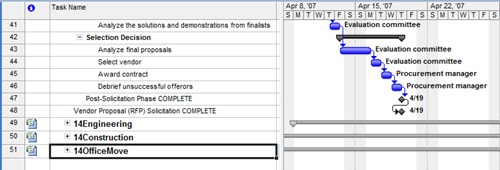
Repeat steps 3–6 for any other projects you want to insert into your master project (see Figure 14-4).
If you’re inserting a project immediately after another inserted project, collapse the tasks of the latter subproject before inserting the next one. Otherwise, the newly inserted project will become a subproject within the previous inserted project, instead of standing on its own.
Indent or outdent the inserted project as appropriate. Also link inserted projects or tasks to native tasks as needed to reflect task dependencies.
In the Network Diagram view, the summary task representing the subproject is formatted differently from other tasks and includes the path and name of the source project file. The subproject tasks themselves look the same as regular tasks.
In the Calendar view, the name of the subproject appears with the individual subproject tasks. If you don’t see the subproject name, drag the bottom edge of a calendar row to increase its height.
You might know during the preplanning stage of your project that you want your project set up as a master project with subprojects, which makes things easier. On the other hand, you might not know until you’re in the middle of project execution that a master project is just the solution you need. You can still set it up without having to significantly rework your project files.
If you already have multiple project files that you want to bring together with a master project, it’s pretty simple. Create a new project file, insert the projects, and you’re all set.
If you have a single large project file and you want to break it up into more manageable subproject files, it’s a little trickier, but still very doable. In this case, you need to do some reverse engineering. The overall process for doing this is as follows:
Create a new project file for each new subproject you want to insert.
In each new file, set the project start date (or project finish date if you’re scheduling from the finish date) for the project.
Set the project start date to the current start date of the first scheduled task in the set of tasks you will be moving into the new file.
Set the project calendar to match the project calendar in the original file.
Note
For information about copying calendars and other project elements from one project file to another, see the section titled Copying Project Elements by Using the Organizer in Chapter 15.
Use the Cut and Paste commands to move tasks from the large project file into the subproject file.
Be sure to select all task information by selecting the row headers, not just the task names. When just the cell is selected, the command name is Copy Cell; when the entire row is selected, the command name is Copy Task, which is what you want. Selecting and copying the entire task copies all necessary task information, including any actual progress information, to the new project file.
Note
For more information about moving project information, see the section titled Copying and Moving Information Between Projects in Chapter 15.
After you have all your separate project files set up, as well as the proper project start and finish dates and calendars, you can insert those files as subprojects into your master project.
New in Microsoft Office Project Professional 2007 and Microsoft Office Project Server 2007 is the ability to insert one enterprise project into another to create a master project-subproject relationship between projects. Using this technique, you can model a program of projects, reflecting all the projects that are being implemented under a specific program in your organization. The overarching program can be represented as the master project, with all the projects within that program set up as subprojects within the master project.
Note
For more information, see the section titled Working with Enterprise Projects in Chapter 22.
You can edit any task, resource, or assignment in a subproject. By default, any change you make to subproject information is instantly made in the source project file. Likewise, any change made in the source project file updates the information in your master project because the subproject and source project are linked. This updating is convenient because you never have to worry about whether you’re synchronized with the most current subproject information.
In some cases, you might not want subproject information to be changed from the master project. Maybe you want to view it only in the master project—which might be the case when you have several project managers in charge of their own subprojects—and you need to see only the high-level view of all integrated project information. In this case, you can change a subproject to be read-only information in your master project, as follows:
Display the Gantt Chart or other task view.
Click the subproject summary task name.
On the Standard toolbar, click Task Information.
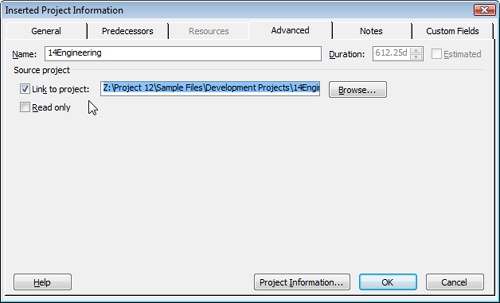
In the Inserted Project Information dialog box, click the Advanced tab (see Figure 14-5).
Select the Read Only check box.
Now, if you make changes to any subproject information and then try to save the master project, you’ll see a message reminding you that the subproject is read-only.
Whether you make a subproject read-only or not, whenever you change subproject information in a master project and save the master project, you are given the choice to save the subproject information to the subproject file. You can always discard those changes.
Work with Subproject-Related Fields
You might find it helpful to add certain subproject-related fields to a task sheet or resource sheet. You can add the Project, Subproject File, and Subproject Read Only fields to a task sheet. In addition, if you want to know which project a resource is associated with, add the Project field to the Resource Sheet.

To add a field, click the column heading to the right of where you want the new field to be inserted. Click Insert, Column. In the Field Name list, click the field you want.
If you make a subproject read-only, and you add the Subproject Read Only column to a task sheet, you’ll see that the subproject summary task is marked Yes, whereas the subtasks are marked No. However, they’re all read-only.
You can also sort, group, or filter tasks or resources by these fields.
Note
For more information about the ways you can view project data, see the section titled Rearranging Your Project Information in Chapter 4.
By default, Microsoft Project calculates a single critical path across all your projects. If you prefer, you can change your settings to see the critical path for each subproject, as follows:
In your master project, click Tools, Options and then click the Calculation tab.
Clear the Inserted Projects Are Calculated Like Summary Tasks check box.
This procedure results in a critical path being calculated for the master project independent of the subprojects. In addition, the critical path for each subproject is shown.
You can easily see the critical path(s) in the Tracking Gantt chart.
You can keep a subproject in a master project but unlink the subproject from its source project file. When you unlink a subproject from its source project file, changes to the source file won’t affect the subproject in the master project, and vice versa. To disconnect a subproject from its source, follow these steps:
Display the Gantt Chart or other task view.
Double-click the subproject summary task.
In the Inserted Project Information dialog box, click the Advanced tab.
Clear the Link To Project check box.
Click OK.
If a message asks if you want to save changes to the subproject, click Yes or No as appropriate.
The subproject is now disconnected from its source, and all the tasks are adopted as native to the master project. The inserted project icon is removed from the Indicators field. Although the project file name still appears in the summary task name field, it’s now just a regular summary task—not an inserted project (see Figure 14-6).
You can completely delete a subproject from the master project and keep the subproject file intact. To remove a subproject from the master project:
Display the Gantt Chart or other task view.
Select the heading of the row containing the subproject summary task.
Click Edit, Delete Task. Or simply press the Delete key.
A Planning Wizard message reminds you that you’re about to delete a summary task along with all of its subtasks.
Make sure that the Continue option is selected and then click OK.
The subproject is removed from the master project. However, the source file for the subproject is still intact.