
The Project Center is your hub of information for your project portfolio. This is where you can inspect the views of an individual project or analyze aspects of multiple projects to get the high-level picture of projects you need.
You can see the projects that are taking the bulk of your resources’ time. This can help you determine whether you need to shift resource allocation and to ramp up or ramp down on hiring or the use of vendors.
You can use specialized views to look at overall costs of entire projects. You can combine projects in different ways to see those costs from various angles.
Most importantly, you can get that vital "view from 30,000 feet" into the collection of your organization’s projects and gain insight into the key scope and activities of the organization. This can help you understand where your organization is now so that you can make strategic decisions about where you want it to go.
You can see the summary list of all published enterprise projects and then drill down to examine the details of an individual project. To see the summary of enterprise projects, follow these steps:
On the Quick Launch task bar, click Project Center.
The Project Center appears. The table lists all enterprise projects, with each project occupying a single row and showing summary data for that project in the table and in the Gantt Chart area.
Note
The Project Center also lists any published proposals and activity plans. These are discussed in the section titled Creating Proposals and Activity Plans later in this chapter.
Manipulate the Project Center table to see the information you want.
In the View box, click the view that shows the best information. Different views can be created and added to the Project Center by the project server administrator or portfolio manager.
You can also sort, filter, or group information to see it the way you need it. You can move the split bar between the table and chart to show more of one side or the other. Scroll through the table or chart. Compare values in a field of information among the various projects.
To see detailed information for any one of your enterprise projects, follow these steps:
In the Project Center, click the name of the project you want to review.
The Project Details view appears, showing the component tasks of the selected project (see Figure 24-8)
Just as with the summary table, choose the view that shows the best information for your current purpose. Sort, filter, or group information. Scroll through the table or chart to find the information you’re looking for. Compare values in a field of information among the various projects.
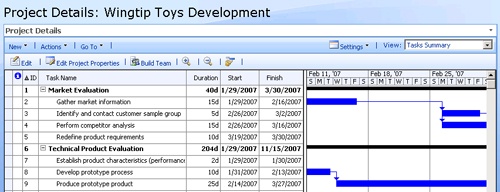
Analyze Projects by Using a Gantt Chart
Whether you’re working on the Project Center page or the Project Details page, the default view contains a Gantt chart. In a Gantt chart, the left side of the view is a table, and the right side displays the Gantt bars showing the start, duration, and finish of each item (project, task, or assignment) across the timescale. The current date is shown as a dashed vertical line.
You can click the Zoom In or Zoom Out buttons to see more or less detail in the time span shown in the chart area.
If you want to see the complete details for a project, you can open it in Office Project Professional 2007. On the Project Center page, click the Enterprise Project icon in the indicators column for the project you want to open in Project Professional 2007.
Depending on the logon method chosen by your project server administrator, you might need to enter your user name and password.
The selected project is now checked out to you and appears in Project Professional. You can view the project, resource, cost, and other information as needed. You can also make changes as your privileges allow.
Note
For details about making changes to project information and publishing those changes to the project server, see the section titled Managing Your Project Files on the Server in Chapter 22.
Portfolio managers or project managers can set up programs in the project server through the implementation of master projects and subprojects. This structure supports large organizations implementing several large projects and subprojects, often taking place at various locations around the world.
When you open a master project, all the subprojects are listed (and checked out) as tasks in any task view. You can then drill down by clicking one of the subprojects to see the tasks within that project.
Dependencies and deliverables between the projects within a program can be identified by the project managers, thereby providing the visibility needed to know when a key deliverable that affects related project is coming due.
Documents, issues, and risks can be added, tracked, linked with tasks, assigned responsibility, and eventually closed. They all become an important aspect of seeing the project through to a successful completion. They are also instrumental in capturing project archival information for use in planning future projects.
Note
For details about creating and viewing documents, risks, and issues, see the section titled Managing Documents, Risks, and Issues in Chapter 22.
The lists of documents, issues, and risks associated with a project are maintained in the project workspace. Typically, all projects have a Windows SharePoint Services workspace created for them. In addition to the documents, issues, and risks, the workspace can include announcements among team members, a calendar of upcoming events, a list of deliverables between related projects, and team discussions.
To open the workspace for a project, select the project either on the Project Center or Project Details page and then click Go To, Project Workspace. The workspace opens in a separate browser window (see Figure 24-9).
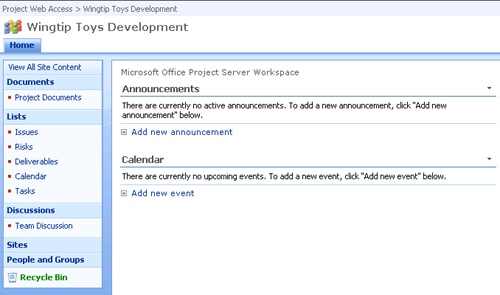
Figure 24-9. By default, as soon as a new enterprise project is published, a new workspace is created for it.
A project team can use the workspace for communication and collaboration as well as the repository for project documents. It is also essential for tracking project issues and risks.
In addition to reviewing and editing existing projects, you can create new projects. This can be helpful if you want to share new project ideas with your staff, or if you want to set up the vision of a program that portfolio managers and project managers can then implement.
To create a new project, click New, Project on the Project Center page. The Project Professional window appears with a blank project (see Figure 24-10).

Note
For more information about creating a new project, see the section titled Creating a New Project Plan in Chapter 3. When you’re ready to save, publish, and check in your new project, see the section titled Managing Your Project Files on the Server in Chapter 22.
New in Microsoft Office Project Server 2007 is the means for using a simplified Web-based interface in Project Web Access to track activities throughout the entire project life cycle, that is, just before and just after the project itself is implemented.
With proposals, you can set up a preproject plan. This is useful if you have a vision for a new project with some high-level tasks, and you want to record these ideas without creating a new enterprise project. When the proposal is approved, it can be converted into a project.
Activity plans can best be used to track the routine operations that typically take place after the completion of a project. You can also use activity plans to track maintenance activities, very small projects, or your own personal to-do list.
Note
Proposals and activity plans all operate only in Project Web Access; there is no visibility to these plans in Project Professional. However, when they are published (rather than just saved), they do appear in the Project Center for all to see.
With both proposals and activity plans, you can use the views and reports in Project Web Access to do high-level or detailed analyses. This can be particularly useful with proposals. Portfolio managers and executives can review the proposals and evaluate feasibilities within the organization’s strategic goals to help decide whether to move forward with a project.
To create a proposal or activity plan, follow these steps:
On the Quick Launch task bar in Project Web Access, under Projects, click Proposals And Activities.
To create a proposal, click New, Proposal.
To create an activity plan, click New, Activity.
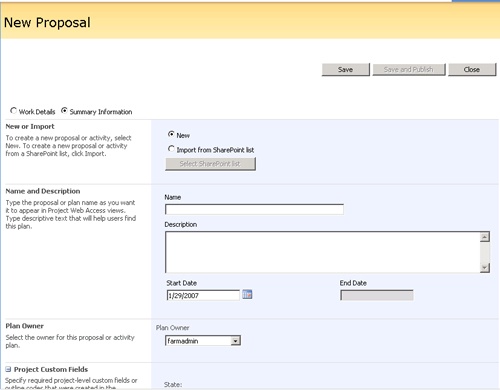
The difference between the two is that the proposal might have a few more proposal-related fields than the activity plan (see Figure 24-11).
Near the top of the page, make sure that the Summary Information option is selected.
Work through the page, reading the section descriptions and completing the fields as appropriate.
If you’re creating a proposal, and if the Workflow Status section is present, click the link to the workflow status and activity pages.
The workflow status feature can be enabled or disabled as part of the customization done for your organization by your project server administrator.
If you’re creating a proposal, under Project Custom Fields, click the button next to the State box and then click Proposed.
The State field is a "built-in" custom field designed for use with proposals. The three enumerated states are Proposed, Approved, and Rejected.
When finished, click Save.
The new proposal or activity plan is saved to your project server, and the Work Details view of your new proposal or activity plan appears. Make sure that the Work Details option is now selected.
Enter the details of your new proposal or activity plan. Enter task names and durations. Use the buttons on the toolbar to indent outline levels or insert new tasks.
If you want to link tasks with a finish-to-start task relationship, select the predecessor task by clicking the row header. Hold down Ctrl and then click the row header for the successor task. Click the Link Tasks button.
An icon in the indicators field shows that the two tasks are linked. You can only link tasks with a finish-to-start task relationship in a proposal or activity plan.
Click Save to save the proposal or activity plan to the project server but keep it to yourself. Click Save And Publish to save the proposal or activity plan to the project server and also make it available for others to see and use.
Unpublished proposals or activity plans are useful when you just need to keep a personal to-do list for yourself. Published proposals or activity plans are useful as a mini-project that you want to be able to share with other resources.
Your new proposal or activity plan is listed on the Proposals And Activities page. If you published the proposal or activity plan, others will be able to open it. If you only saved the proposal or activity plan without publishing it, only you can see it in the list.
To view, change summary information, or change task details about your proposal or activity plan, follow these steps:
On the Quick Launch task bar in Project Web Access, under Projects, click Proposals And Activities.
On the Proposals And Activities page, click the name of the proposal or activity plan you want to view or change.
By default, the Work Details view of the proposal or activity plan appears.
Make any changes you want to the task information and then click Save.
If you need to view or change summary information, above the table, select the Summary Information option.
The Summary Information view of the proposal or activity plan appears. In this view, you can review or change the description, the proposal state, and so on.
When finished, click Save or Save And Publish. Click Close.
On the Proposals And Activities page, proposals are the items that have a state associated with them: Proposed, Approved, or Rejected. Activity plans are also listed on this page, but their state fields are blank. You can select a proposal or activity plan without opening it by clicking anywhere in the row except on the name itself.
You can add resources to your proposal or activity plan and assign them to tasks. Resources assigned to tasks in proposals or activity plan are not really assigned; that is, they do not see notifications of new assignments, even if the proposal or activity plan is published. The purpose for doing this is to suggest possible resources in the event that this proposal or activity plan is approved and then converted to a project.
To add resources to your proposal or activity plan, follow these steps:
On the Quick Launch task bar in Project Web Access, under Projects, click Proposals And Activities.
On the Proposals And Activities page, click the name of the proposal or activity plan to open its Work Details view.
If you make any other changes to the proposal or activity plan, click Save.
Click Build Team.
On the Build Team page, select the check boxes next to the resources you want to add to the proposal or activity plan and then click Add.
Click Save.
Click in the Resource Name field for a task, and you’ll see a list of all the resources you just added. Click a resource to suggest the assignment of that resource to the current task. You can only add one resource to a task.
When finished, click Save or Save And Publish and then click Close.
If it is determined that the proposal or activity plan should become a project, you can easily convert it. To do this, follow these steps:
On the Quick Launch task bar in Project Web Access, under Projects, click Proposals And Activities.
On the Proposals And Activities page, click anywhere in the row except on the name to select the proposal or activity plan but not open it.
Click Convert.
Read the alert that appears and then click OK.
The proposal or activity plan is submitted to the project server queue for processing. When it’s finished, the Proposals And Activities page appears, and your proposal or activity plan is no longer listed.
On the Quick Launch task bar, click Project Center.
You’ll see your former proposal or activity plan, which is now a project, listed there.
Click the name of your newly converted proposal or activity plan.
You can now edit the proposal or activity plan, which is now a project, in Project Web Access or Project Professional. If you had already added resources, when you publish the project, those resources will see their assignments for this project.