Suppose you want to move larger quantities of information between Microsoft Project and Excel, or you don’t like having to jockey columns around to make sure data transfers to the right place. For these situations, you can import or export information in either direction—from Microsoft Project to Excel or from Excel to Microsoft Project. Importing information means bringing information from a foreign file format into the current application (for example, from the Excel XLSX file format to Microsoft Project, which uses the MPP file format). When you export information, you’re saving information in the current application in a different file format so that it can be opened by another application. In both cases, the information will look as if it were originally created in the target application.
With two templates specifically designed for integration, Excel gives you a head start on importing information for tasks, resources, and even assignments from Excel to Microsoft Project. These templates include commonly used fields, and the fields are already mapped to the corresponding fields in Microsoft Project. All you have to do is open the Excel file and make a few choices, and the data is imported into your project plan.
One template is designed for importing basic task information into a Gantt Chart. Another template allows for more detailed project information, including resources and assignments.
If a team member or other stakeholder has created project information in Excel without using one of these templates, never fear. You can still import an Excel workbook into Microsoft Project the "old way."
Building a project plan doesn’t have to be a solitary activity. You might ask others on the project team to create task lists for their portion of a project and then incorporate their work in an Excel workbook into Microsoft Project. The Microsoft Project Task List Import template in Excel, introduced back in Project 2002, simplifies this process.
The standard Excel importing process involves mapping the Excel columns to the corresponding Microsoft Project columns to ensure that the right information ends up in the right places in your Gantt Chart task sheet. The Microsoft Project Task List Import template has columns set up to work with Microsoft Project’s Import Wizard to handle that aspect of the process for you. For example, suppose that the marketing department suggests an addition to the project plan that clarifies their test marketing efforts, but they want to develop the list of detailed tasks in Excel. Have them use the Microsoft Project Task List Template in Excel, as follows:
In Excel, click the Microsoft Office Button and then click New.
In the New Workbook window, click Installed Templates.
In the Installed Templates list, click Microsoft Project Task List Import Template and then click Create.
Excel creates a new file that contains columns corresponding to fields in the default Gantt Chart in Microsoft Project.
The columns in this Excel template are specifically designed for integration with Microsoft Project. For example, the ID, Duration, Start, and Deadline fields are all set up to flow into their corresponding Microsoft Project fields.
The second worksheet, labeled either Info_Table or "Microsoft Project, contains a brief explanation of how Microsoft Project can use and augment the template.
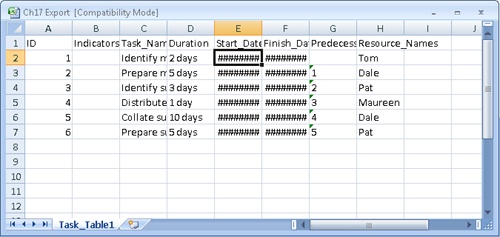
Enter the task information in the Task_Table sheet (see Figure 17-14).
In the template, the columns are labeled so you know where to enter each piece of information. The columns are also formatted to fit the type of data they are to contain. Be sure to enter data valid to the data type that’s expected for each column. For example, the Start cells are already set up to display values as dates, but you still must type valid dates. The Duration field must contain values that represent a length of time. You can type a value, such as 2d or 2w, to represent the duration, but typing words or a date will generate an error when you try to import the file.
When you finish entering task information, click the Microsoft Office Button, click Save, and give the file a name.
Make sure that you’re saving the new task list as an Excel workbook, rather than overwriting the template (Excel Template).
Close the file.

At this point, the new Excel task list is ready to be imported into Microsoft Project, as follows:
In Microsoft Project, open the project plan into which you want to import the Excel task list.
On the Standard toolbar, click Open.
In the Open dialog box, browse to the location on your computer or network where the Excel task list is saved.
Click the arrow on the button that indicates the current file type, which is set to Microsoft Project Files by default, and click Microsoft Excel Workbooks.
The file for the task list, along with other Excel workbooks, appears in the list.
Caution!
If you don’t see Excel workbooks that you’ve created, the problem is that choosing Microsoft Excel Workbooks as the file type does not display Excel 2007 workbooks, unless you save them with the Excel 97-2003 Workbook format. Compounding the problem, Microsoft Project sets a Security option by default that doesn’t open or save files creating in Excel 97-2003 format. To open Excel workbooks created in Excel 2007, be sure to save them with the Excel 97-2003 Workbook format. In Project, choose Tools, Options. In the Options dialog box, click the Security tab and select the Allow Loading Files With Legacy Or Non Default File Formats options.
Click the task list workbook and then click Open.
The Import Wizard appears.
On the Welcome page of the Import Wizard, click Next.
On the Data Type page, select the Project Excel Template option and then click Next.
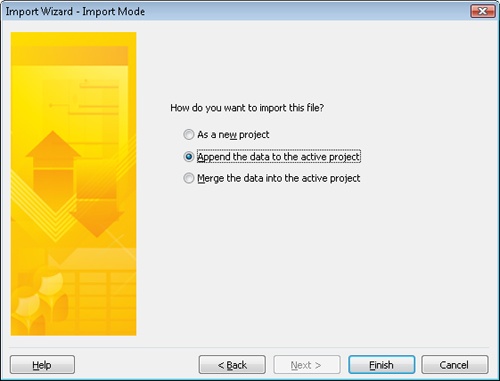
On the Import Mode page, specify whether you want to import the file as a new project, append the tasks to the currently active project, or merge the data into the active project (see Figure 17-15).
If you built an entire task list in the Excel template, select As A New Project. To add new tasks to the end of the current file, select Append The Data To The Active Project. If you plan to insert the imported tasks somewhere within the Project task list, select Merge The Data Into The Active Project.
The values from the Excel columns are imported into the corresponding Microsoft Project fields, for example, the value in the Duration column imports into a task Duration field. If you scroll to the right, you see that the resource names appear in the Resource Names column, but the Predecessors column is still empty. The imported tasks still need to be organized, outlined, and linked.
Note
For more information about inserting and organizing tasks, see Chapter 3.
Inside Out: Remove the SNET constraints
All tasks imported from the Excel task list template come in to the project file with a Start No Earlier Than (SNET) constraint. If the workbook’s Start field contains a date, that becomes the SNET constraint date. If no date was entered, the SNET date is today’s date.
Be sure to review those imported start dates. If any dates besides today’s date are entered, check with the person who provided the task list to see if the SNET constraint was intentional. Unless you explain to the people who use the template that Microsoft Project figures out start dates for them, they might think they’re supposed to enter a start date.
To make a schedule flexible so that you can respond quickly to the inevitable changes, you need to change those imposed (and arbitrary) date constraints to the most flexible As Soon As Possible constraint. To change the constraints all at once, do the following:
In the Gantt Chart, select the names of all tasks with date constraints.
You can select the Start column if you’re changing all tasks in the project to an ASAP constraint.
If you want to change only certain tasks, click their row headings while holding the Ctrl key.
On the Standard toolbar, click Task Information.
In the Multiple Task Information dialog box, click the Advanced tab. In the Constraint Type box, click As Soon As Possible.
When asking others to enter task information by using the Excel Task List template, ask them to enter any important finish dates in the Deadline column and any important start dates in the Notes column. By doing this, you can change all the SNET constraints to ASAP without having to examine every imported date to see whether it’s a real date constraint.
Note
For more information about setting constraints, see the section titled Scheduling Tasks to Achieve Specific Dates in Chapter 5.
If some team members or project stakeholders are doing more than just building a task list in Excel, have them use the Microsoft Project Plan Import Export Template. This Excel template includes columns for building a project with tasks, resources, and assignments.
The standard Excel importing process involves mapping the Excel columns to the corresponding Microsoft Project columns to ensure that the right information ends up in the right locations in your Resource Sheet, for example. The Microsoft Project Plan Import Export Template is set up to enter more detailed resource information in the format needed by Microsoft Project. To use this template, make sure that Excel is installed on the same computer as Microsoft Project and then follow these steps:
In Excel, click the Microsoft Office Button and then click New.
In the New Workbook window, click Installed Templates.
In the Installed Templates list, click Microsoft Project Plan Import Export Template and then click Create.
Note
If the template is not in the Templates dialog box (which might be the case if you’re working with Excel 2000 or earlier), close the dialog box and then click File, Open. Browse to the Office template directory, which is typically Program FilesMicrosoft OfficeTemplates1033. Double-click the Projplan.xlt file.
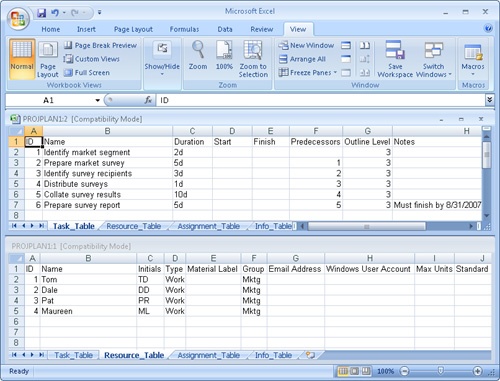
The template creates a new file with columns that correspond to many commonly used fields in Microsoft Project. There is one worksheet each for tasks, resources, and assignments. A fourth worksheet, labeled Info_Table, provides general information on how to use the template.
The data fields are set up so that when you fill in the worksheets and import them into Microsoft Project, you don’t need to map your data. If you decide to include additional columns (fields) of data, Microsoft Project maps that data to appropriate fields in the Microsoft Project data tables for you.
At the bottom of the workbook window, click the tab for the worksheet you want to use.
Enter the data in the fields you want. You don’t have to use all the fields in all the sheets; just the ones you need (see Figure 17-16).
When finished, click Save on the Standard toolbar and give the file a name.
Make sure you’re saving the new file as an Excel workbook, rather than overwriting the template.
Close the file.
This workbook is ready to import into Microsoft Project.
To import the information from this new Excel workbook into Microsoft Project, do the following:
On the Standard toolbar in Microsoft Project, click Open.
Go to the location on your computer or network where the Excel workbook is saved.
In the Files Of Type list, click Microsoft Excel Workbooks.
The workbook appears in the list of folders and files. Remember, choosing Microsoft Excel Workbooks as the file type does not show Excel workbooks saved in Excel 2007 format. To use an Excel 2007 file, save it with the Excel 97-2003 format.
Click the workbook file and then click Open.
The Import Wizard appears.
On the Welcome page, click Next.
On the Data Type page, click Project Excel Template and then click Next.
On the Import Mode page, specify whether you want to import the file as a new project, append the resources to the currently active project, or merge the data into the active project.
Click the Finish button.
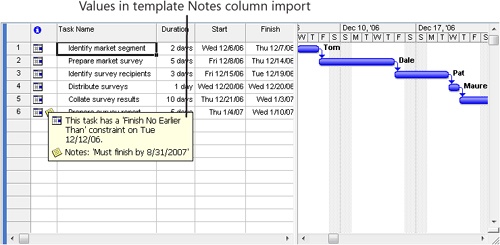
The new project opens with all the data populated from the template (see Figure 17-17).
If you or your team members created an Excel workbook containing project information before you knew of the existence of the templates, you can still import Excel worksheets. The only difference is that you must map the columns in the workbook to fields in Microsoft Project, so your information imports to the appropriate fields.
To do this, follow these steps:
On the Standard toolbar in Microsoft Project, click Open.
Go to the location on your computer or network where the Excel workbook is saved.
In the Files Of Type list, click Microsoft Excel Workbooks.
The workbook appears in the list of folders and files.
Click the workbook file and then click Open.
The Import Wizard appears.
Read the Welcome page and then click Next.
On the Data Type page, select Only Selected Data and then click Next.
On the Map page, select New Map and then click Next.
Note
If you are a veteran data importer, you might have maps that you created in the past. If the Excel workbook you want to import conforms to the settings in an existing map, select Use Existing Map and then click Next. On the Map Selection page, select the name of the map you want to use and click Next.
On the Import Mode page, specify whether you want to import the file as a new project, append the resources to the currently active project, or merge the data into the active project. Click Next.
On the Map Options page, select the types of data you want to import. You can select one or more types depending on what you want to import. If your workbook file includes column headings, select the Import Includes Headers check box. Click Next.
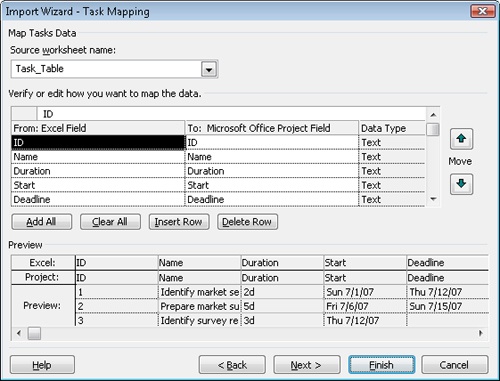
On the Mapping page, under Source Worksheet Name, select the sheet that contains the data you’re importing, even if it’s just Sheet1.
The fields from the selected Excel sheet appear in the From: Excel Field column. If there is an obvious match to a Microsoft Project field, it appears in the To: Microsoft Office Project Field column. If Microsoft Project cannot identify a matching field, the field name appears as (Not Mapped).
For any fields that are not mapped, click the box and select the Microsoft Project field in which you want to store the corresponding imported field. Scroll through the entire table and make sure that all the Excel fields you want to import are mapped to a Microsoft Project field.
The Preview area shows a sample of how your table data is mapped (see Figure 17-18).
If, on the Map Options page, you selected multiple types of data to import (for example, Tasks and Resources), click Next to proceed to the Mapping page for the next data type. Repeat steps 10 and 11 for that data type.
You can potentially work through a Task Mapping, Resource Mapping, and Assignment Mapping page.
When finished mapping, click Next.
On the End Of Map Definition page, click Save Map if you want to save the map for future use.
In the Save Map dialog box, in the Map Name box, type a name for the map and then click Save.
Click Finish.
Microsoft Project creates a new project file if you specified that and imports the data from the workbook into the fields you specified.
Suppose that your company’s accounting department wants to analyze your project cost information in conjunction with those of other projects taking place throughout the company. The department uses Excel to analyze project cost data, so you’ll need to export your Microsoft Project information to an Excel workbook.
With the Export Wizard, you can export information you select or export key information from the entire project.
When you export data as an Excel file, it is saved as an Excel 5.0/95 workbook. However, new default security settings in Microsoft Project 2007 block the opening or saving of legacy or nondefault file formats.
Therefore, you cannot save an Excel export map until you have set your Microsoft Project security appropriately. To do this, follow these steps:
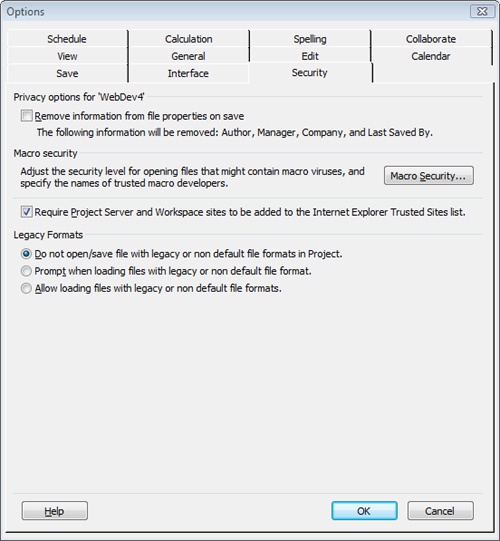
Click Tools, Options and then click the Security tab (see Figure 17-19).
Under Legacy Formats, select either the Prompt When Loading Files With Legacy Or Non Default File Format option (medium security) or the Allow Loading Files With Legacy Or Non Default File Formats option (low security).
Although you can export most information types from Microsoft Project to Excel, it’s most useful to export numeric data for further analysis in Excel. Numeric data is any data that can be used in calculations and mathematical operations. Examples of such data include cost and work data. Work data (such as hours) can be converted to numeric fields, but it is stored in Microsoft Project as text because of the unit labels such as hours, days, or weeks. On the other hand, dates are not considered numeric data, even though they consist mostly of numbers.
When preparing to export information from Microsoft Project to Excel for numerical analysis, first decide which tasks, resources, and fields you want to export to Excel. You can export certain selected or filtered tasks or resources to Excel. You can export the same fields you see in a given table—such as the Earned Value, Cost, or Tracking table—or you can export just three or four fields that you select. You can export a large representation of all your project data with the different types of project, task, resource, and assignment data appearing in different worksheets within the Excel workbook.
To specify the project data you want to export and then send it to Excel, follow these steps:
In Microsoft Project, open the project plan that contains the project information you want to export.
Apply the view that contains the task, resource, or assignment information you want to export.
The table or fields applied to the view do not matter at this point because as part of the export process you choose the fields you want.
If you want to export only certain tasks, resources, or assignments, select their rows by using the Shift or Ctrl keys. If you want to export all tasks, all resources, or all assignments, click the Select All cell in the upper-left cell in the view, above the ID number.
Later, as part of the export process, you can apply a task or resource filter if you want.
Click File, Save As.
The Save As dialog box appears.
Browse to the drive and folder where you want to save your information.
In the Save As Type list, click Microsoft Excel Workbook.
In the File Name box, enter a name for your new Excel file.
By default, the project file name is adopted with the XLS extension.
Click Save.
On the Welcome page of the wizard, click Next.
On the Export Wizard – Data page, be sure that the Selected Data option is selected and then click Next.
On the Export Wizard – Map page, be sure that the New Map option is selected and then click Next.
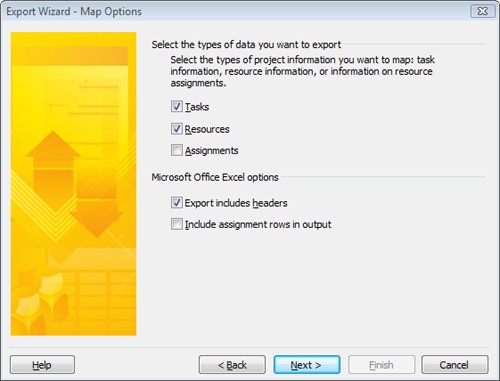
On the Export Wizard – Map Options page, select the check box for each type of data you want to map and export: Tasks, Resources, or Assignments. Under Microsoft Office Excel Options, be sure that the Export Includes Headers check box is selected (see Figure 17-20). Click Next.
On the Mapping page of the wizard, in the Destination Worksheet Name box, you can enter a name for the target worksheet within the workbook you’re creating.
You can also just use the default name provided, for example, Task_Table1.
In the Export Filter box, click any filter you want to apply to the tasks or resources you’re exporting.
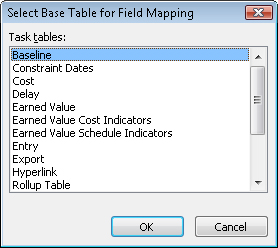
If a particular Microsoft Project table—for example, the Entry table, the Cost table, or the Earned Value table—includes most or all of the fields you want to export, it’s best to simply base the data mapping on that table. To do this, click the Base On Table button. The Select Base Table For Field Mapping dialog box appears (see Figure 17-21).
Figure 17-21. Select the Microsoft Project table that contains the fields you want to use as your export data source.
Click the Microsoft Project table you want to export (for example, Earned Value or Cost) and then click OK. The fields that define that table appear in the data mapping grid under Verify Or Edit Microsoft Project’s Assumptions For How You Want To Import The Data.
You can add and remove fields in the data mapping grid one at a time as well. Do this to modify the fields to be exported or to create a list of fields from scratch. If you are building a data map from scratch rather than starting with a table, be sure to start with the Name field to include the task name, or the Resource Names field to make sure the resource name is exported.
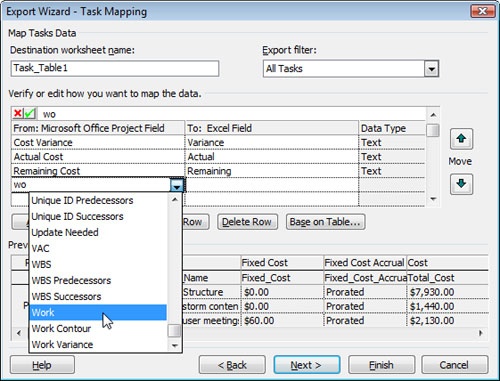
To add a field, click in a blank row in the From: Microsoft Office Project Field column, and then click the arrow that appears. Select the field you want from the list that appears (see Figure 17-22). If you are mapping tasks data, only task fields are listed. If you are mapping resource data, only resource fields are listed. And, if you are mapping assignment data, only assignment fields are listed. Type the first two or three characters of the field name to move to it quickly in the list. Press Enter or Tab, and the field name is entered, along with the Excel name counterpart.
To remove a field from the list, click the field name and then click Delete Row.
If you want to export just numeric project data, you can use this table to select only those fields containing numeric values. For example, you might select Name, Cost, and Duration.
In the table, specify how each field of data should be defined when it is exported to Excel.
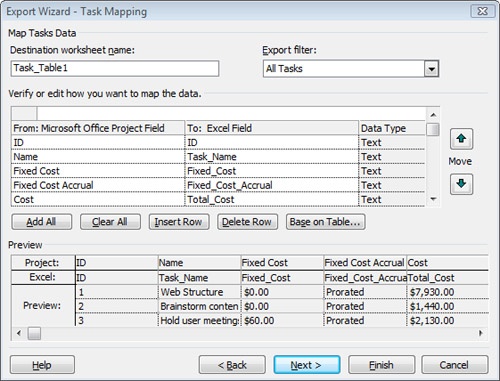
As soon as you enter a field in the From column, its default equivalent appears in the To: Excel Field column, showing the name of the field as it will appear in the Excel workbook column heading (see Figure 17-23). You can change the Excel column heading here if you want (for example, from Baseline Cost to Task Budget).
Figure 17-23. The Microsoft Project field, its Excel equivalent, and the data type as exported show in the table.
The Data Type column shows the data type of the field. Incidentally, this data comes in as Text fields, even though it might really be number, date, or currency fields in Microsoft Project. To simplify the export process, all fields are changed to text fields. Then you can easily convert the data type for any of these fields in Excel, which is especially important for numeric data on which you want to run calculations.
Use the Move up and down buttons to the right of the table to rearrange the order of the fields, which represents the order in which the columns will appear in Excel.
In the Preview area at the bottom of the Mapping page, a preview of the data shows how it will appear in Excel. Use the scroll bar to view all the columns.
When the map is the way you want, click Next.
If you had specified on the Map Options page that you want to export more than one type of data—tasks, resources, and assignments, for example—the Export Wizard – Resource Mapping page appears again for the next data type. Repeat steps 13–18 for that data type.
Each additional type of data will result in a separate worksheet in the Excel workbook.
When you have defined the data maps for each type of data, the Export Wizard – End Of Map Definition page appears.
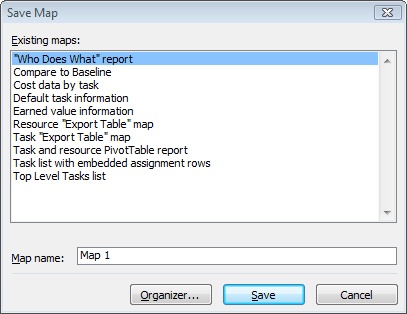
If you expect to export this same information again, click the Save Map button. In the Save Map dialog box, give your map a name (see Figure 17-24). Click Save.
Figure 17-24. The Save Map dialog box shows all built-in export maps and any additional maps that you have created.
Your export map is now saved in the global project template (Global.mpt), so it’s available in any project file on your system.
Click Finish.
Your specified project data is exported and saved as a complete Excel workbook in the Excel 97-2003 format and in the exact layout you defined.
Troubleshooting
Microsoft Project is not exporting to Excel because of security settings
You might define all your fields in the export map, only to click Finish, see a security error message, and lose all your mapping work.
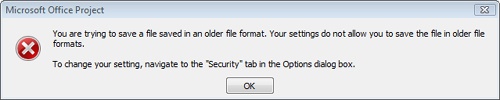
Because of new default security settings in Microsoft Project 2007, you cannot save an export map until you have set your security to allow loading of files with legacy or nondefault file formats. This is because Microsoft Project saves the Excel file to a Microsoft Excel 5.0/95 workbook to ensure that you can read the exported project data in whatever recent version of Excel you have installed on your computer.
To change your security setting, follow these steps:
To open and review your exported project data in Excel, follow these steps:
In Excel, click the Microsoft Office Button and then click Open.
In the Open dialog box, browse to the drive and folder in which you saved your exported Excel workbook.
Double-click the workbook.
Your project data appears in the workbook, using the tasks (or resources or assignments), filter, and table or fields you selected in the export process (see Figure 17-25).
Adjust columns, change data types, and do any additional reformatting needed. If you’re analyzing numerical data, you can now set up the formulas or charts you want.
Sometimes, Smart Tags appear on some cells, for example, when the export transfers numbers into fields formatted as text. Click a Smart Tag and, if necessary, click a command to correct an error.
Click the Microsoft Office Button and then click Save.
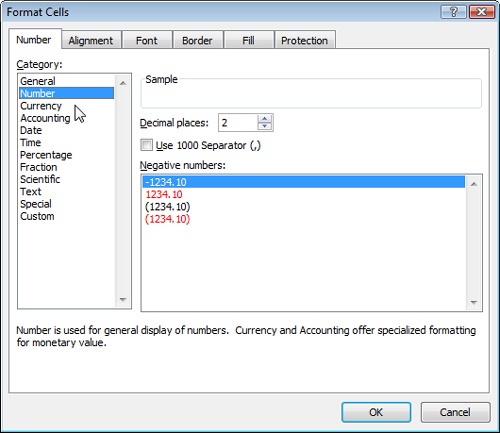
Figure 17-26. Use the Number tab in the Format Cells dialog box in Excel to change the data type or number format of a set of exported project fields.
Even though the Task Mapping page of the Microsoft Project Export Wizard says they’re Text fields, currency fields (such as Cost and Actual Cost) and earned value currency fields (such as BCWS and VAC) are automatically formatted as currency in Excel.
Inside Out: Overwrite Excel Format
Suppose that you changed information or formatting in your new Excel workbook that contains your exported project information, and now you’re ready to save your changes. After you click the Save button, you might get a prompt asking whether you want to overwrite the older Excel format with the current format.
To ensure compatibility with older versions of Excel, Microsoft Project exports to the Microsoft Excel 5.0/Excel 95 file format. When you begin the process of saving the new Excel file the first time, Excel prompts you to update the format to the current version you have installed on your computer, which might be Excel 2003 or Excel 2007, for example.
Click Yes to update the workbook format, which ensures that you can use the latest features of your current Excel version on your exported project data.
Just as you can import information about tasks, resources, and assignments, the Export Wizard helps you export complete project information, organized by Task, Resource, and Assignment data types, which in turn are presented in their own separate worksheets in a single Excel workbook. However, this export procedure does not export timephased information, such as resource usage over time.
To create a complete Excel workbook of project information from your project file, follow these steps:
In Microsoft Project, open the project whose complete information you want to export to Excel.
Click File, Save As.
Browse to the drive and folder where you want to save your information.
In the Save As Type list, click Microsoft Excel Workbook.
In the File Name box, enter a name for the Excel file and then click Save.
In the Export Wizard Welcome page, click Next.
In the Export Wizard – Data page, click Project Excel Template and then click Finish.
Your data is saved as an Excel workbook in the Excel 97-2003 format.
To open and review your exported project data in Excel, follow these steps:
In Excel, open the Excel file.
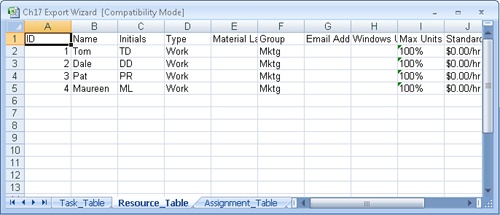
The workbook contains four worksheets of discrete information: Task_Table, Resource_Table, Assignment_Table, and Info_Table (see Figure 17-27). Info_Table provides general instructions for using this workbook.
Click the Microsoft Office Button and then click Save.
Note
When you export date fields from Microsoft Project to Excel, the Excel date fields also include the time. If you prefer, you can change the Excel date format. To do this, first click the column headings for the date fields. On the Home tab, in the Cells group, click Format and then click Format Cells. In the Format Cells dialog box, click the Number tab if necessary. Under Category, click Date. Click the date format you prefer and then click OK.
If you frequently use the same Microsoft Project data in Excel to, for example, run a monthly report, you would benefit from saving the export map and re-using it each time, rather than having to re-create it each time you need it. At the end of the export map definition step in the export data process, you click the Save Map button and give your map a name. Then you can call the map up in the future when you need to export the same Microsoft Project fields again. To do this, follow these steps:
Open the project that contains the data you want to export with your saved export map.
If you want to export only certain tasks, resources, or assignments, use the Shift or Ctrl keys to select their rows. If you want to export all tasks, all resources, or all assignments, click the Select All cell in the upper-left cell in the view, above the ID number.
Click File, Save As.
The Save As dialog box appears.
Browse to the drive and folder where you want to save your information.
In the Save As Type box, select Microsoft Excel Workbook.
In the File Name box, enter a name for your new Excel file.
By default, the project file name is adopted with the XLS extension.
Click Save.
The first page of the Export Wizard appears.
On the Welcome page of the wizard, click Next.
On the Export Wizard – Data page, be sure that the Selected Data option is selected. Click Next.
On the Export Wizard – Map page, select Use Existing Map. Click Next.
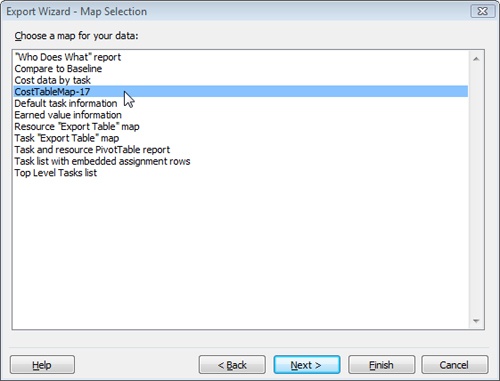
In the Export Wizard – Map Selection page, click your export map from the list (see Figure 17-28).
Click Next.
The Export Wizard – Map Options page appears with selections as defined by your saved export map.
Click Next.
The Export Wizard – Task Mapping page appears with the fields already defined as you had saved them.
Click Finish.
Your project data is exported as an Excel file.