Linking is another method of exchanging data between applications. By linking information, you maintain a connection to the source application. When a change is made to the information, it’s reflected in the target application.
A major advantage of linking is that the file size is much smaller than it would be if the information in the linked file were embedded. A potential difficulty with linking is that you always need to know the current location of the linked file and its update status. If the linked file is moved, the link is broken. If the information in the linked file becomes obsolete, the linked information also becomes out of date.
You can create a link from Microsoft Project information in another application using the Copy and Paste Special commands. Follow this procedure:
In Microsoft Office Project 2007, display the view that contains the information you want to copy and link to another application.
If it’s text-based information—such as tasks, resources, or assignment fields—select the information. If it’s graphical information—such as a Gantt Chart, Resource Graph, or Network Diagram—arrange the view to contain the information you want represented in the other application.
Click Edit, Copy.
The Copy command changes based on the type of view you’re copying and what is currently selected:
If you’re in a sheet view with an individual cell selected, click Edit, Copy Cell.
If you’re in a task sheet view with a row selected, click Edit, Copy Task.
If you’re in a resource sheet view with a row selected, click Edit, Copy Resource.
Open the target application, for example, Word. Place the cursor where you want the information to be inserted.
In the target application, click Edit, Paste Special.
If you’re linking into a Microsoft Office 2007 application that uses the Ribbon, on the Home tab, in the Clipboard group, click the arrow under Paste. In the menu that appears, click Paste Special.
In the Paste Special dialog box, select the Paste Link option (see Figure 16-15).
Review the choices available in the As box. Click each one to read its description in the Result box and then select the one that meets your needs.
The choices vary depending on the type of information that was copied in Microsoft Project. One of the choices is always Microsoft Office Project Document Object, which creates an embedded object that’s linked.
Click OK.
The linked information appears in the target application. When changes are made to the information in Microsoft Project, those changes are reflected in the target application.
Note
For information about linking information from Microsoft Project to Excel, see the section titled Linking Between Microsoft Project and Excel in Chapter 17.
You can link a source object from another application into a target area in Microsoft Project. Linked graphical information can be pasted only in select locations in Microsoft Project, for example, the Gantt Chart, Notes areas, and the Task and Resource Forms. Linked textual information can also be pasted into a table cell.
To link data from another application, follow these steps:
In the source application, select the information to be linked in Microsoft Office Project 2007 and then click Edit, Copy.
If you want to copy and link information from a Microsoft Office 2007 application that uses the Ribbon, on the Home tab, in the Clipboard group, click Copy.
In Microsoft Office Project 2007, display the view and select the location to contain the linked information.
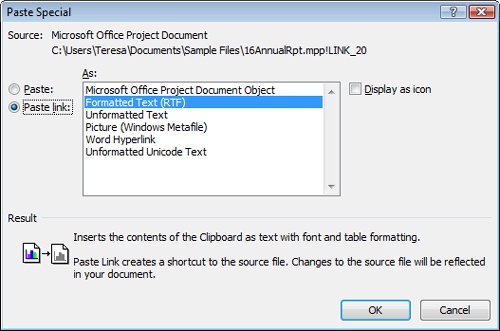
Click Edit, Paste Special.
In the Paste Special dialog box, click the Paste Link option.
The As box changes to present the options for linking the copied information into Microsoft Project.
Review the choices available in the As box. Click each one to read its description in the Result box and then select the one that meets your needs.
Click OK.
The linked information appears at the selection point in your project. When changes are made to the information in the source application, those changes can be reflected in this project file.
By default, whenever you open the project file containing the link, a message appears, asking whether you want to re-establish the link between the files (see Figure 16-16). Clicking Yes re-establishes the link and updates any changed information.
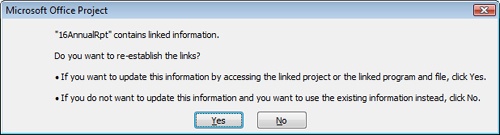
If you do not want to see this alert each time you open the project, click Tools, Options and then click the View tab. Under Show, clear the OLE Links Indicators check box.
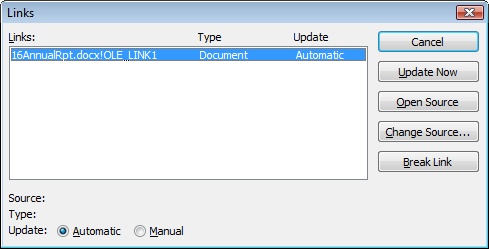
To review and work with links in your project, follow these steps:
Click Edit, Links.
The Links dialog box appears, showing all links existing in your project file (see Figure 16-17).
If you chose not to update a link when opening the project file or if you’re not prompted, you can select a link and click Update Now.
If the linked document location has changed, you can update the information in the project by clicking Change Source.
To break the link with the source application, click Break Link.
Note
For information about linking information from Excel to Microsoft Project, see the section titled Linking Between Microsoft Project and Excel in Chapter 17.