
Among the advantages of enterprise project management is the capability to work with the enterprise resource pool and its associated functions. The enterprise resource pool is the set of people, equipment, and materials available to be assigned and carry out the work of projects throughout an organization. It contains fundamental information about resources, such as skill sets and availability, which helps you find the right resources for your projects. The enterprise resource pool also contains cost information, which not only helps you work within your allotted budget, but also helps accounting and human resources figure costs from their points of view.
With the enterprise resource pool, comes a high level of visibility into resource availabilities, skills, roles, and utilization. Project managers as well as upper management can see when additional staff is needed and where there are underutilized resources. They also can view the basic data for all project resources in one place.
Resource managers can also use the enterprise resource pool to staff, plan, and budget with more accuracy and confidence. They can see resources by skill level and definition, availability, and organizational hierarchy. In addition, they can assist project managers with current and anticipated resource requirements by analyzing the enterprise resource database. Together with project managers, resource managers can work with generic resources in the enterprise resource pool to perform planning and contingency analyses.
The project server administrator is often the one who sets up and maintains the enterprise resource pool. However, because of the specialized information having to do with resource skills, costs, and availability, other specialists—such as the portfolio manager or a human resources representative—might be involved in the setup. By default, the project server administrator and portfolio manager are given permission to add and edit enterprise resource data.
Note
For more information about enterprise resource pool setup, see the section titled Administering the Enterprise Resource Pool in Chapter 21.
You can have Microsoft Project "mine" the entire enterprise resource pool to find resources who have the exact skills, availability, and other traits you need for your project. Specifically, in the planning processes of your project, when putting together the perfect team to carry out your project, you can:
Find and add resources by name.
Find resources associated with a certain title, code, skill set, or other attribute.
Use a generic resource as a placeholder.
Find resources who are available for work during a certain period of time.
Replace a resource already on your team with another enterprise resource.
Find more resources that have the same traits as a resource already on your team.
Match and replace generic resources in your project with real enterprise resources.
Propose tentative resources to your project.
You can use the Build Team dialog box to find enterprise resources and add them to your project team. The Build Team process adds resources to your project but does not necessarily assign tasks (unless you replace a resource who has already been assigned to tasks). After the resources are added, you use the Assign Resources dialog box, as usual, to assign tasks to project resources.
You might already know exactly which enterprise resources you need to add to your team. If this is the case, find and add resources by name as follows:
Make sure that Microsoft Office Project Professional 2007 is connected to the project server and then check out the project to which you want to add resources.
Click Tools, Build Team From Enterprise.
If there are more than 1,000 resources in the enterprise resource pool, a dialog box appears to help you prefilter the enterprise resources. In the custom enterprise resource field that appears, select a code or other attribute to help define the list of resources you’ll be working with. Click OK.
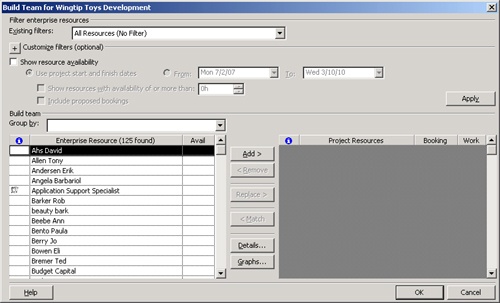
The Build Team dialog box appears (see Figure 22-15). The upper portion of the dialog box contains filters and options for finding resources that meet certain criteria. The Enterprise Resource table on the left contains the list of enterprise resources. When no filter is applied, the table lists all members of your organization’s enterprise resource pool. The Project Resources table on the right lists any enterprise and nonenterprise resources you have already added to the current project.
By default, the enterprise resources are listed alphabetically by name. To be certain, you can re-sort the list by clicking the Enterprise Resource column heading.
Scroll through the Enterprise Resource table to find and select a resource by name.
You can select multiple resources at once. Use Shift to select multiple adjacent resources; use Ctrl to select multiple nonadjacent resources.
Click the Add button.
The selected resources are added to the Project Resources table.
Note
You can learn more about a resource by clicking the resource name in either table and then clicking the Details button. The Resource Information dialog box opens. You can review information about this resource’s availability, costs, and custom fields. This information is set up by users with special permission to edit resource information, as granted by the project server administrator.
Custom fields for identifying enterprise resource attributes can be defined by your project server administrator or other user with the proper permissions.
After the custom resource fields are defined, the project server administrator (or other user) associates resources in the enterprise resource pool with the custom resource fields that define those resources. In this way, the enterprise resources are defined by their job code, qualifications, specialties, locations, or any other attributes needed by an organization.
Note
For more information about custom enterprise fields, see the section titled Working with Custom Enterprise Fields earlier in this chapter.
You can use the custom enterprise resource fields to do the following:
Match or replace resources in your project with others associated with the same values in their custom fields. You do this using the Build Team dialog box.
Substitute generic or enterprise resources in your project with enterprise resources possessing matching values in their custom fields. You do this using the Resource Substitution Wizard.
Arrange enterprise resources in your project by their custom fields so that you can review your project team by your organization’s resource breakdown structure or other resource hierarchy. You do this by sorting, filtering, or grouping by the custom field.
Your project server administrator is responsible for setting up the custom enterprise resource fields according to the needs of your organization.
Note
For more information, see the section titled Customizing Enterprise Project Fields in Chapter 21.
To add a custom enterprise resource field to your enterprise project, follow these steps:
With Microsoft Office Project Professional 2007 connected to the project server, check out the enterprise project to which you want to add the custom enterprise resource field.
Display the Resource Sheet and table to which you want to add the custom enterprise field.
Right-click the column heading where you want the custom enterprise field to be inserted. Click Insert Column on the shortcut menu.
In the Field Name box, find and click the custom enterprise resource field.
You’ll know the name of the field from information you’ve received from your project server administrator.
In the Insert Column dialog box, click OK.
A column containing the selected custom enterprise resource field appears in the sheet view.
Note
In Microsoft Office Project 2003, certain enterprise resource outline codes could be used to define multiple traits within a single code. New in Microsoft Office Project 2007 is the ability for custom fields to represent multiple hierarchical values through the use of a lookup table. In fact, a lookup table can be defined for all the custom fields (Text, Number, Date, and so on) except for Flag, which by its nature is defined by Yes or No.
You can use generic resources in Microsoft Project 2007 to help you define resources of a particular role or skill set, for example, VB Programmer Expert.
Generic resources can be created by the project manager. Generic resources can also be created and added to the enterprise resource pool by the project server administrator or other user with the proper permissions. For best results, an organization should define a generic resource for every classification in its resource breakdown structure. Project managers and resource managers can then use those generic resources in their projects for planning and modeling purposes.
Because generic resources are just placeholders for real resources, they are not associated with any availability status. They can be used in as many projects by as many project managers as needed.
Generic resources are invaluable for helping project managers identify team requirements and ultimately find real resources. Generic resources are typically defined by a job title or function, rather than a person’s name. What makes generic resources truly useful is the association of custom enterprise resource fields, which go a long way toward defining the attributes of the resource.
With generic resources associated with custom fields that define resource attributes, you can populate your project team using the Build Team dialog box.
Note
Your organization might have established a set of generic resources as part of the enterprise resource pool. If this is the case, rather than create your own, use the Build Team dialog box to find the generic resources you want and then add them to your project team.
If you’re not sure whether generic resources have been defined for your organization, check with your project server administrator. Or, just filter and browse the enterprise resource pool in the Build Team dialog box.
Sometimes you don’t need to add specific enterprise resources to your project; sometimes you just need a collection of people from a particular department or group to carry out certain tasks. You can assign tasks to the group, and members of the group can assign themselves to the tasks, report on them, and complete them.
This is the idea behind team assignment pools, also known as team resources, a new feature in Project 2007. A team assignment pool might be a department such as Marketing, or a group of individuals doing the same job such as Editors.
Note
For you to be able to use team resources, your project server administrator needs to have defined the team assignment pool in the enterprise resource pool.
To find team assignment pools and add them to your list of project resources, do the following:
With Microsoft Office Project Professional 2007 connected to the project server, and your enterprise project open, click Tools, Build Team From Enterprise.
In the Build Team dialog box, click the plus button next to Customize Filters to expand the section.
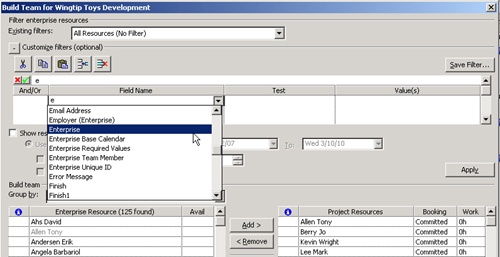
Click in the Field Name column of the first row and select Team Assignment Pool. You can move to it quickly in the list if you type te.
In the Value(s) field, click Yes.
Click the Apply button.
All enterprise resources that are identified as team assignment pools, or team resources, are listed in the Enterprise Resource table.
Click a team resource you want and then click Add to add it to your project resource list (see Figure 22-16).
Figure 22-16. Build a custom filter to find all team assignment pools and then add the one you want to your project.
You can now assign tasks to the team assignment pool.

If you’re looking for a set of enterprise resources who fit a certain set of criteria, you can use the various built-in filters, groups, and other controls in the Build Team dialog box to narrow your search.
To find and add resources who possess certain attributes, follow these steps:
Click Tools, Build Team From Enterprise.
The Build Team dialog box appears.
If you want to filter the enterprise resource list by using a built-in filter, under Filter Enterprise Resources, click the arrow in the Existing Filters box and then select the filter that describes the resources you’re looking for, for example, material resources or group. Provide any additional information as applicable.
Only those enterprise resources who meet the criteria of the filter are listed in the Enterprise Resource table. This not only reduces your choices to a more manageable level, but it also shows you just the resources that are most useful for your project’s purposes.
If you need to find resources who have a certain amount of time available to work during a specific period of time, you can specify that with the Show Resource Availability controls. Select the Show Resource Availability check box.
Specify whether you want to use the project start dates or other specific dates to indicate when you need the resources.
If you want to filter for resources with a specific amount of available time, such as 180d or 40w, select the Show Resources With Availability Of Or More Than check box.
Click the Apply button.
The resources listed in the Enterprise Resource table change to show only those resources who meet the availability criteria you specified. The amount of availability shows in the Avail column.
If you want to group the resources in the table by a particular resource field, click the arrow in the Group By box and then click the field. For example, you might find it helpful to group resources by Standard Rate or Group.
The list of enterprise resources is rearranged according to your selected group.
Note
For more information about using existing filters and groups, see the section titled Rearranging Your Project Information in Chapter 4.
You can quickly create your own filter within the Build Team dialog box if you need to filter on a specific field (or two or three) that isn’t provided for in the Existing Filters list. Creating your own Build Team filter is particularly useful if you want to find resources that are associated with a certain value in a custom enterprise field such as Enterprise Resource Text or Enterprise Resource Number. Likewise, if RBS codes have been set up and applied to enterprise resources, you can filter for a particular RBS code. If the filter is especially useful or one that you expect to apply often, you can save it.
To create a Build Team filter, follow these steps:
In the Build Team dialog box, click the plus button next to Customize Filters to expand the section.
A filter definition table appears.
Click in the Field Name column of the first row and select the field you want to filter on (see Figure 22-17).
In the Test column, click the test you want to use, such as Equals or Is Greater Than.
In the Value(s) field, enter the value that should be stored in the field for the resources found by the filter.
If you need to define another set of criteria, in the second row of the table, click in the And/Or field and then click And or Or.
In the rest of the row, select the field, test, and value for the second set of criteria.
When finished defining the filter, click Save Filter if you want to save it for future use. Otherwise, click the Apply button.
You can combine the application of your filter with other criteria, including an existing filter or work availability criteria. When you click the Apply button, the list of enterprise resources changes to show only those resources who meet the criteria of your filter(s).
Note
For more information about creating your own filters, see the section titled Customizing Filters in Chapter 25.
You can use the Build Team dialog box to replace a resource on your project team with one from the enterprise resource pool. This replacement is useful if you have a local resource in the project that you know has been added to the enterprise resource pool. It is also useful if you want to replace generic resources in your project with real enterprise resources.
To replace an existing project resource with an enterprise resource, follow these steps:
In the Build Team dialog box, apply any filters or groups you need to find the replacing resource.
In the Project Resources table, click the name of the resource you want to replace.
In the Enterprise Resource table, click the name of the replacing resource.
Click Replace.
The resource selected in the Enterprise Resource table replaces the one selected in the Project Resources table. If the original resource had reported any actual work on assigned tasks, the original resource remains in the project plan as associated with those assignments. Any remaining work on any tasks assigned to the original resource is now assigned to the replacing resource.
Suppose you have a resource who has the perfect combination of qualifications for certain tasks in your project, and everything is great—except that you need five more resources just like him. If the existing resource and enterprise resources have attributes defined for them—such as RBS codes, skill sets, or certifications—you can use the Build Team dialog box to find other resources who have the same attributes.
To find more enterprise resources whose defined traits match those of an existing project resource, follow these steps:
In the Build Team dialog box, apply any filters or groups you might need to define matching resources.
In the Project Resources table, click the name of the resource whose traits you want to match with additional enterprise resources.
Click Match.
The list of filtered enterprise resources is searched for resource matches. The resulting list of resources represents resources whose attributes exactly match those of your selected resource.
If you want to add any of these resources, click their names and then click Add.
You can combine the Match and Replace functions in the Build Team dialog box to help you find enterprise resources to replace generic resources, as follows:
In your project plan, click Tools, Build Team From Enterprise.
The Build Team dialog box appears.
If necessary, apply any filters to better focus the list of resources.
In the Project Resources table, select your generic resource and then click Match.
Microsoft Project 2007 finds all the resources in the enterprise resource pool that have the same attributes as the ones you defined in your generic resource. Those matching resources are listed in the Enterprise Resource table.
Select the matching resource you want to replace the generic resource and then click Replace.
The matching enterprise resource is added to your project team. If you had assigned any tasks to the generic resource, the replacing enterprise resource is now assigned to those tasks.
Repeat steps 3–4 to match and replace any other generic resources in your project plan.
As soon as you add enterprise resources to your project team and assign tasks to those resources, their availability information changes in the enterprise resource pool. This availability update ensures, for example, that a single resource is not inadvertently booked full-time to two or three different projects.
However, sometimes you need to build a project and its team as a proposal or estimate. You might want to show actual resources in the project, to demonstrate the skill level as well as calculate real costs. However, if the project is just an estimate or model, you probably wouldn’t want to tie up the resource’s availability in case the project does not actually happen.
In another scenario, you might be working with an approved project and want to run a what-if analysis on the impact of adding certain resources to the project.
For either of these cases, you can soft-book resources on your project by adding them as proposed, rather than committed resources on your team.
Note
The booking type, proposed or committed, applies to the resource as a whole on your project. The booking type does not apply to individual assignments within the project.
By default, all resources are booked as committed. To specify that a resource you’re adding is to be booked as a proposed resource on your project team, do the following:
In the Build Team dialog box, apply any filters or groups you might need to find the resources you want.
In the Enterprise Resource table, click the name of the resource you want to add as a proposed resource.
Click Add.
In the Project Resources table, in the Booking field for the resource, change Committed to Proposed.
This resource is now considered soft-booked. As you work through your project, you can choose to consider resources’ booking types when assigning tasks to resources in your project and when leveling assignments to resolve overallocations.
Note
When you’re searching for resources who meet certain availability criteria, you can choose whether Microsoft Project should consider proposed resource information. In the Build Team dialog box, select or clear the Include Proposed Bookings check box.
A resource’s booking type becomes part of the resource information. When you’re ready to confirm a resource’s place in your project, display the Resource Sheet or other resource view. Double-click the proposed resource’s name to open the Resource Information dialog box. On the General tab, in the Booking Type box, change Proposed to Committed.
Once you have built your project team, you’re ready to assign tasks to its members. You can assign tasks to regular resources, team resources, or generic resources. Use the Assign Resources button on the Standard toolbar to open the Assign Resources dialog box. Assign your project tasks to the resources in your list.
Note
For more information, see Chapter 7.
When you assign a task to a work resource, by default, that resource becomes the assignment owner, that is, the person responsible for providing progress updates about the assignment. However, what if certain resources do not have Project Web Access readily available to them, or if there’s some other reason they won’t be able to provide progress updates? Or, what if the work resource is a piece of equipment?
In such cases, you can identify a different assignment owner. Even though the assigned resource is still responsible for carrying out the assignment itself, the assignment owner becomes responsible for the progress updates on the assignment.
Note
Assignments to material resources and generic resources are owned by the default assignment owner, which is typically the person who created the project plan. That’s probably you. Cost resources do not have assignment owners.
To identify an assignment owner different from the assigned resource, follow these steps:
With Microsoft Office Project Professional 2007 connected to the project server, and your enterprise project open, make sure that the resource has been assigned to tasks.
Click View, Task Usage or View, Resource Usage to open an assignment view.
Click the assignment for which you want to designate a different assignment owner.
In the Task Usage view, the assignment is the resource name under the task name. In the Resource Usage view, the assignment is the task name under the resource name.
On the Standard toolbar, click Assignment Information.
On the General tab, in the Assignment Owner box, select the name of the resource to be responsible for submitting status updates for this assignment.
All enterprise resources added to this project, as well as the project manager who originally published this project, are listed as possible assignment owners.
Click OK.
In Project Web Access, the assignment owner will receive the assignment information and the reminders to submit updates and status reports on this assignment.
Each work resource has a default assignment owner. Typically, that default is the resource himself or herself. Otherwise, the default assignment owner is the project manager who generated the current project. The default assignment owner for any enterprise resource can be changed to any work resource on your project team by the project server administrator or other user with the permission to edit enterprise resource information. This is done on the Edit Resource page in Project Web Access.
Although you cannot change the default assignment owner in Project Professional, you can see who it is on the General tab in the Resource Information dialog box.
The flip side of the assignment owner is the status manager. Just as a resource needs to be responsible for submitting status information about an assignment, another person needs to be responsible for receiving that status information. That person is the status manager.
The default status manager for a task is the person who originally published the task to the project server. There can be different status managers for different tasks. To see or change the status manager for tasks, add the Status Manager field to a task sheet in Project Professional, as follows:
With Microsoft Office Project Professional 2007 connected to the project server, and your enterprise project open, switch to a task sheet such as the Gantt Chart.
Right-click the column heading next to where you want to insert the Status Manager field.
In the shortcut menu that appears, click Insert Column.
In the Field Name box of the Column Definition dialog box, select Status Manager and then click OK. To move to Status Manager quickly, type stat.
The Status Manager field appears in the task sheet.
To change a status manager for a task, click in the field and then click the arrow. In the list of status managers for the current project, click the status manager you want for this task.