
When you import or export information between Microsoft Project and other applications, you’re transferring information so that it appears as if the source information were originally created in the target application. Importing and exporting essentially converts the information from the file format of the source application to that of the target application.
When you import and export data from other applications in and out of Project 2007, files are often saved as an earlier version of whatever file format you’re working with. However, new default security settings in Microsoft Office Project 2007 block the opening or saving of legacy or nondefault file formats.
Therefore, in most cases you will not be able to finish the import or export operation until you have set your Microsoft Project security appropriately. To do this, follow these steps:
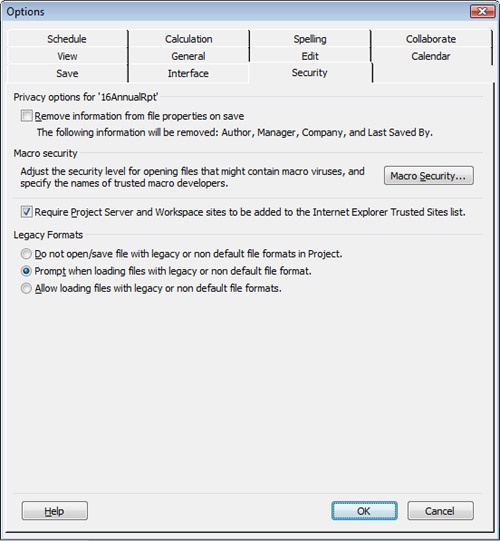
Click Tools, Options and then click the Security tab (see Figure 16-19).
Under Legacy Formats, select either the Prompt When Loading Files With Legacy Or Non Default File Format option (medium security) or the Allow Loading Files With Legacy Or Non Default File Formats (low security) option.
You can bring information into Microsoft Project from another application and another file format by importing it. Importing converts another application’s file format into the Microsoft Project file format. You start an import process by simply using the File, Open command.
You can import the file formats shown in Table 16-2.
Table 16-2. Supported Import File Types
File format | File name extension |
|---|---|
Project files (for Project 1998 through 2007) | .mpp |
Project templates | .mpt |
Project databases | .mpd |
Project workspaces | .mpw |
Project Exchange (for Project versions 4.0 and 98) | .mpx |
Access databases | .mdb |
Excel workbooks | .xls |
Text files (tab delimited) | .txt |
CSV Text files (comma delimited) | .csv |
XML format files | .xml |
To import data to Microsoft Project, follow these steps:
In Microsoft Project, click File, Open.
Click the file type button, which is labeled Project Files by default, and then click the file format of the file you are importing, for example, Access Databases or Text (Tab Delimited).
Browse to the drive and folder that contain the file you want to import.
Click the file name of the file you are importing and then click the Open button.
Read the Import Wizard welcome page and then click Next.
On the Import Wizard – Map page, select the New Map option. Click Next.
On the Import Mode page, select whether you want to import the file as a new project, to be appended to the current project, or to be merged with the current project. Click Next.
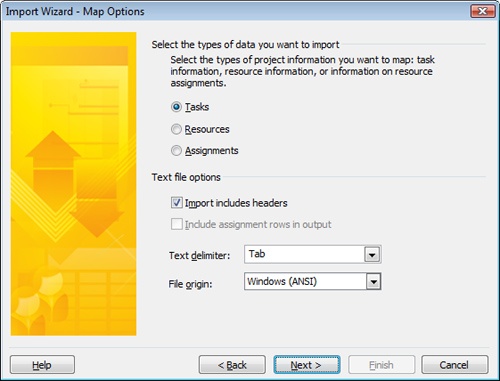
On the Import Wizard – Map Options page, under Select The Types Of Data You Want To Import, click the Tasks, Resources, or Assignments check box as appropriate (see Figure 16-20). Click Next.
Figure 16-20. Use the Map Options page of the Import Wizard to specify the types of data you are importing.
You will see a separate Mapping page for each data type you select on this page, for example, Task Mapping, Resource Mapping, or Assignment Mapping.
On the Mapping page, complete the fields to specify the information to be imported. In the To: Microsoft Office Project Field column of the table, specify how fields from the source application are to map to specific Microsoft Project fields. Any unmapped data appears in red and will not be imported. Click Next.
If, on the Map Options page, you selected multiple types of data to import (for example, Tasks and Resources), click Next to proceed to the Mapping page for the next data type. Repeat step 9 for each additional data type.
You can potentially work through a Task Mapping, Resource Mapping, and Assignment Mapping page.
On the Import Wizard – End of Map Definition page, click Save Map if you want this import map you just defined to be saved for future use.
In the Map Name box of the Save Map dialog box, type a name for the map and then click Save.
Click Finish.
The imported data appears in your project plan as you specified. This process might take a few minutes, depending on the source of the information and the speed of your computer. However, after the information is imported, it’s set in your project plan. Save the project, and the information is there for you to work with instantly, as if you had originally created it in Microsoft Project.
Note
For information about importing information from Excel to Microsoft Project, see the section titled Importing and Exporting with Excel in Chapter 17.
Note
For information about importing information from Microsoft Project to Visio, see Chapter 19.
You can use information from Microsoft Project in another application and another file format by exporting it. Exporting converts your Microsoft Project information into the file format of another application. You start an export process by simply using the File, Save As command.
You can export a project file to the file formats shown in Table 16-3.
Table 16-3. Supported Export File Types
File format | File name extension |
|---|---|
Project files (for Project 1998 through 2007) | .mpp |
Project templates | .mpt |
Excel workbooks | .xls |
Excel PivotTables | .xls |
Text files (tab delimited) | .txt |
CSV Text files (comma delimited) | .csv |
XML format files | .xml |
To export data from Microsoft Project, follow these steps:
In Microsoft Office Project 2007, open the project that contains the information you want to export.
Click File, Save As.
In the Save In list, select the drive and folder where you want to save the new exported file.
In the File Name box, enter the name for the new exported file.
By default, the name of the project is adopted, and the extension representing the new file format will be added.
In the Save As Type list, click the file format to which you want to export your project information. For example, if you want to export your project information to XML, click XML Format (*.xml).
Click the Save button.
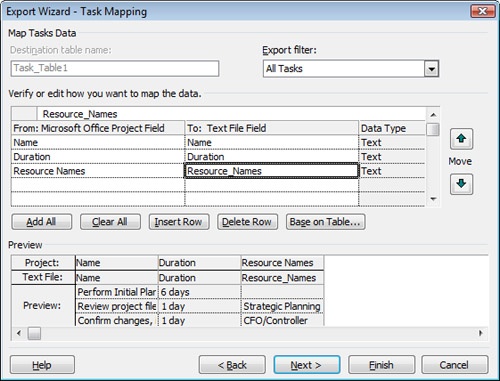
The Export Wizard opens and guides you step-by-step through the specifics of data mapping the information you want from Microsoft Project to the target file (see Figure 16-21). Some steps and choices of the Export Wizard vary depending on the file type you are exporting to.
Work through each page of the Export Wizard, clicking Next after making your selections on each page.
On the final page, click Finish. Microsoft Project exports your project information to the selected file format.
Note
If you want to export a wide and representative range of fields, click in the Export Wizard Task Mapping or Resource Mapping page, click the Base On Table button, and then click Export. The task Export table contains more than 70 task fields. The resource Export table contains more than 20 resource fields.
Note
For information about exporting information from Microsoft Project to Excel, see the section titled Importing and Exporting with Excel in Chapter 17.
Note
For information about exporting information from Microsoft Project to Visio, see Chapter 19.
Microsoft Project plans can be saved in XML format. XML is a self-defining, adaptable language that’s used to define and interpret data between different applications, particularly in Web documents. With XML, you can:
Define the structure of data used.
Make your data platform-independent.
Automatically process data defined by XML.
Define your own unique markup tags that hold your data elements.
The simple and consistent nature of XML makes it very useful for exchanging data between many types of applications. You can use this project XML data in any application that recognizes XML.
By creating and applying an XSL template to the XML data, you can determine which project data is used and how it’s formatted for use in a particular application, to generate a report, or to publish to a Web site.
Note
In Microsoft Office Project 2007, you can no longer save a project as an HTML or HTM file for an instant Web page. Instead, save the project as an file and then apply an XSL style sheet.
To save your project as an .XML file, follow these steps:
Open the project plan you want to save as an XML file.
Click File, Save As.
In the Save As Type field, click XML Format.
In the Save As dialog box, navigate to the location where you want to save the new XML file.
In the File Name box, type the name for your new XML file.
Click Save.
The file is saved. You or your organization’s Webmaster can now open it in a markup language editor, apply style sheets, and prepare the information for publication on the Web.
Note
If you just want to show a view of project information in a report or on a Web site, you can simply copy a picture of the view using the Copy Picture function. This creates a GIF graphic file, which you can insert into a report or on a Web page. For more information, see the section titled Capturing a View for Other Applications earlier in this chapter.
In Microsoft Office Project 2007, the ability to save project fields to a database has been removed from the Save As dialog box. This includes the Microsoft Project database (.mpd file), and the ODBC file for SQL Server or Oracle Server. The ability to save a project file in XML format replaces this functionality, because saving the file to XML essentially saves all contents of all fields that make up the project file database.
Although you cannot export to these database formats, you can still open Microsoft Project database and ODBC files to import them into your project plan. ODBC is the protocol used to access data in SQL database servers. With ODBC drivers installed, it is possible to connect a Microsoft Project database to SQL databases.
To open an ODBC-compliant database file in Microsoft Project, follow these steps: