Now that your project file has the foundation it needs, you’re ready to get down to the real business of entering tasks.
Note
If you’re working with a template or a copy of an existing project plan, you already have tasks in place. In this case, you can skip this section.
When entering tasks and filling in the Gantt Chart, you are essentially entering the elements and the hierarchy reflected in your work breakdown structure (WBS). There are several approaches you can take to develop your work breakdown structure. The following are some examples:
Brainstorming. Enter tasks as you think of them, without regard to sequence or grouping of related tasks. You can move and organize the tasks later.
Sequential. Think through the project from beginning to end, and enter tasks sequentially.
Phases. Think of the overall phases of the project. For example, in a commercial construction project, you might enter the phases of Procurement, On-Site Mobilization, Site Grading, Foundations, Steel Erection, and so on. After those phases are in place, you can add tasks and subtasks beneath them.
Milestones and deliverables. Consider what the project is producing in terms of the milestones and deliverables. Enter those events as tasks and then add tasks and subtasks beneath them to flesh out the project. Your scope statement can be a valuable guide in this process.
Team collaboration. Ask team members to list the tasks they believe will be necessary to the areas under their responsibility. This assumes, of course, that you already have team members in place and available. Team members can do this informally, for example, through e-mail. Or, team members can submit tasks and their estimated durations in a Microsoft Office Excel 2007 spreadsheet, which you can then import into Microsoft Project. If you’re using Project Server, team members can send you tasks from Project Web Access and then you can incorporate them automatically into your project plan.
Note
For more information about using tasks entered in an Office Excel 2007 spreadsheet, see the section titled Importing Tasks from an Excel Worksheet later in this chapter. For more information about creating new tasks through automated team collaboration, see the section titled Assigning Tasks to Enterprise Resources in Chapter 22.
Archived projects. Review completed projects of a similar type done in your organization. With such historical information, you might find that much of the "legwork"—in terms of phases, task sequencing, resource assignments, and more—has been done for you. If the archived projects contain solid tracking information, you’ll have excellent data on durations and costs.
Note
For more information about using an old project as a starting point for a new one, see the section titled Starting a New Project Using a Template in Chapter 28. For more information about saving a completed project for future reference, see the section titled Closing a Project in Chapter 28.
Expert consultation. Ask known experts what tasks are needed for various aspects of the project. This is particularly useful if you’re the manager of a project in which you’re not necessarily an expert. This happens frequently enough, and it’s not necessarily a bad thing, but you will need dependable experts to help provide reliable task information. Even if you’re well-versed in the project knowledge area, you might not know all the nitty-gritty details for each phase. Experts can come from within your own group, from stakeholders, from other groups or project managers within your organization, or from colleagues in your profession or industry.
To enter tasks directly into your project plan, follow these steps:
Make sure you’re working in the Gantt Chart.
You can see the name of the current view in the Active View bar that runs vertically along the left side of the view. If it doesn’t say Gantt Chart, click View, Gantt Chart.
Note
You can enter tasks in any task view, of course. For more information about views, see Chapter 4.
Type the name of the task in the Task Name field.
Press Enter or the Down Arrow key to move to the next row.
The task name isn’t recorded, and other commands remain unavailable until you press Enter.
To edit a task that’s already entered, click the task name and then make your changes in the entry box just above the task sheet.
You can also click in the selected task name until the cursor appears and edit it directly in the Task Name field. You might have to click the task name twice to get the cursor to appear. However, do it slowly enough so that it’s not interpreted as a double-click, or a dialog box will appear.
Note
For more information about entering durations, links, and start and finish dates, see Chapter 5.
Many project managers find that they can more quickly build an accurate task list for their project plan by having others on the team develop a task list of their specific areas of responsibility. Even if a team isn’t in place yet, you can still ask the advice of those with the necessary expertise. If these individuals are not Microsoft Project users, a great way to automate this process is to have them use Excel to create their task lists. You can then import the worksheets into the Microsoft Project Gantt Chart.
The standard Excel importing process involves mapping the Excel columns to the corresponding Microsoft Project columns to ensure that the right information ends up in the right places in your Gantt Chart task table. Microsoft Project comes with an Excel Task List template set up for this very purpose.
To use Excel and the Excel Task List template on the same computer on which Microsoft Project is installed, follow these steps:
Start Microsoft Office Excel 2007. Click the Microsoft Office Button and then click New.
In the New Workbook dialog box, under Templates, click Installed Templates.
Click the Microsoft Project Task List Import Template.
Click the Create button.
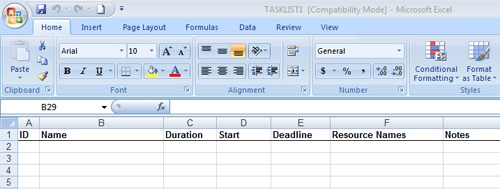
The template creates a new file with columns that correspond to the default Gantt Chart in Microsoft Project (see Figure 3-16).
Save this file and provide it to your team members to use to enter tasks and other task information. Have them save the information and return the file to you when they’re finished.
Note
If you’re working with a version of Microsoft Office Excel 2003 or earlier, you can still use the Microsoft Project Task List Import template. Open Microsoft Office Excel 2003 and then click File, New. In the task pane, click the On My Computer link. Click the Spreadsheet Solutions tab. Double-click the Microsoft Project Task List Import Template.
When you’re ready to import the task list into your project plan, follow these steps:
Open the project plan into which you want to import the Excel task list.
On the Standard toolbar, click Open.
Browse to the location on your computer or network where the Excel task list is saved.
In the Files Of Type list, click Microsoft Excel Workbooks (*.xls).
The task list appears in the list of folders and files.
Click the task list workbook and then click Open.
The Import Wizard appears.
Click Next.
Click Project Excel Template and then click Next.
Specify whether you want to import the file as a new project, append the tasks to the currently active project, or merge the data into the active project.
Click Finish.
The tasks are imported into Microsoft Project as you specified.
If you want to provide this template to others on your team, by default, it’s located in the C:Program FilesMicrosoft OfficeTemplates1033 folder, and it’s named TASKLIST.XLT.
Those who want to use this template should copy this file to the same location on their computers.
Note
For more information about using Microsoft Project with other applications, see the section titled Importing and Exporting Information in Chapter 16, and Chapter 17.
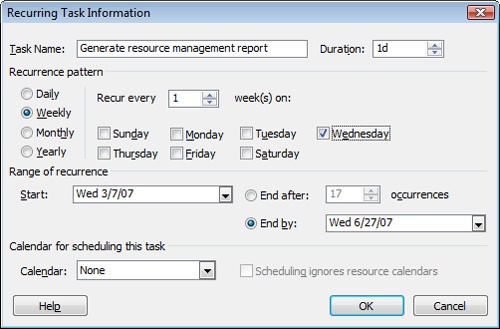
You might have certain tasks that need to be scheduled at regularly occurring intervals. For example, suppose that you have a project team meeting every Thursday morning. Or perhaps you gather information and generate a resource management report the first Monday of each month. Instead of entering the same task every week or every month throughout the span of the project, you can create a recurring task. To do this, follow these steps:
Make sure that you’re working in the Gantt Chart.
If necessary, click View, Gantt Chart.
In the Task Name field, click in the row above which you want the recurring task to appear.
Click Insert, Recurring Task.
In the Recurring Task dialog box, type the name of the recurring task in the Task Name field, for example, Generate resource management report (see Figure 3-17).
Under Recurrence Pattern, specify how often the task is to be scheduled; that is, daily, weekly, or monthly.
Specify the details of when the task is to take place during that frequency, for example, every other Thursday or the first Monday of every month.
Under Range Of Recurrence, specify when the recurring task is to start and end.
If this recurring task is to be scheduled according to a base calendar that’s different than the project calendar, in the Calendar box, select the name of the base calendar to be used.
When finished, click OK.
The recurring task is marked with a recurring task indicator. It’s represented with a summary task with all occurrences of the task as subtasks. Click the + icon next to the recurring summary task to see each occurrence of the recurring task.