The easiest and quickest way to create a macro, especially one that will be used to automate a lengthy series of steps, is to record the steps that make up a task. Recording a macro is just what it sounds like: Start the macro recorder, perform the series of actions you want the macro to do, and then stop the recorder. In most cases, there’s no need to edit the VBA code generated by the recorder.
Note
For more information about creating macros by writing VBA code directly, including how to edit macros, see the Microsoft Office Project 2007 Software Development Kit (SDK), available online at http://msdn2.microsoft.com/en-us/library/aa568824.aspx.
Before you can record a macro, you must first prepare your project environment for recording by setting the conditions required for the steps in the macro to occur. Such conditions might include something obvious such as opening a particular project, but can also include steps such as selecting a certain task or resource. You should also have a clear plan for what you want to record. Any mistakes you make while the macro recorder is running will be included in the macro. After you have set the conditions and made your plan, you’re ready to begin recording.
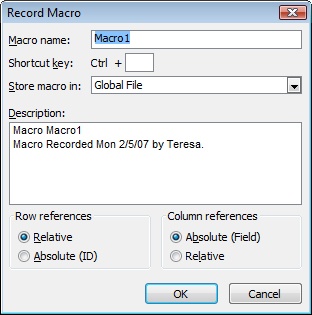
Click Tools, Macro, Record New Macro. The Record Macro dialog box appears (see Figure 27-1), in which you can enter information about the macro (such as a name and a description) and assign it a shortcut key.
Figure 27-1. The decisions you make in the Record Macro dialog box determine not only when you can use a macro, but also aspects of how it will behave when it runs.
Note
For more information about assigning keyboard shortcuts to macros, see the section titled Creating Keyboard Shortcuts later in this chapter.
Three settings in the Record Macro dialog box are even more important than the name of the macro or the keyboard shortcut you might use to run it:
Store Macro In. Use the choices in the drop-down list to specify where the macro will be stored. If you choose This Project, the macro is stored in the file with the project that is currently open and will be available only when that project is open. If you choose Global File, the macro is stored in the global project template file (global.mpt) and is available whenever Microsoft Project is running, regardless of whether a particular project (or any project at all) is open.
Row References. Accept the default setting of Relative if you want Microsoft Project to record relative row references. Thus, when the macro is run, it will always attempt to move the same number of rows from the selected cell after the macro encounters the command to select a new cell.
For example, suppose that a cell in row 1 is selected and you select a cell in row 4 while recording the macro. From then on, every time the macro is run and encounters the command to select a new cell, it always moves three rows from whatever cell was selected before the macro was run.
Select the Absolute option if you want be certain that a particular row—based on the selected cell’s row ID—will be selected when a macro runs. In the example just given, your macro will always select a cell in row 4, regardless of which cell is selected before the macro is run.
Column References. Unlike row references, the default setting for column references is Absolute, based on the selected field. No matter where fields are positioned, absolute column references select the same column every time. Relative column references work just like relative row references.
Knowing when to stop the recorder can be as important as the recording environment itself. For an automatic procedure like a macro to be truly trustworthy—and therefore useful—it should have an ending point that is intuitive, or at least easy to remember.
For example, the Bold button on the Formatting toolbar is basically a macro to automate clicking Font on the Format menu and then clicking Bold in the Font Style list. If you have already selected a word, you know that clicking the Bold button formats the word a certain way and then stops. If you haven’t selected a word, you know that the Bold button turns on a certain kind of formatting for anything you type until you click it again to turn that formatting off. Both endings are so easy to remember that they’ve probably become intuitive for you.
The same should be true for any macro you record. It should be easy for you to remember what conditions must be met before you can run the macro, what the macro will do, and when it will stop. A macro that performs a 20-step procedure for you is no good if you’re afraid to run it because you can’t remember what it might do along the way.
Let’s return to the idea of a weekly report, as described earlier in this chapter. The report that you print every Friday requires you to do the following:
Change the view to the Tracking Gantt.
Apply a filter to display only incomplete tasks.
Sort the tasks by finish date in ascending order.
Use the Slipping Tasks report to print the results.
Note
Before recording your macro, make sure that all your planned steps will take you successfully through to the end of the process you want to program.
In the following example, you need to open a project that actually contains slipping tasks. If there are no slipping tasks, a report is not generated, and you can’t record the steps for printing the report and closing the dialog boxes.
You’ve decided to automate the tasks needed to print your Friday report by recording them in a macro. Follow these steps to record the macro:
Click Tools, Macro, Record New Macro.
The Record Macro dialog box appears.
In the Macro Name box, enter a name for your new macro, for example, Friday_Report.
A macro name cannot contain spaces, but you can use the underscore character to represent spaces if you want. Although the macro name can contain letters, numbers, and the underscore character, it must begin with a letter. Also, the macro name cannot use any word that Microsoft Project reserves as a keyword.
In the Store Macro In box, click This Project.
In the Description box, change the first line to a descriptive name, for example, Weekly task report.
Because the macro won’t be selecting cells, make sure that the Row References option is set to Relative, and the Column References option is set to Absolute (Field).
Click OK to begin recording.
If you are showing the Visual Basic toolbar, the Record Macro button changes to the Stop Recorder button. Otherwise, there’s no indication that you’re in the macro recording mode.
Click Project, Filtered For, Incomplete Tasks.
Click Project, Sort, By Finish Date.
Click Report, Reports.
Double-click Current Activities, double-click Slipping Tasks, and then click Print.
Click OK in the Print dialog box and then click Close in the Reports dialog box.
Stop the recorder by clicking Tools, Macro, Stop Recorder. If you’re showing the Visual Basic toolbar, you can click the Stop Recorder button instead.
Note
We chose to store this macro in the open project, but it’s a good example of a macro that could be stored in the global file as well. Because all the macro does is change the way the data in a particular project is displayed and then print a report, you could record the steps to open the right project at the beginning of the macro. You could then print the report whenever Microsoft Project is running without having to manually open the project first.
For many people, knowing how to record and play back a macro is sufficient for most of their needs. But what if you made a minor mistake while recording a macro? What if you recorded a complex macro that referenced a project by file name and then the file name was changed? Although you might not ever need to know how to write VBA code, much less create an entire macro with it, the first step to making simple changes or corrections is to understand how simple and logical the macro code can be.
Note
For more information about the Visual Basic Editor, refer to its Help system. Click Tools, Macro, Visual Basic Editor. Click Help, Microsoft Visual Basic Help.
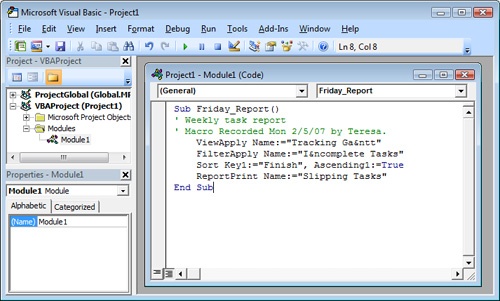
If you were to start the Visual Basic Editor that is included as part of Microsoft Project and open the Friday_Report macro, this is the code you would see:
Sub Friday_Report()

' Macro Weekly task report

' Macro Recorded Tue 2/5/07 by Steve Masters.

  ViewApply Name:="Tracking Ga&ntt"

  FilterApply Name:="I&ncomplete Tasks"

  Sort Key1:="Finish", Ascending1:=True

  ReportPrint Name:="Slipping Tasks"

End Sub
It’s short and reasonably simple. You might already have made some guesses about what different sections of the code mean, such as information that also appears in the Microsoft Project interface. Table 27-3 gives descriptions of each line in the VBA code.
Table 27-3. Breakdown of Code in the Friday_Report Macro
Macro code | What it means |
|---|---|
Sub Friday_Report() | It’s the beginning of the macro. Sub is short for subroutine, which is what a macro really is. The text that follows is the name of the macro. |
‘ Macro Weekly task report ‘ Macro Recorded Tue 3/5/02 by Steve Masters. | Any line that starts with an apostrophe is a comment and is ignored by Visual Basic. You can use comments anywhere in a macro to remind yourself of what the different parts do. |
ViewApply Name:= "Tracking Ga&ntt" | This line changes the view to the Tracking Gantt. The ampersand (&) comes before the letter that acts as an access key on the View menu. |
FilterApply Name:= "I&ncomplete Tasks" | This line applies a filter to display only incomplete tasks. |
Sort Key1:= "Finish", Ascending1:=True | This line sorts the tasks by finish date in ascending order. |
ReportPrint Name:= "Slipping Tasks" | This line prints the Slipping Tasks report. |
End Sub | It’s the end of the macro, like the period at the end of a sentence. |
If, after recording the macro, you decide that you prefer to sort the tasks in descending order, it doesn’t take much time or trouble to record the macro all over again. But it takes even less time to simply edit the macro and change True to False in the line Sort Key1:= "Finish", Ascending1:=True.
Follow these steps to start the Visual Basic Editor so that you can edit the macro code:
Click Tools, Macro, Macros.
Pressing Alt+F8 is another way to display the Macros dialog box.
In the Macro Name list, click the name of the macro you want to edit.
Click the Edit button.
The Visual Basic Editor starts and displays your macro code (see Figure 27-2). You can now begin editing the macro code.


