So the resources are digging into their assignments and progress is being made. At regular intervals, you want to record their progress in Microsoft Project. Depending on how much time you want to spend entering progress information (and how much time you want your team members to spend doing that), you can choose a simple, high-level method; a comprehensive, detailed method; or something in between.
Entering actual progress information into Microsoft Project ensures that you’ll always know how the project’s going. You can keep an eye on the critical path and your budget. You can monitor key tasks and know exactly when you’ll be handing off an important deliverable. With actual information coming into your project plan, you can also anticipate potential problems and take corrective actions as necessary.
If you’re using Office Project Server 2007 with Microsoft Office Project Web Access, updating task progress can become highly automated. You set up the types of progress information you want to receive from your team members, and that information is integrated with the assignments in the progress tracking Web page that team members use in Office Project Web Access. Every week (or however often you specify), team members send you an update regarding their actual progress toward completing tasks. You can have the progress information automatically integrated into your project plan, or you can review the information before incorporating it.
Note
For more information about exchanging task updates using Project Web Access, see Chapter 22.
Whether you’re exchanging updates electronically, getting a status update in a weekly meeting, using paper timesheets, or making the rounds to hear team members’ progress, you can enter the following actual progress information in your project plan:
Percentage complete
Actual duration and remaining duration
Actual start and actual finish
Percentage work complete
Actual work complete and remaining work
Actual work complete by time period
Note
When you enter actuals in your project plan, bear in mind that you’re not just keeping your schedule up to date. You’re also building historical information that you can use as metrics for other similar project plans. You’re recording solid, tested data about how long these tasks actually take.
When you enter one piece of status information, Microsoft Project often calculates other pieces of information. Certainly the schedule and costs are automatically recalculated.
You have several ways to track actual progress information in your project plan. How do you decide which method to use?
The first consideration is the level of detail you need. Your managing stakeholders might expect you to report a certain level of detail at the weekly status meetings. Or you might need reliable historical information from this project because it’s serving as a benchmark for similar future projects.
The second consideration is time. Will you have time to enter detailed progress information, or will you be so busy managing the project and perhaps working on your own assigned tasks that you won’t be able to keep track of everything with an adequate amount of detail? What about your team members? Are they going to be too stretched to complete an electronic or paper timesheet? If you’re using Project Server and Project Web Access, certain processes are automated for you, but they still take time for your team members.
The third consideration is whether you’ve assigned resources to tasks in your project plan. Obviously, resources will carry out the tasks one way or another. But if you’ve chosen not to include resources in your project plan, you have fewer available tracking methods.
A fourth and very important consideration is the accuracy and completeness of your progress tracking data. While you can choose a single method such as entering percentage complete or actual start and actual finish, it’s really a combination of methods that will result in the most reliably updated project. Whatever combination of methods you choose, make sure you record each of the following types of information:
The following are recommended methods which include these three values:
Actual start, percentage complete, and remaining duration
Actual start, actual work, and remaining work
Actual work and remaining work in the timephased portion of the Task Usage or Resource Usage view
Using one primary method of tracking actuals does not prevent you from using other methods for other tasks. Although you might achieve more consistent results if you stick to one method, sometimes other tasks simply lend themselves to a different type of progress information. Certain tasks are so important that you want to track them very closely. You can do that—you’re never locked into a single tracking method.
You can update progress by entering actual information from task scheduling controls such as percentage complete, duration, start date, and finish date. You can use these methods whether or not resources are assigned in Microsoft Project.
One of the simplest methods of tracking task progress is to specify percentage complete. When you enter percentage complete, Microsoft Project calculates actual duration and remaining duration.
To enter percentage complete for one or more tasks, do the following:
In a task sheet view, such as Gantt Chart or Tracking Gantt, select the task(s) whose percentage complete you want to update.
If you are updating multiple tasks at one time, make sure they all have the same actual start date and the same percentage complete.
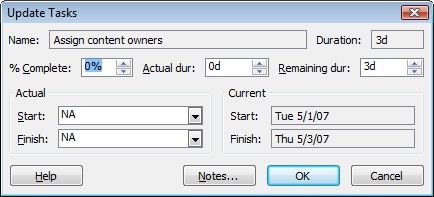
Click Tools, Tracking, Update Tasks. The Update Tasks dialog box appears (see Figure 10-10).
In the % Complete box, enter the percentage complete that applies to all selected tasks.
Note the start date date under Current. If the actual start date for the selected task(s) is different from the current start date, enter that date in the Start box under Actual.
If you do not change this start date, the actual start date is recorded as the current or scheduled start date. If you do change the actual start date, that becomes the new current, scheduled start date.
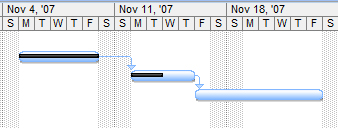
The tasks are updated to reflect the actual start date and percentage complete. In the Gantt Chart, the percentage complete is represented as a thin black line within Gantt bars (see Figure 10-11). If you changed the actual start date, the Gantt bar shifts to the new start date, and any successor tasks are also adjusted accordingly.
By default, when you enter percentage complete for a task, this percentage is distributed evenly across the actual duration of the task. You can change this to distribute to the status date instead. Click Tools, Options and then click the Calculation tab. Select the Edits To Total Task % Complete Will Be Spread To The Status Date check box.
If you enter the actual duration of a task, Microsoft Project calculates the percentage complete. You can change remaining duration, if necessary.
To enter actual duration of one or more tasks, do the following:
In a task sheet view, such as the Gantt Chart or Tracking Gantt, select the task whose actual duration you want to update.
Click Tools, Tracking, Update Tasks.
In the Actual Dur box, enter the actual duration value.
Note that when you change a value in the Actual Dur box, the value in the Remaining Dur box is not automatically recalculated unless you click OK and close the dialog box. For example, suppose you’re entering your first actuals for a 4-day task. When you enter 2d in the Actual Dur box, the Remaining Dur box still shows 4d. If you leave the Remaining Dur box as is and click OK, when you open the Update Tasks dialog box again, the Remaining Dur box now shows 2d.
If you expect the task to take more or less time than currently scheduled, update the remaining duration in the Remaining Dur box.
Note the start date date under Current. If the actual start date for the selected task(s) is different from the current start date, enter that date in the Start box under Actual.
If you do not change this start date, the actual start date is recorded as the current or scheduled start date for the task. If you do change the actual start date, that becomes the new current, scheduled start date for the task.
The tasks are updated to reflect the actual start date and actual duration, including the calculated percentage complete.
Note
By default, when you enter progress information for tasks, Microsoft Project automatically calculates the actual and remaining work and cost for assigned resources. This is the case when you update percentage complete, actual duration, or remaining duration of tasks or assignments.
If you prefer to enter values for actual and remaining work and cost yourself rather than have Microsoft Project calculate it for you based on entered task progress, you can turn this option off. Click Tools, Options and then click the Calculation tab. Clear the Updating Task Status Updates Resource Status check box.
When you enter actual start and finish dates for tasks, you can better monitor the finish date of the project as whole, especially when working with critical tasks. When you enter an actual start date, the scheduled start date changes to match the actual start date. Likewise, when you enter an actual finish date, the scheduled finish date changes to match the actual finish date. Any successor tasks are rescheduled as needed.
To enter an actual start or finish date for one or more tasks, do the following:
In a task sheet view, such as the Gantt Chart or Tracking Gantt, select the task(s) whose actual start or finish date you want to update.
Click Tools, Tracking, Update Tasks.
Under Actual, enter the actual start date in the Start box or the actual finish date in the Finish box.
The scheduled start and finish dates are shown under Current.
If resources are assigned in Microsoft Project, you can update progress information based on work for the task or the assignment. Work doesn’t exist in your project plan unless you assign resources, at which time task duration is translated into assignment work time. Work can be further divided among multiple assigned resources, depending on the task type. Using work to update progress can be more precise than updating with percentage complete or actual duration.
The following work tracking methods are listed in order from the quickest and simplest to the most sophisticated. Remember that for the most accurate and complete updates of project information, be sure that the method you use includes the actual start date, some indication of actual work completed, and some indication of the remaining work.
If human resources are assigned in Microsoft Project, you can enter their reports of what percentage of work they’ve completed so far. Remember, work comes into existence only when work resources (people or equipment) are assigned to tasks. To enter percentage work complete for a task (rather than for an assignment), follow these steps:
Display a task sheet view, such as the Tracking Gantt or Task Usage.
Click View, Table, Work to apply the Work table.
In the % W. Comp. field of the task you want to update, enter the value of percentage work complete.
For better progress tracking results, also make sure that the Actual Start field for this task is updated.
Follow these steps to enter percentage work complete for an assignment (rather than for a task):
Display the Task Usage view.
Select the assignment (the resource name beneath the task) whose percentage work complete you want to update.
If you want to update several assignments at once with the same percentage work complete, select them all.
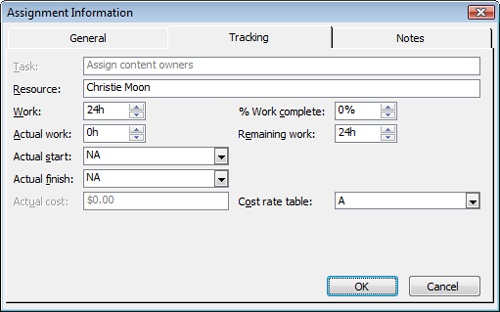
On the Standard toolbar, click Assignment Information and then click the Tracking tab (see Figure 10-13).
In the Actual Start box, enter the date that work on this assignment began.
In the % Work Complete box, enter the percentage complete for this assignment.
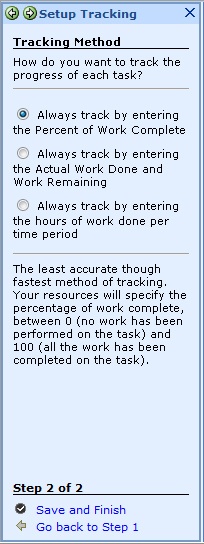
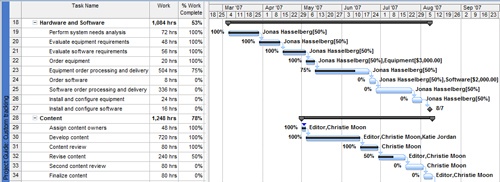
If entering percentage work complete will be your primary method of updating progress information, use the Project Guide to create a custom tracking view. A view similar to the Tracking Gantt is created with the % Work Complete field added as a column in the sheet portion of the view (see Figure 10-14).
If resources are assigned in Microsoft Project, you can enter their reports of actual work completed. If they believe that there is more or less work (than originally scheduled) remaining to be done, you can adjust remaining work as well.
If you have multiple resources assigned to a task, and you enter actual work completed for the task, the work amounts are evenly distributed among the assigned resources. To enter total amounts for actual work completed on a task (rather than for an assignment), do the following:
Display a task sheet, such as the Task Usage view or Tracking Gantt.
Click View, Table, Work.
If necessary, drag the divider bar to see the Actual (work) field (see Figure 10-15).
In the Actual (work) field of the task you want to update, enter the actual work value.
The values in the Remaining (work) and % W. Comp fields are recalculated.
For better progress tracking results, make sure that the Actual Start field for this task is updated.
To enter total amounts of actual work completed on an assignment (rather than for a task), do the following:
Display the Task Usage view.
Click View, Table, Work.
If necessary, drag the divider bar to see the Actual (work) field.
In the Actual (work) field of the assignment (the resource name under the task) you want to update, enter the actual work value.
The values in the Remaining (work) and % W. Comp fields for the assignment are recalculated.
Note
Another way to update actual work is by using the Assignment Information dialog box. Double-click the assignment to open the Assignment Information dialog box. Click the Tracking tab. Update the value in the Actual Work box. This is also a good method of updating actual work for multiple assignments if they all have the same value.
If entering actual work will be your primary method of updating progress information, use the Project Guide to create a custom tracking view. A view similar to the Tracking Gantt is created with the Tracking table applied. You might consider adding the Actual Start field to the table. This method is considered a happy medium—moderately detailed and moderately time-consuming.
The most comprehensive method of updating actual progress information is to enter actual and remaining work on assignments by time period. This is the smallest unit of information you can enter because you’re entering information about the assignment (rather than the task as a whole), and you’re probably entering hours worked in a day.
To enter actual and remaining work in the timephased portion of the Task Usage view, follow these steps:
Display the Task Usage view.
Click Format, Details, Actual Work.
The timephased portion of the view changes to include Act. Work as a row under (scheduled) Work.
If you also want to show rolled-up actual work totals for assignments, apply the Work table to the sheet portion of the view. Click View, Table, Work (see Figure 10-16).
In the Act. Work field for the assignment and the day, enter the actual work value.
If you want to enter actual work for different time periods, click Zoom Out or Zoom In on the Standard toolbar.
If you want to enter timephased remaining work as well, click Format, Details, Remaining Work and enter values as needed.
If entering actual work by time period will be your primary method of updating progress information, use the Project Guide to create a custom tracking view. A view similar to the Task Usage view is created with the Act. Work field added as a row in the timephased portion of the view and the Work and Actual Work fields added as columns in the sheet portion of the view.
Suppose that you and your team started executing a project a few months ago. Some tasks were completed and some were in progress when your team’s efforts were redirected to a different urgent priority. Now, you’re all back to work on this project again, ready to pick up where you left off.
What do you do with your project plan? The scheduled dates of tasks you need to work on now are two months old. Do you have to readjust all the tasks to align them with the current calendar?
No, you just need to reschedule incomplete tasks for the current date. Microsoft Project will shift any incomplete tasks forward to a date you specify, and you can continue forward from there.
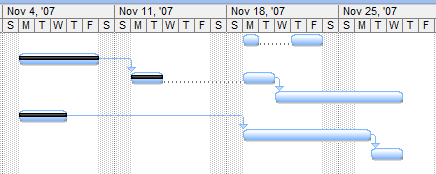
This can also work with shorter periods of time, whether it’s a few weeks or even a few days on selected tasks (see Figure 10-17).
Figure 10-17. This project stalled for a few days and then was rescheduled to continue on November 19.
Note
In a situation like this, it might be a good idea to set a new baseline. Keep the old one, but use the new baseline for your everyday variance measurements.
To reschedule uncompleted tasks, follow these steps:
Click Tools, Tracking, Update Project.
Select the Reschedule Uncompleted Work To Start After option.
Enter the start after date in the box.
By default, today’s date appears.
You can use this method to reschedule the entire project or just selected tasks. Select either the Entire Project or the Selected Tasks option to specify your choice.
By default, any tasks that were in progress are split so that remaining work is scheduled after the date you specify. If you don’t want in-progress tasks to be split, click Tools, Options and then click the Schedule tab. Clear the Split In-Progress Tasks check box.
Any uncompleted tasks that have a date constraint (such as Must Start On or Finish No Earlier Than) are not rescheduled, which preserves the constraint and gives you the option of deciding how to handle it.
You can enter any reschedule date you want, even one in the past. If a task is in progress, the date does need to be after the task’s existing stop date or actual start date.

