
Preparing the Project for Animation
Before you begin animating the scene, you should make sure all the stationary elements are set up correctly so you can concentrate exclusively on motion. You must attend to four remaining details.
Breaking Up the SmallFloatingBalls Layer
The SmallFloatingBalls layer contains four flying spherical vehicles that will be animated independently. Because they were imported on a single layer, you need to break this layer into four parts.
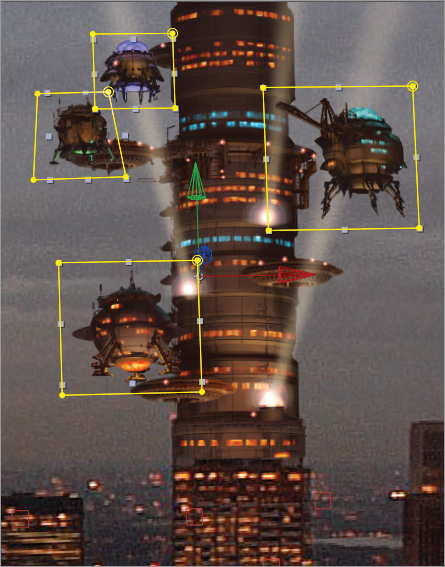
Position the layer on top of the RoundRiser building, and move it slightly in front of the building and spotlights on the Z-axis. With SmallFloatingBalls selected, use the Rectangle tool in the Toolbar panel ![]() to draw a rectangular mask around one of the balls. Duplicate the layer and, on the duplicate, move and scale the mask so it shows another of the flying balls. Repeat this process two more times until each flying ball is on a separate layer with its own mask (Figure 14-56).
to draw a rectangular mask around one of the balls. Duplicate the layer and, on the duplicate, move and scale the mask so it shows another of the flying balls. Repeat this process two more times until each flying ball is on a separate layer with its own mask (Figure 14-56).
Figure 14-56: SmallFloatingBalls layer duplicated four times, and each flyer masked separately
Positioning the Remaining Layers
Position the remaining layers of your composition on your own. When you’re finished, all the layers should be seamlessly attached to the video footage. You can compare your work so far to FutureNYC_LayersPositioned.aep on the DVD.
Making the Nulls “Shy”
Because you’re finished using the nulls, you can hide them so they don’t take up space in the Timeline while you animate. There is a switch to the right of each layer to mark a layer as shy; the switch looks like a little man peering over a fence ![]() . If you click the icon, it changes to look as though the little man has ducked down behind the fence
. If you click the icon, it changes to look as though the little man has ducked down behind the fence ![]() . At the top of the Timeline, clicking the Hides All Layers For Which The ‘Shy’ Switch Is Set icon
. At the top of the Timeline, clicking the Hides All Layers For Which The ‘Shy’ Switch Is Set icon ![]() hides all marked layers until you click the switch again. For this project, select all the null layers and click the Shy switch next to one of the layers. Now, click the master Shy switch at the top of the Timeline (Figure 14-57). All the null layers are hidden, freeing up a lot of room in the workspace and making it easier to see at a glance the layers with which you’re working. You can always unshy the switch, if you need to go back and work with a shy layer.
hides all marked layers until you click the switch again. For this project, select all the null layers and click the Shy switch next to one of the layers. Now, click the master Shy switch at the top of the Timeline (Figure 14-57). All the null layers are hidden, freeing up a lot of room in the workspace and making it easier to see at a glance the layers with which you’re working. You can always unshy the switch, if you need to go back and work with a shy layer.
Figure 14-57: Hide the null layers using the Shy switch.
Rotating the Layers to Minimize Lens Distortion
With all the layers in place, you’ll notice a problem when you scrub through the Timeline: some of the layers, such as the BigBall layer, distort dramatically as the camera pans and moves near the edge of the frame. At frame 35, the BigBall layer looks fine (Figure 14-58).
Figure 14-58: The BigBall layer shows no distortion on frame 35.

However, by frame 225, the ball looks stretched and distorted, plus the edge of the layer is visible because the layer is no longer facing the camera (Figure 14-59). This is due to lens distortion from the wide-angle lens used to photograph the original footage.
Figure 14-59: The BigBall layer shows considerable distortion on frame 225.
Next, move to frame 225, where the BigBall layer begins to exit the comp. Rotate the layer so it’s flat on to the camera, or about 22˚ on the Y-axis. Scrub through the comp again. The distortion on the layer is significantly minimized (Figure 14-62)
To minimize that distortion, you’ll animate the layer orientation to keep it straight on to the edge of the comp. This isn’t a perfect solution—the best solution requires an advanced technique that maps the painting onto 3D geometry in the comp, as was done in the camera-projection project. However, this cheat works reasonably well.
Scrub between frames 0 and 50, and note when the camera begins to pan. The camera starts to move somewhere around frame 35. Select the BigBall layer, and set an Orientation keyframe at frame 35 to establish a starting point for the rotation of the layer. You can make sure the layer is aligned to the camera by checking that the layer edges are aligned with the edge of the comp. You can easily do this by checking the edges of the layer visible outside of the View window (Figure 14-60 and Figure 14-61).
Figure 14-60: Edge of the layer not aligned
Figure 14-61: Edge of the layer aligned
Next, move to frame 225, where the BigBall layer begins to exit the comp. Rotate the layer so it’s flat on to the camera, or about 22˚ on the Y-axis. Scrub through the comp again. The distortion on the layer is significantly minimized (Figure 14-62).
Figure 14-62: The BigBall layer keyframed to face the camera on frame 225
Scrub through the Timeline to see what layers show the most distortion. The RoundRiser layer will also look better if it’s animated to face the camera. Luckily, that layer has the animated beams and lens flares parented to the building, so they will all rotate with their parent layer.