
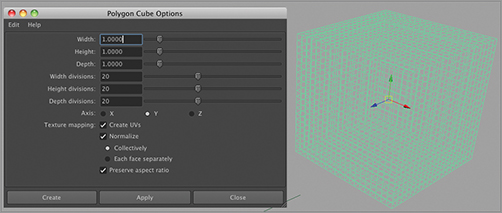
Choose Create Polygon Primitives Cube, and select the box next to Cube. Add another cube for the foreground hill, with Height, Width, and Depth set to 5 and with 20 subdivisions on each dimension to give you some geometry to sculpt (Figure 9-8). Rename this object Hill.
Figure 9-8: Create a cube for the foreground hill with 20 subdivisions in each direction.
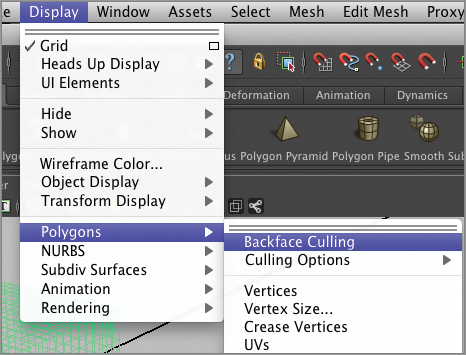
With 20 subdivisions on the cube, it will be difficult to see what you’re sculpting. To make dense objects easier to work with, choose Display Polygons Backface Culling (Figure 9-9). Doing so turns off the visibility of the back sides of the cube and only shows the geometry that faces toward you.
Figure 9-9: Backface culling
You can further simplify the scene on a per-viewport basis by clicking the grid icon ![]() at the top of each viewport to turn the grid on or off.
at the top of each viewport to turn the grid on or off.
Move the 20-sectioned cube under the castle cubes, and rotate it to match the castle’s angle (Figure 9-10). Make sure it’s large enough to cover the entire hill.
Figure 9-10: Positioning the geometry for the hill

The Sculpt Geometry Tool
You’ll now use Maya’s Sculpt Geometry tool to shape the hill. If you want to work over a copy of the project that’s already set up to this point, open Fgr_Hill_Chapter_9.ma in the scenes folder in the Chapter 9 materials on the DVD. Again, save it to the Castle_Project folder on your hard drive, and confirm that the project is set to that folder to keep the project organized.
To open the Sculpt Geometry tool, go to the drop-down menu in the upper-left corner of the interface. What appears in the main menu changes according to what task you’re performing in Maya. Choose Polygons from the drop-down menu, which adds Mesh to the main menu; then, select Mesh and click the box to the right of Sculpt Geometry Tool (Figure 9-11).
Figure 9-11: Opening the Sculpt Geometry tool
Open the Tool Settings panel for the Sculpt Geometry tool by clicking the Tool Settings icon in the upper-right corner ![]() .You may need to click it a couple of times until Tool Setting appears (Figure 9-12). You’ll only look at the Brush and Sculpt Parameters rollouts, but this panel has many more rollouts that you should explore on your own.
.You may need to click it a couple of times until Tool Setting appears (Figure 9-12). You’ll only look at the Brush and Sculpt Parameters rollouts, but this panel has many more rollouts that you should explore on your own.
Figure 9-12: Sculpt Geometry tool interface

The Sculpt Geometry tool functions like a brush to shape the polygons that make up the cube. You can control whether the tool Pushes ![]() , Pulls
, Pulls ![]() , Smoothes
, Smoothes ![]() , Relaxes
, Relaxes ![]() , Pinches
, Pinches ![]() , or Erases
, or Erases ![]() the polygons.
the polygons.
The main Brush controls are the upper radius, Radius(U); the lower radius, Radius(L); and Opacity. The Radius sliders work like Size Jitter does in Photoshop, controlling the size of the brush according to how hard you press when using a digitizing tablet. The Radius(U) diameter is the largest the brush can be when you press hard, affecting a larger area. The Radius(L) diameter is the smallest the brush can be when you press softly, affecting a smaller area. You can resize the upper radius by holding down the B key and pressing and holding the middle mouse button. Dragging to the right makes the brush larger, and dragging to the left makes it smaller.
It’s helpful to turn down the brush’s opacity to move the vertices into position gradually. High Opacity makes the brush affect the vertices forcefully, whereas a smaller number makes the brush work in a more gradual manner. A setting of 0 gives the brush no effect. Try 0.25 as a starting place, and go over an area repeatedly to move the vertices in a controlled fashion.
If you haven’t worked with the sculpting tools before, set aside time to experiment with each one. Don’t worry about making mistakes. You can use the Erase tool in Sculpt Parameters to remove any modifications you make to the geometry.
Begin shaping the foreground hill with the Sculpt Geometry tool (Figure 9-13). Use the Push, Pull, and Smooth operations to shape the hill. You may find that this tool produces some odd shapes and spikes, especially if you have the opacity set too high. If this happens, use the Smooth tool to even them out.
Figure 9-13: Using the Sculpt Geometry tool

Component Mode
Each piece of geometry is made up of different components, including edges, faces, and vertices. A vertex occurs wherever two or more straight lines intersect. Vertices are the points that make up the object.
You can model the cube by moving the components of an object manually. Choose the Select tool from the left menu, and select the hill. Press and hold the right mouse button to display the components menu. You can choose between all of the object’s different components. In this case, choose Vertex, and release the mouse button. Magenta dots appear where the vertices occur on the object. Now you can push and pull the vertices manually to achieve sharp detail (Figure 9-14).
Figure 9-14: Vertex mode

You can move, scale, and rotate the vertices rather than the entire object. Vertex mode lets you work on discrete sections of the object; it’s extremely useful for adding fine details.
Soft Selection Mode
While in Vertex mode, you can also use the Soft Selection tool to move areas more uniformly. Choose Window ![]() .
.
In the Attribute Editor, scroll down until you can select Soft Select. The vertices that you’ve selected turn yellow and move the most. The vertices surrounding the selection are now soft transforming vertices, and they will also be affected by the transform tools. You can change the size of the affected area by changing the Falloff Radius setting. The closest soft transforming vertices are colored red and move progressively less as the distance increases from the selected yellow vertices. Even further away, the vertices are dark brown, moving less and less. Finally, the original magenta vertices don’t move at all (Figure 9-15).
Figure 9-15: Using the Move tool and Soft Selection

Now you’re on your own. Use this set of tools to shape the hill to match the reference.