
With your project set up, you’re ready to begin animating. The first layer to which you’ll add motion is SummerSky. Move the Current Time Indicator to 00000 in the Timeline panel. Select the SummerSky layer, and click the arrow to the left of the name. Doing so displays the Transform group. Click the arrow next to the Transform group to display the animateable properties: Anchor Point, Position, Scale, Rotation, and Opacity (Figure 13-13).
Figure 13-13: Click the arrow next to the SummerSky layer name to reveal the animateable properties.
In After Effects, it isn’t possible to know whether the arrow to the left of a property is open (pointing down) ![]() or closed (pointing to the right)
or closed (pointing to the right) ![]() in the user interface. In this chapter, if you’re asked to click an arrow to reveal additional properties, and the properties are already showing, do nothing and proceed with the lesson.
in the user interface. In this chapter, if you’re asked to click an arrow to reveal additional properties, and the properties are already showing, do nothing and proceed with the lesson.
Setting Keyframes
With the Current Time Indicator at frame 0, click the stopwatch next to Position in the Transform properties ![]() . Clicking the stopwatch sets a keyframe for that property. As in Maya, you set a keyframe whenever you want to change something over time. Notice that a yellow diamond shape appears at frame 0 in the Timeline to the right of the Position property, indicating where the keyframe was set.
. Clicking the stopwatch sets a keyframe for that property. As in Maya, you set a keyframe whenever you want to change something over time. Notice that a yellow diamond shape appears at frame 0 in the Timeline to the right of the Position property, indicating where the keyframe was set.
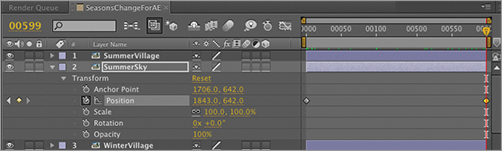
The sky should move from right to left over the course of the animation. You don’t want to move it too dramatically—only enough to give the scene some life. To the right of Position are the X and Y coordinates of the layer: 1966.0, 642.0. X represents the position of the layer horizontally, or to the right or left in the Viewer panel. Y represents the position of the layer vertically, or up or down in the Viewer. Move the Current Time Indicator to frame 599. Click the X (horizontal) coordinate position, and change it to 1843 to move the sky to the left. You don’t need to set another keyframe manually. After you’ve set one keyframe for a property, when you move to another frame and change that property, a new keyframe is automatically set (Figure 13-14).
Figure 13-14: Two keyframes set to move the sky between frame 0 and frame 599.
Move the Current Time Indicator back and forth—an action known as scrubbing—between frame 0 and frame 599, to see the motion (Figure 13-15).
Figure 13-15: Subtle motion of the sky

RAM Preview
To preview the motion as it will appear in the final animation, select the Preview panel at right in the interface. On the right side of the panel is the RAM Preview button (Figure 13-16). When you click it, or press the 0 key on the numeric keyboard as a shortcut, After Effects begins to load the animation into RAM. When as many frames as the memory can hold are loaded, the frames automatically begin to play in real time. If it’s taking too long to load, and you only want to see part of the sequence in real time, click the RAM Preview button or press 0 on the numeric keyboard again. Only the frames already loaded will play. If this motion is too subtle for your taste, feel free to move the sky more.
Figure 13-16: RAM Preview button
Bear in mind that After Effects’ ability to load in all the frames in the animation depends on how much RAM is in your computer. A green line appears below the Time Ruler to show how many frames were successfully loaded into RAM (Figure 13-17).
Figure 13-17: Frames loaded into RAM preview

The number of frames you can RAM-preview is directly related to the resolution setting. You can preview 16 times as many frames when Resolution is set to Quarter ![]() as you can when it’s set to Full
as you can when it’s set to Full ![]() .
.
You can check your progress by opening SeasonsChange_03_Sky.aep on the DVD.