Setting Up a Ground Plane Using a Solid
When you’re working in 3D space, you need to think of positioning elements spatially, like pop-up cards. Therefore, you have to create one horizontal plane from which all the images stick up vertically. To create the horizontal plane, you’ll use an advanced technique: you’ll project the image of the GroundPlane layer onto a horizontal solid.
Projecting an image in After Effects is a complex process because there is no utility specific to this function. However, you can use a workaround that produces the same effect. After Effects 3D space allows you to use a spotlight to cast shadows from one layer to another. Adapting this capability, you’ll use the light as a projector to transfer the painting of the ground plane onto a solid white layer.
Be forewarned that if you miss any of the steps, the procedure won’t work. A checklist is provided at the end of this section for troubleshooting.
Rotating the Solid
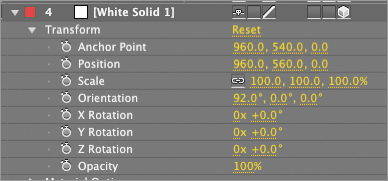
Turn off the visibility of all the layers except the GroundPlane and Camera 1. Choose Layer New Solid, click the Make Comp Size button, and select a pure white color from the color selector. Because the solid is white, After Effects names it White Solid 1. In the Timeline panel, make White Solid 1 3D, and click the arrow to the left of Transform. Under Orientation, rotate the solid on the X-axis 90°. It’s now flat on to the camera and shows up in the Active Camera view as a line—it’s like looking at the edge of a piece of paper. Move the plane down a small amount on the Z-axis so its position is 960, 560, 0. Rotate it two degrees more on the orientation X-axis to 92° (Figure 15-24).
Figure 15-24: Position and orientation of the White Solid 1 layer
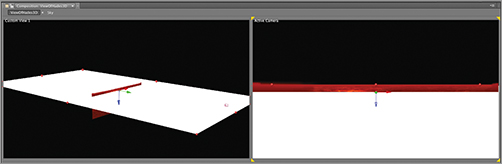
The White Solid 1 layer is now visible as a sliver of white in the Active Camera view (Figure 15-25).
Figure 15-25: White Solid 1 visible as a sliver of white
Scaling the Solid
Scale the plane so it’s large enough to cover the foreground in the Active Camera view and the horizon at the back of the GroundPlane layer. The final Scale settings should be around 250, 550, 100. Note that the Constrain Proportions box, which looks like a linked chain ![]() , has been turned off for the solid so that it can be non-uniformly scaled (Figure 15-26).
, has been turned off for the solid so that it can be non-uniformly scaled (Figure 15-26).
Figure 15-26: Final Scale attributes of the White Solid 1 layer
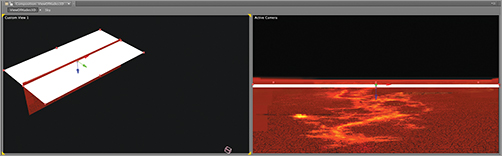
Check in the Active Camera view to ensure that the plane covers the view completely on the right and left sides. When you’re finished, the ground plane should look like Figure 15-27.
Figure 15-27: Final position of the White Solid 1 layer