
Make the BlackMask layer visible so you have clean edges on the frame. Create a new layer just below the BlackMask layer, and call it BlueMultiply. Fill the layer with a dark blue (an RBG readout of 55, 80, 115 in the Color Picker). Set the layer blending mode to Multiply. The composition immediately looks more like a night scene, but it’s too dark (Figure 11-6).
Figure 11-6: Dark blue multiplied over the entire composition
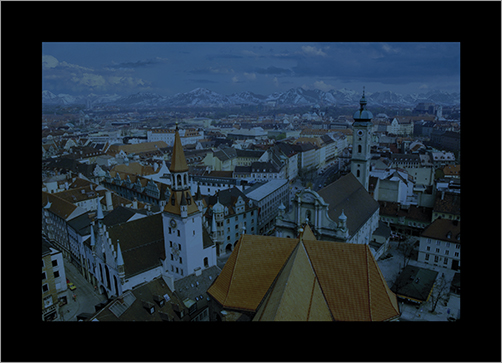
For the rest of the chapter, the mask around the edges of the composition won’t be shown in order to allow for larger figures, but it’s still there.
Creating Mattes to Add Directional Lighting
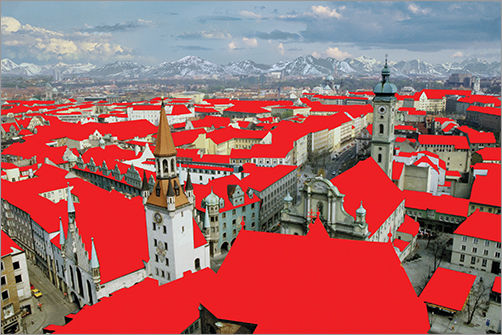
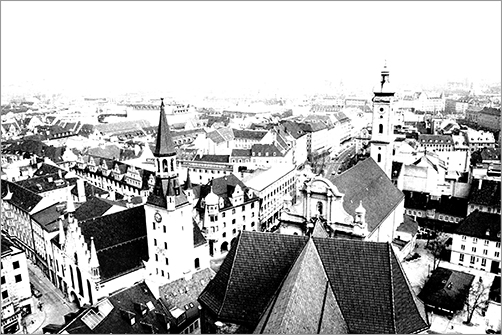
Because light will be coming up from the street, the rooftops will receive the least light. First, you’ll create a matte that selects just the rooftops. Turn off the BlueMultiply layer so you can see the plate clearly. Now, marquee off just the tops of the roofs. As you move far into the background, it will be more difficult to delineate the rooftops, so limit your work to where the roofs are easily defined. I live in a city with a lot of flat roofs; when I look across the city at night from a high angle, I see lines of lights from the streets, divided by sections of dark rooftops. Add to the existing selection to include some of those lines of dark roofs in the distance. Create a new layer called RoofTops, and fill the selection with bright red (Figure 11-7). This mask-loading layer will hold the roof-top selection for later use.
Figure 11-7: Create a mask for the rooftops.
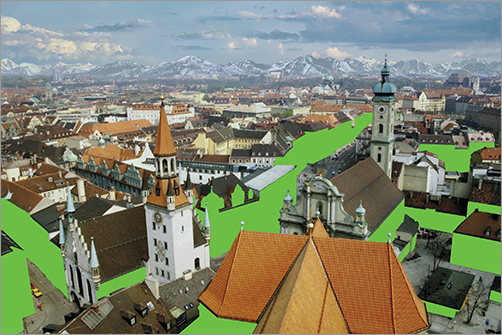
Next, you need a layer with just the front faces of the buildings. These buildings will be lit from the street level up, so you need a mask-holding layer with that selection. Create a new layer, name it BuildingWalls, and marquee around the building faces in the foreground. You can be sloppy where the faces intersect the roofs, because you already have a mask for that, and you can subtract it from the selection. When the selection is complete, fill it with green (Figure 11-8).
Figure 11-8: Create a mask for the building faces lit from the street.
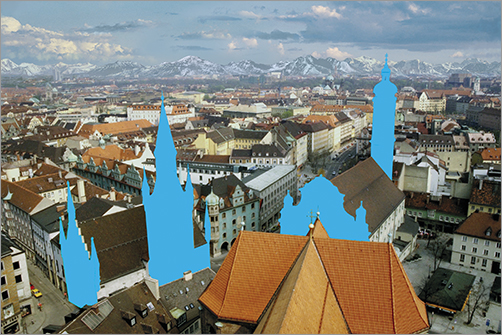
Create a mask for the towers and the front of the foreground churches. Name it Towers+ChurchFronts, and fill it with blue (Figure 11-9). It’s useful to have a separate matte for these structures because they will be rendered separately from the rest of the city.
Figure 11-9: Create a mask for the towers and the church fronts.
You need one more mask for the street and the areas where light rises up from distant streets and courtyards. Loosely marquee around the areas where the street shows, and subtract the existing masks from the selection. Add to the street selection by going through and selecting those areas where light would climb up the sides of buildings or show from distant streets. The more areas you define, the more detailed and beautiful the city will look. Make a new layer, rename it Streets+Courtyards, and fill it with purple (Figure 11-10).
Figure 11-10: Create a mask for the street and the light wells.
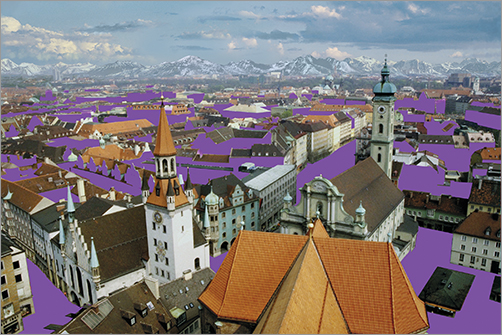
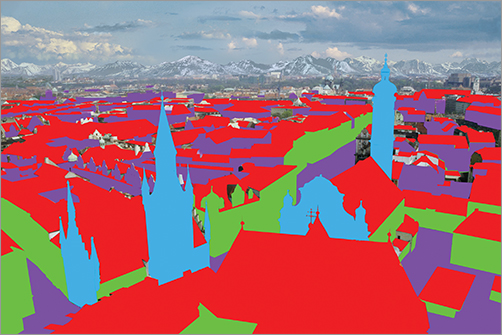
Figure 11-11 shows what the file should look like with all the masks defined. Some areas aren’t covered by a mask, but you have enough to create an effective night scene.
Figure 11-11: All the masks visible
Preparing these masks may seem like a lot of work, but you’ll use them again and again during this project to light the scene.
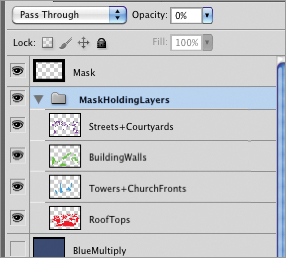
Select all the mask-holding layers, and click the Create New Group icon. Rename the group MaskHoldingLayers, and set the opacity of the group to 0% (Figure 11-12).
Figure 11-12: Group the mask layers, and set the opacity to 0.
Painting Into the BlueMultiply Layer Mask
With all the masks set up, it’s time to begin painting. Return to the BlueMultiply layer, and turn it on. Add a layer mask. You’ll paint into the mask to block the areas that are lit from the street. When you paint into the layer mask, white reveals the BlueMultiply layer and black blocks it. Press D to reset the Color Picker to the default black and white. You can switch between black and white by pressing X. Make sure black is loaded in the Foreground color slot.
First, load in two selections, BuildingWalls and Streets+Courtyards, by Command/Ctrl+clicking into the layer thumbnail previews. Using a soft round brush with the opacity set to 50%, paint where light would rise up from the street. It would be brightest at the street level where storefronts, streetlights, and car headlights provide illumination. The building fronts closer to the roofline get less light. The main street in the center of the composition should be the brightest area, because it appears to be a major retail hub.
In the distant areas, where light wells up from the streets and courtyards, use the Radial Gradient tool to add light that diminishes as it rises to the rooftops.
After you add light to the BuildingWalls and Streets+Courtyards selections, load in Towers+ChurchFronts. Paint and use the Radial Gradient tool to cast light up the sides of the church towers. The tops of the towers shouldn’t receive light because they’re far above the street level.
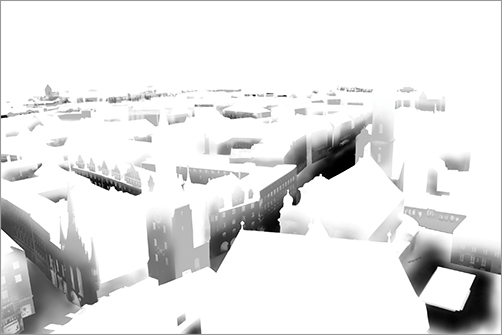
While you’re painting, it’s often useful to view the layer mask separately so you can visualize more clearly what areas are blocked. View the layer mask by Option/Alt+clicking into the mask preview thumbnail (Figure 11-13). You can continue to paint in the black-and-white layer mask.
Figure 11-13: Option/Alt+click into the layer mask thumbnail to view the mask separately.

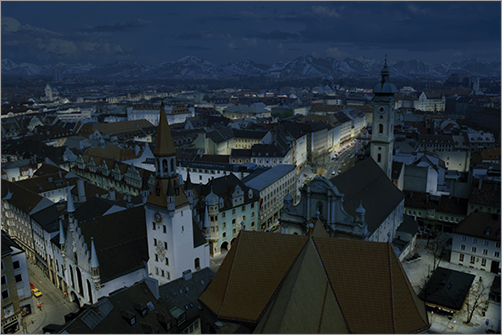
When you want to see the RGB version, Option/Alt+click in the thumbnail preview again. With the layer mask for BlueMultiply applied, your composition should look like Figure 11-14.
Figure 11-14: BlueMultiply layer blocked by the layer mask to show areas illuminated by the street
Creating a Mask for the Building Windows
If you look at the layer mask for the BlueMultiply layer, you’ll note a loss of building detail. Your piece will have more form if you restore some of the windows in the foreground buildings. Turn off the BlueMultiply layer for a moment and, in the Channels panel, check out which of the RGB channels offers the most contrast and shows the windows most distinctly. The Blue channel is the clearest, so duplicate it. On the duplicate, create a high-contrast matte by opening Curves and pulling in the white and black points until the windows are black against white. Some of the background windows still look gray, so marquee around them and run another curve until you isolate as many of the windows as possible. Your final high-contrast matte should look like Figure 11-15.
Figure 11-15: High-contrast duplicated Blue channel to isolate windows
Command/Ctrl+click into the high-contrast matte thumbnail to load the selection. The selection is the reverse of what you need, so invert it using Shift+Command/Ctrl+I. Now, return to the BlueMultiply layer, and turn it on. Option+click into the layer mask, and paint with white into the mask to restore some of the window detail (Figure 11-16). Paint only into the areas where you have windows; otherwise, you risk adding more of the BlueMultiply layer than you want to.
Figure 11-16: Final BlueMultiply layer mask
Creating a Warm Overlay Layer for the Street Lights
The cool lights are beginning to work, but the streetlights need to be warm. Create a new layer above the BlueMultiply layer, and rename it StreetOverlay. Command/Ctrl+A to select all. Fill the layer with a warm yellow-orange (RGB setting of 250, 190, 90 in the Color Picker). Set the layer’s blending mode to Overlay. The streetlights warm up—but, unfortunately, so does everything else.
You need to confine the warm color to the lit areas. Load the selection from the layer mask for the BlueMultiply layer by Command/Ctrl+clicking into the mask thumbnail. Invert the selection, and apply it to the StreetOverlay layer as a layer mask. By applying the inverse of the BlueMultiply layer, you warm up only the areas that aren’t being affected by the cool blue (Figure 11-17).
Figure 11-17: An orange overlay layer warms up the city lights.
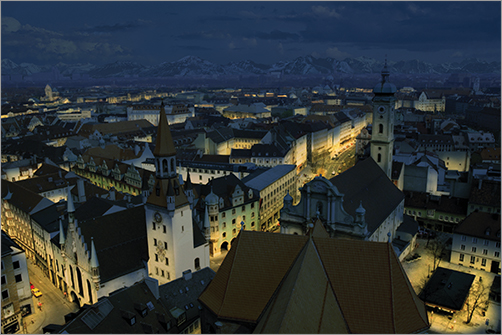
Silhouetting the Mountains
The background mountains should be darker to silhouette against the sky. We tend to think of the night sky as black; but actually the sky is the brightest element in almost any scene, except for the Sun, the Moon, or artificial lights. You could create a new layer to darken the mountains, but you’ll get the same effect by painting into the BlueMultiply layer with a neutral dark blue.
Load the selection from the Mountains layer, and darken the area where the mountains meet the sky, softly blending the transition to where the city starts. Invert the selection, and paint a lighter blue on the horizon just behind the mountains. Now they should stand out nicely (Figure 11-18).
Figure 11-18: Darken the mountains on the BlueMultiply layer, and lighten the sky behind them.
