As the project server administrator, you configure enterprise project management options on the Server Settings page in Project Web Access. Links to all pages are listed on the left side of the Project Web Access window in the task pane, which is called the Quick Launch. Click Server Settings. The Server Settings page appears (see Figure 21-1). Only users with administrator permissions can open the Server Settings page in Project Web Access.
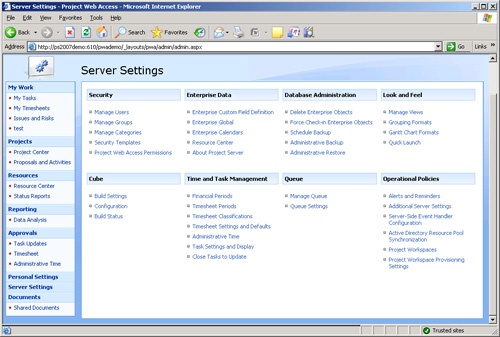
Figure 21-1. Set up enterprise project management options on the Server Settings page in Project Web Access.
To allow people throughout the organization to use the Microsoft Office Project 2007 enterprise project management features they need, you first need to identify them as users of your project server. At the same time, you also specify the users’ permissions that enable them to carry out their category of project responsibilities according to that user’s role and responsibilities.
Note
If you ever need assistance while using Project Web Access, click Help in the upper-right corner of the Project Web Access page. Microsoft Project Web Access Help appears on the right side of the window.
Project Server 2007 is loaded with a set of built-in user groups, each of which is associated with a set of permissions having to do with various aspects of enterprise project management. Consider using the built-in groups and permission sets as a starting point. As you and your organization gain more experience with Project Server 2007 and start to get a better idea about how you want to implement enterprise project management features, you can make adjustments and customizations.
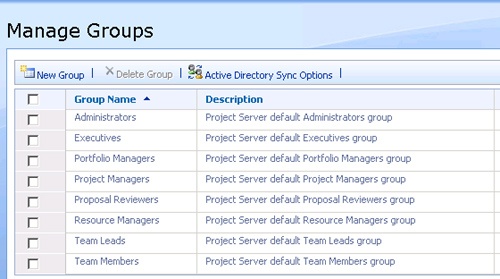
The built-in user groups, also known as roles, are as follows:
Administrators
Executives
Portfolio Managers
Project Managers
Proposal Reviewers
Resource Managers
Team Leads
Team Members
Each of the user groups can be associated with a security template that includes the set of permissions most likely to be needed by someone in that user group.
In addition to setting the permissions for a new user, you also set the categories of information that can be associated with a user group, to which users are then assigned. Although you can create your own categories, the built-in categories are as follows:
My Direct Reports
My Organization
My Projects
My Resources
My Tasks
To create a new user account in Project Web Access and set the user’s permissions, follow these steps:
In the Project Web Access Quick Launch task bar, click Server Settings.
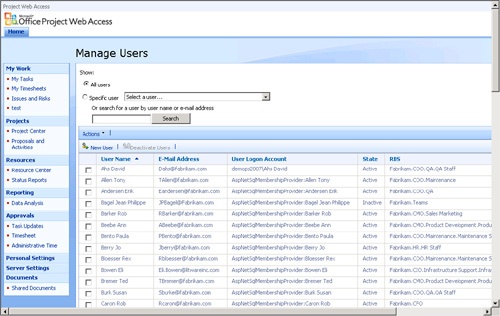
Under Security, click Manage Users.
The Manage Users page appears (see Figure 21-2).
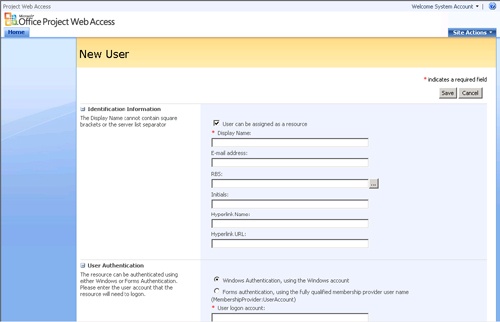
Above the table, click New User.
The New User page appears (see Figure 21-3).
In the Identification Information section, make sure that the User Can Be Assigned As A Resource check box is selected if the user is to be part of your enterprise resource pool.
Enter at least the user’s display name, typically the person’s first and last names.
If you complete the E-mail Address box, type it in the format of [email protected].
In the User Authentication section, select the option for this user’s authentication method.
With Windows Authentication, users can log on to Project Web Access by using the same user ID and password they use to log on to your organization’s Windows network.
With Forms Authentication, users log on to Project Web Access by using the user ID you set up on this page. They can then set their password in Project Web Access. If you have already added enterprise resources, they are automatically added as forms authentication users.
In the User Logon Account box, enter the user’s account name.
If you’re entering a Windows account, enter it in the format of domainusername.
If you’re entering a Forms account, the name is typically in the form of MembershipProvider:UserAccount. The person who set up Project Server 2007 determined the exact form, so check with that person if you’re not sure. The first time that forms authentication users log on to Project Web Access, they’ll be prompted to set a password.
In the Assignment Attributes and Resource Custom Fields sections, make any necessary changes appropriate for this user.
This section is available only for users identified as resources.
In the Security Groups section, click the group that this user belongs to and then click Add.
A user can be a member of more than one group.
In the Group Fields, Team Details, and System Identification Data sections, make any necessary changes or entries appropriate for this user. Click the plus sign next to the section name if necessary to expand the section.
The Team Details section is available only for users identified as resources.
When finished, click the Save button at the bottom of the page.
After you set up the user accounts, team members and other Project Web Access users just need to use their Web browser to go to the designated URL for your project server location. They enter their user name (and password if necessary), and their own view of Project Web Access appears.
Note
You can see a list of all users and their permissions. In any page of Project Web Access, click Site Actions in the upper-right corner and then click Site Settings. Under Users And Permissions, click Advanced Permissions. A list of all users, their user names, and their permission group appears.
To return to the Project Web Access home page, click the Home tab in the upper-left corner.
Note
Project managers using enterprise project management features in Microsoft Office Project Professional 2007 and Project Web Access should refer to Chapter 22.
Note
Team members and resource managers needing information about using Project Web Access should refer to Chapter 23.
Note
Executives and other managing stakeholders using Project Web Access should refer to Chapter 24.
You can deactivate a user, for example, one who has left the company after working on several projects. When you deactivate a user, the information about that user’s assignments remain intact. You can also delete a user. This should only be done if the user was added by mistake, or if no project information is associated with that user.
To deactivate a user, follow these steps:
On the Server Settings page, under Security, click Manage Users.
Select the check box next to the name of the user you want to deactivate. You can select several check boxes if you need to deactivate multiple users.
In the alert that appears, click OK.
The selected user is deactivated and can no longer log on to the project server.
To delete a user from the project server, follow these steps:
On the Server Settings page, under Database Administration, click Delete Enterprise Objects.
Under What Do You Want To Delete From Project Server, select the Resources And Users option.
The page updates to show all users.
Select the check box next to the name of the user you want to delete. You can select several check boxes if you need to delete multiple users.
Click the Delete button.
In the alert that appears, click OK.
The selected user is deleted from the project server. Any projects owned by that user are assigned to your account.
You can review the sets of permissions assigned to a particular user group. You can also modify the set of permissions used for a user group. To do this, follow these steps:
Open the Server Settings page of Project Web Access.
Under Security, click Security Templates.
Click the name of the template whose permissions you want to see, for example, Executives or Proposal Reviewer.
In the Add Or Edit Template page, scroll through the Category Permissions and the Global Permissions lists to see the permissions for the selected group.
Make any changes you want by selecting or clearing the Allow or Deny check boxes next to permissions. When finished, click Save at the bottom of the page.
A security template is a collection of permissions that can be associated with a user group or a category. Project Server 2007 comes with eight built-in security templates: one for each of the eight built-in user groups from Team Member to Administrator.
You can set up your own security templates with entirely different sets of permissions. You can then assign the new set of permissions to users, groups, and categories in a single step. To create a new security template, follow these steps:
Open the Server Settings page of Project Web Access.
Under Security, click Security Templates.
Above the table, click New Template.
The Add Or Edit Template page appears.
In the Name section, enter at least a name in the Template Name box. You can also type a description.
If you want to base your new security template on an existing template, click a template in the Copy Template box.
In the Category Permissions section, make any changes needed to permissions by selecting or clearing the Allow or Deny check boxes next to permissions.
In the Global Permissions section, make any changes you want to permissions by selecting or clearing the Allow or Deny check boxes next to permissions.
When finished, click Save at the bottom of the page.
Each group, or role, defined in Project Web Access is identified by a set of permissions. You can specify which users belong to which group, the categories of information they have access to, and the permissions for what they can do with that information.
If your organization uses different roles from those identified as groups in Project Web Access (for example, Project Managers and Team Leaders), you can create your own. To do this, follow these steps:
Open the Server Settings page of Project Web Access.
Under Security, click Manage Groups.
The Manage Groups page appears (see Figure 21-4)
Above the table, click New Group.
The Add Or Edit Group page appears.
In the Group Information section, enter the group name and description in the first two boxes.
In the Users section, click the users you want to add to the group and then click Add.
You can also add users after you’ve finished defining the group.
In the Categories section, click any categories (for example, My Tasks or My Resources) that are appropriate to be accessed by members of this group and then click Add.
In the Selected Categories box, select each category in turn and then, in the Permissions box, set the permissions for the category. Repeat this process for each category in the Selected Categories box.
If you want to use a security template to set permissions for a category, scroll to the bottom of the page, click the arrow in the Set Permissions With Template box, and then select the template. Click Apply. Make any adjustments to the permissions as necessary for the selected category.
Click the plus sign next to the Global Permissions label to expand the list. Specify the global permissions that you want to apply to your new group.
If you prefer to use a security template to set global permissions for a category, scroll to the bottom of the page, click the arrow in the Set Permissions With Template box, and then select the template. Click Apply. Make any adjustments to the permissions as necessary for the selected category.
When finished defining the new group, click Save at the bottom of the page.
To edit an existing group, click Manage Groups under Security on the Server Settings page. In the table, click the group you want to change. The Add Or Edit Group page appears. Make the changes you want to add or remove users in the group, change the categories associated with the group, or change permissions for the group.
Categories are clusters of information, such as My Tasks, My Projects, or My Resources. Some user groups should have access to all categories, whereas other groups only need access to two or three categories.
If the built-in categories don’t quite fit the way your organization works with projects, you can customize them or create entirely new ones. To create a new category, follow these steps:
Open the Server Settings page of Project Web Access.
Under Security, click Manage Categories.
The Manage Categories page appears.
Above the table, click New Category to open the Add Or Edit Category page.
In the Name And Description section, enter a name and description for your new category.
In the Users And Groups section, select the users and groups you want to be a part of the category and then click the Add button.
Select the first user or group in the Users And Groups With Permissions box, and then in the Permissions box, specify the permissions that users in this category should have. Repeat this process for each user and group you have added to the category.
In the Projects section, specify which projects the users in this category should be able to access: all projects in your project server database or just selected projects.
Select or clear the project-related check boxes to further define the category.
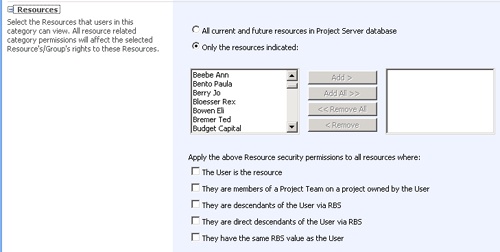
In the Resources section, specify which resources the users in this category should be able to view: all current and future resources in your project server database or just selected resources (see Figure 21-5).
Select or clear the resource-related check boxes to further define the category.
In the Views – Add To Category section, select the check box for the views that the users in this category should be able to see. To select all views in a group of views, such as Project or Resource Center, select the check box next to that name, and all the views within that group are selected.
When finished, click Save at the bottom of the page.
Your new category is added to the table in the Manage Categories page.
To modify an existing category, click the category name in the Manage Categories page that you want to change, for example, My Direct Reports or My Tasks. Review the information in the Add Or Edit Category page and make the changes you want. When finished, click Save.
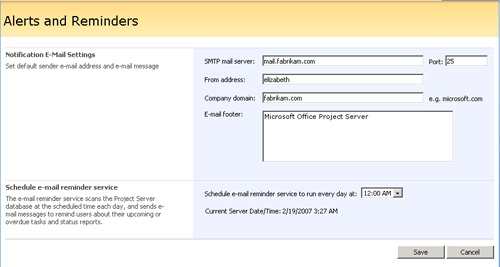
You can have Project Server 2007 automatically send e-mail messages to team members and project managers to remind them about assignments and status reports that are due. To set up automated alerts and reminders, follow these steps:
On the Server Settings page, under Operational Policies, click Alerts And Reminders.
Complete the fields in the Notification E-Mail Settings section (see Figure 21-6).
In the Schedule E-Mail Reminder Service section, specify the time of day that the reminder should be sent.
Click Save.