New in Microsoft Office Project Server 2007 is the means for using a simplified Web-based interface in Project Web Access to track activities throughout the entire project life cycle, that is, just before and just after the project itself is implemented.
With proposals, you can set up a preproject plan. You can create a resource plan to help you anticipate potential resource needs for the project without committing those resources to a project that might or might not be initiated. When the proposal is approved, the proposal can be converted into a project.
With activity plans, you can track the routine operations that typically take place after the completion of a project. You can also use activity plans to track maintenance activities or very small projects.
Note
Proposals, resource plans, and activity plans all operate only in Project Web Access; you cannot see these plans in Project Professional.
With both proposals and activity plans, you can use the views and reports in Project Web Access to do high-level or detailed analyses. This can be particularly useful with proposals. Portfolio managers and executives can review the proposals and evaluate feasibilities within the organization’s strategic goals to help decide whether to move forward with a project.
You can also use timesheets and project workspaces with proposals and activity plans. Activity plans definitely work well with timesheets, because timesheets are designed to track various categories of time, whether related to a project or not.
Calendars and custom fields created in Project Web Access can also be used with proposals and activity plans.
A proposal is a simple way to list tasks and durations for a potential project without investing a lot of time in it. If the project is approved, you can then convert it into a real project plan that can be opened in Project Professional, and the groundwork is already laid. You don’t need to do any converting or importing; you just need to add detail.
To create a proposal, follow these steps:
On the Quick Launch task bar in Project Web Access, under Projects, click Proposals And Activities.
Click New, Proposal.
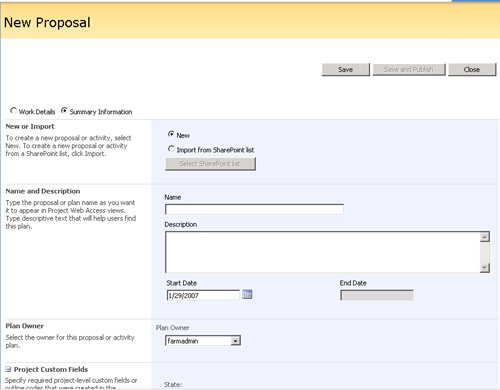
The New Proposal page appears (see Figure 22-32).
Near the top of the page, make sure that the Summary Information option is selected.
Work through the page, reading the section descriptions and completing the fields as appropriate.
If the Workflow Status section is present, click the link to the workflow status and activity pages.
The workflow status feature can be enabled or disabled as part of the customization done for your organization by your project server administrator.
Under Project Custom Fields, click the button next to the State box and then click Proposed.
The State field is a "built-in" custom field designed for use with proposals. The three enumerated states are Proposed, Approved, and Rejected.
When finished, click Save.
The new proposal is saved to your project server, and the Work Details view of your new proposal appears. Make sure that the Work Details option is now selected.
Enter the details of your new proposal. Enter task names and durations. Use the buttons on the toolbar to indent outline levels or insert new tasks.
If you want to link tasks with a finish-to-start task relationship, select the predecessor task by clicking the row header. Hold down Ctrl and then click the row header for the successor task. Click the Link Tasks button.
An icon in the indicators field shows that the two tasks are linked. You can only link tasks with a finish-to-start task relationship in a proposal.
Click Save to save the proposal to the project server but keep it to yourself. Click Save And Publish to save the proposal to the project server and also make it available for others to see and use.
Your new proposal is listed on the Proposals And Activities page.
To view your proposal information, change summary information, or change task details, follow these steps:
On the Quick Launch task bar in Project Web Access, under Projects, click Proposals And Activities.
On the Proposals And Activities page, click the name of the proposal.
By default, the Work Details view of the proposal appears.
Make any changes you want to the task information and then click Save.
If you need to view or change summary information, above the table, select the Summary Information option.
The Summary Information view of your proposal appears. In this view, you can review or change the proposal description, the proposal state, and so on.
When finished, click Save or Save And Publish. Click Close.
On the Proposals And Activities page, proposals are the items that have a state associated with them: Proposed, Approved, or Rejected. Activity plans are also listed on this page, but their state fields are blank. You can select a proposal without opening it by clicking anywhere in the row except on the proposal name itself.
If you do not expect to create a resource plan to associate with your proposal, you can add resources to your proposal and assign them to tasks. Resources assigned to proposed tasks are not really assigned; that is, they do not see notifications of new assignments, even if the proposal is published. The purpose for doing this is to propose possible resources for if this proposal is approved and then converted to a project.
To add resources to your proposal, follow these steps:
On the Quick Launch task bar in Project Web Access, under Projects, click Proposals And Activities.
On the Proposals And Activities page, click the name of the proposal to open its Work Details view.
If you make any other changes to the proposal, click Save.
Click Build Team.
On the Build Team page, select the check boxes next to the resources you want to add to the proposal. Then click Add.
Click Save.
Click in the Resource Name field for a task, and you’ll see a list of all the resources you just added. Click a resource to propose the assignment of that resource to the current task. You can only add one resource to a task.
When finished, click Save or Save And Publish. Then click Close.
If it is determined that the proposal should become a project, you can easily convert it. To do this, follow these steps:
On the Quick Launch task bar in Project Web Access, under Projects, click Proposals And Activities.
On the Proposals And Activities page, click anywhere in the proposal’s row except on the name to select the proposal but not open it.
Click Convert.
Read the alert that appears and then click OK.
The proposal is submitted to the project server for conversion from a proposal to a project. When the conversion is finished, the Proposals And Activities page appears, and your proposal is no longer listed.
On the Quick Launch task bar, click Project Center.
You’ll see your former proposal, which is now a project, listed there.
Click the name of your newly converted proposal.
You can now edit the proposal, which is now a project, in Project Web Access or Project Professional. If you had already added resources, when you publish the project, those resources will see their assignments for this project.
Activity plans are designed to track routine operations or maintenance tasks that continue on after a project is complete. However, you can use activity plans as a simplified task list or for a very small project.
Activity plans are created and used in a manner nearly identical to proposals. To create an activity plan, click Proposals And Activities on the Quick Launch task bar and then click New, Activity. Follow the same process as for creating a new proposal. One difference is that for activities there is no Workflow Status section and no State field.
You can view and change activity plan information the same way as proposals, you can add resources to a proposal, and you can convert an activity plan to a project in the same way.
With a resource plan, you can estimate potential resource requirements for your proposal, activity plan, or project. A resource plan can also define the use of resources if you’re using a proposal for a small task-only project.
Resource plans are always created within the context of a proposal or activity plan. The proposal or activity plan must be published before you can create its resource plan. To create a resource plan, follow these steps:
On the Quick Launch task bar, click Proposals And Activities.
On the Proposals And Activities page, click the name of the proposal or activity plan to open its Work Details view.
Be sure that your proposal or activity plan has been published. You can only create a resource plan for proposals or activity plans that have been published.
Click Resource Plan.
Click Build Team and select the check boxes for the resources you want to add to your resource plan. Click Add and then click Save.
The Resource Plan page for your proposal or activity plan appears, listing the resources you added from the Build Team page.
Click Settings, View Options.
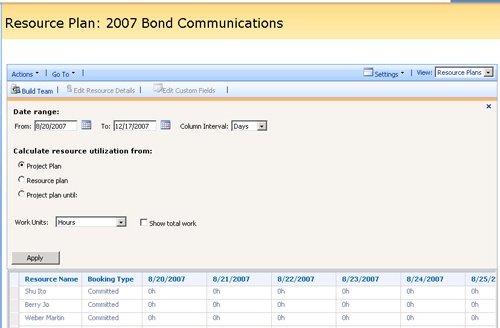
The Resource Plan page opens (see Figure 22-33).
Under Date Range, set the options for how you want to view dates in the resource plan.
Under Calculate Resource Utilization From, select how resource availability should be calculated for reports generated from this resource plan, as follows:
Select Project Plan to have availability calculated from all assignments in the proposal or activity plan, but not from the resource plan.
Select Resource Plan to have availability calculated from resource information in the resource plan.
Select Project Plan Until to have availability calculated from all assignments within this proposal or activity plan until the date you enter.
Click Apply. If you want, click Settings, View Options again to hide the view options.
In each time period for a resource, enter the amount of time that this resource should be shown as occupied. This will figure into the resource’s availability data according to the calculations options you just set.
When finished, click Save or Save And Publish. Then click Close.