
Not every minute of every day can be devoted to your project assignments. You know that you have to take time taken for nonproject tasks such as attending staff meetings and participating in training workshops. And then there are also vacations, holidays, and personal time off.
Project Web Access has a new method for tracking different categories of time—timesheets. With timesheets, you can log how you spend your time throughout the workday and the workweek, whether it’s on project tasks, nonproject working, or non-working time.
Such detailed tracking is important in organizations that have specific time reporting requirements, either for their own internal purposes or for working with their customers. For example, certain organizations need to see all billable and nonbillable time, scheduled and actual time, overtime, and so on. Your project server administrator sets up the format for the timesheet as it is to be used for your organization’s needs.
Note
If your organization does not need such exact time tracking, it might not have implemented the timesheet feature. If this is the case, either you will not see it in Project Web Access, or it will be an empty page.
You submit timesheets to your timesheet managers on a periodic basis based on your organization’s reporting period. Common reporting or fiscal periods include calendar months or 4-week periods. When you log on to Project Web Access, your list of reminders includes any timesheets that are coming due.
To see a list of timesheets for your reporting periods, click My Timesheets on the Quick Launch task bar and then click My Timesheets. The list of timesheets appears (see Figure 23-16).
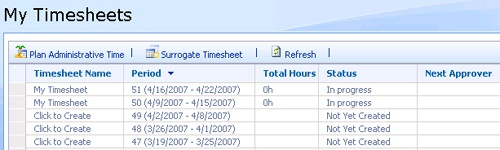
Figure 23-16. Timesheets for each of your organization’s reporting periods are listed on the My Timesheets page.
To see a different set of timesheet periods, click the arrow in the View box and then click the set of timesheets you want.
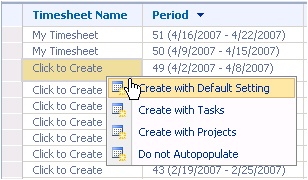
The first time you open your list of timesheets, the entry in the Timesheet Name field for all of them might be Click To Create. Your project server administrator has already set up the information your timesheets are to include, as follows:
Task assignments taking place during this reporting period
The list of all projects to which you are assigned
No tasks or projects; only the administrative time categories
In spite of this default, you can create your timesheet with the choice you want of these three. Rest your mouse pointer to the right of the Click To Create link until an arrow appear and then click the arrow. The drop-down list shows four options, the first one being to create with the default setting.
Make a selection and then the timesheet appears (see Figure 23-17).
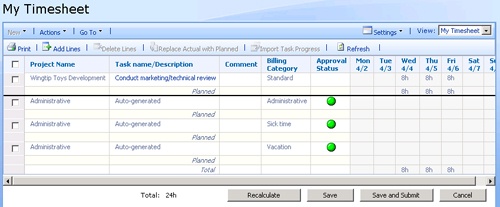
Figure 23-17. The timesheet for a particular period includes fields for each day in the reporting period.
To complete and submit your timesheet, follow these steps:
In the Timesheet Name column, click the name of the timesheet for the period for which you want to log your time.
To enter time on a day for a certain category, whether it’s a project name, a task name, or administrative time such as Vacation, click in the day field for the timesheet item and then type the number of hours, for example, 8h.
To save your changes to a timesheet, click the Save button. It’s a good idea to keep your timesheet up to date as you work through the period. This way, when your timesheet comes due, it will be nearly complete and ready to submit.
When your timesheet is due and ready to submit to your timesheet manager, click the Save And Submit button.
In the Submit Timesheet dialog box, type a comment if you’d like, and then click OK.
The timesheet is saved, and your timesheet manager will see a notification that your timesheet is available for review and approval.
Your timesheet manager could be your supervisor, a resource manager, or other person in your organization who is responsible for reviewing and approving timesheets.
Items in your timesheets can be used independently of the assignments on your My Tasks page, or they can work together. You can bring assignments from the My Tasks page into a timesheet. You can also bring timesheet items from the timesheet onto your My Tasks page. Doing this can help consolidate your time tracking for the different categories and save you some effort.
If a timesheet has already been created without your tasks for that period and you want to add them, click Import Task Progress. In the alert that appears, click OK. Tasks for that period appear in your timesheet.
You can also use the Add Lines command to add any existing assignment or create an entirely new item as a line in your timesheet. To do this, follow these steps:
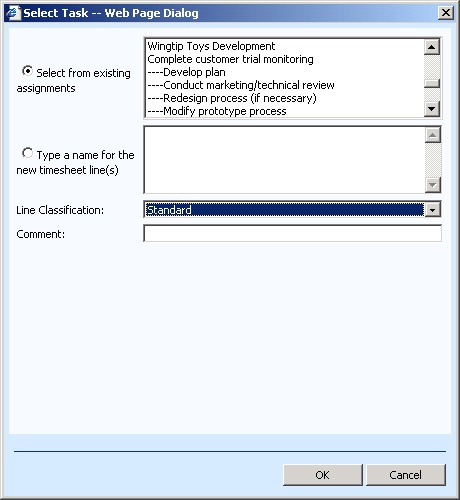
In the timesheet to which you want to add an assignment line, click Add Lines.
The Select Task dialog box appears (see Figure 23-18).
To add a line from one of your task assignments, make sure the Select From Existing Assignments option is selected and then click the name of the assignment in the box.
To create a new line, select the Type A Name For The New Timesheet Line(s) option and then type the name for the line.
In the Line Classification box, select the billing category for the new line. These classifications are preset.
Enter a comment if necessary and then click OK.
The new line appears in your timesheet.
Click Save.
To import timesheet items onto your My Tasks page, go to the My Tasks page and then click Import Timesheet. In the Timesheet field, select the reporting period of the timesheet you want to import. Click Import.
If you are planning a vacation or an upcoming week of training, for example, you can account for this in your timesheet by requesting administrative time. Certain categories of administrative time are set up by your project server administrator to reflect common types of nonproject working time or nonworking time. You can specify when you plan to need administrative time, and it becomes a part of your timesheet. Some categories require management approval; others do not.
Note
In Project 2003, the administrative project was introduced, in which users could create nonproject working time and nonworking time categories and then assign themselves to these categories. In Project 2007, this feature has become a part of the timesheet as administrative time.
To specify administrative time, follow these steps.
In your list of timesheets, click Plan Administrative Time.
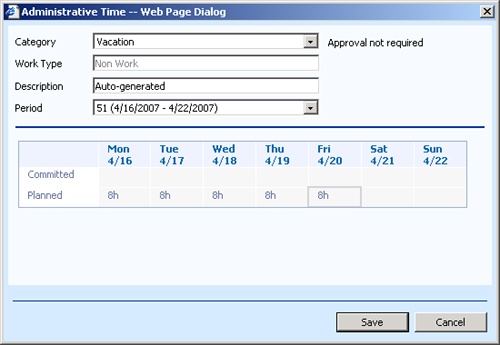
The Administrative Time dialog box appears.
In the Category box, click the category for the administrative time you are planning, such as Vacation or Administrative (nonproject working time).
In the Period box, click the reporting period during which the event will take place.
The timesheet updates to reflect your selected reporting period.
In the timesheet area, enter the number of working hours you will use for the event in the appropriate day. Notice that the timesheet area has a Committed and Planned field for each day. If the event is in the future, enter the number of hours in the Planned field for the day (see Figure 23-19). If the event is in the past, for example, for Sick Time, enter the number of hours in the Committed field.
Click Save.
The administrative time is saved. When you open the timesheet for the time period in which you entered the administrative time, it reflects the hours you entered.
If you have chosen a category that requires management approval, your timesheet manager will get notification of it and then accept or reject your request.