Through Project Web Access, you have tools at your disposal for making your life a little easier. You can set up automated notifications so that you can receive e-mail reminding you about various aspects of your project and progress tracking. You can specify when you want to see reminders appear on your Project Web Access home page regarding your assignments and status reports. You can also integrate your project tasks into your Microsoft Office Outlook calendar.
To configure automated e-mail alerts and reminders to yourself, follow these steps:
On the Quick Launch task bar, click Personal Settings.
Click Manage My Alerts And Reminders.
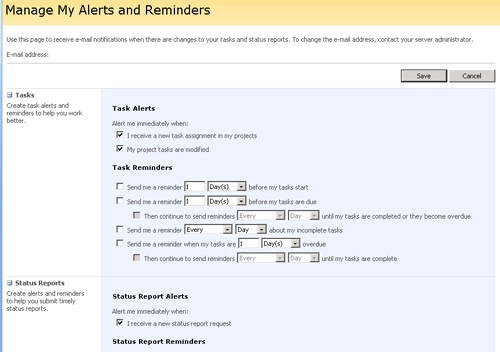
Review the options in the Tasks and Status Reports sections, and select the check boxes and make further specifications for the events for which you want to be notified via e-mail (Task Alerts) and see reminders on the Project Web Access home page (Task Reminders).
Clear the check boxes for events for which you do not want an e-mail notification or reminders.
You can set up notification and reminder options for new or changed tasks, upcoming tasks, overdue tasks, and for status reports (see Figure 23-20).
When finished, click Save.
If you use Office Outlook, you can keep track of your assigned tasks in your Outlook Calendar, along with your other appointments. You can update progress on your project assignments in the Calendar and report the status back to your project server directly from Outlook.
Project tasks can be displayed as free or busy time, just like any other Calendar entries.
As an alternative, you can also add your assigned project tasks to your Outlook Tasks list. Either way, you can get Outlook reminders for your project tasks, and report progress on them back to Project Web Access.
If you choose to integrate your project assignments with Outlook like this, your assignments are still published from Project Professional to the project server. At that point, your assignments appear in Outlook as well as in Project Web Access. You still use Project Web Access for the custom fields, project views, status reports, and other project-related features. However, you now have a choice to work in either Project Web Access or Outlook to review, track, and update your project assignments.
From Outlook, you can update your assignments and send actual progress information back to the project manager via the project server. As usual, the project manager reviews and approves your updates and incorporates them into the project plan.
The first step in working with your Project Web Access assignments in Outlook is to download the Outlook integration add-in. To do this, follow these steps:
On the Quick Launch task bar, click Personal Settings.
Click Set Up Outlook Sync.
Read the Synchronize Your Tasks With Outlook page, which explains what you can do with Outlook integration, as well as system requirements and download instructions for the Outlook integration add-in.
Click Download Now.
In the alert that appears, click Run (or Open).
In the security alert that appears, click Run.
Work through the Microsoft Office Project 2007 Add-In For Outlook Setup Wizard pages until the add-in is successfully installed.
To establish the connection between Outlook and Project Web Access, follow these steps:
In Outlook, click Tools, Options.
In the Options dialog box, click the Project Web Access tab.
Under Integrate With, select Outlook Tasks or Outlook Calendar.
Under Date Range, specify the time period from which you want assignments to be imported.
If you want to import assignments from the standard reporting time period set up in Project Web Access, select the Project Web Access Date Range option.
If you want to import assignments from a different time period (for example, the next 4 weeks), select the Next option and then select the date range.
Under Advanced, click the Advanced Options button.
Click the Enter Login Information button.
In the Project Web Access URL box, enter the address to your project server, for example, http://servername/projectserver.
If you click the Test Connection button, Outlook tests the URL you entered and makes sure that it’s a valid project server. If your project server account uses a Forms account for authentication (rather than Windows authentication), you will be prompted for your password.
Under When Connecting, specify whether you should be validated with your Windows user account or whether you’re using a separate Project Server account name. If your project server account uses Forms authentication, click the Use A Project Server Account option and enter your user name if necessary. Click OK.
In the Advanced Options dialog box under Assignment Import, specify your availability for other appointments during the time of your assignments.
Just as with other Outlook appointments, you can show your availability as free, busy, tentative, or out of the office. The setting you choose becomes the default for all project assignments in Outlook. You can still change the availability for individual assignments as needed.
Under When Importing From Project Web Access To Outlook, specify whether you want reminders. Click OK.
In the Options dialog box, click OK.
To import assignments from Project Web Access into Outlook, follow these steps:
Open the Outlook Calendar view or Tasks view.
Which one you choose depends on whether you selected integration with Outlook Tasks or Outlook Calendar on the Project Web Access tab in the Options dialog.
If necessary, show the Project Web Access toolbar by clicking View, Toolbars, Project Web Access.
On the Project Web Access toolbar, click Import New Assignments.
If the Enter Password dialog box appears, enter your Forms account password.
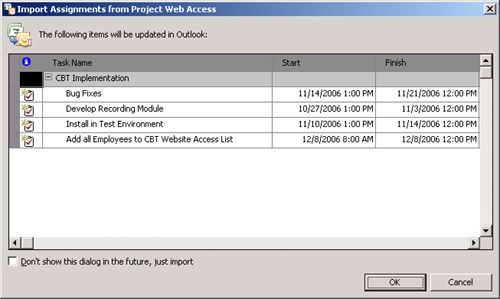
The Import Assignments From Project Web Access dialog box appears, listing your project assignments (see Figure 23-21). These are the assignments within the date range you set previously in the Options dialog box.
Click OK.
The listed assignments are imported into your Outlook Calendar or Tasks To-Do List.
To record progress on a project assignment from Outlook, follow these steps:
Open the Outlook Calendar view or Tasks view.
Which one you choose depends on whether you selected integration with Outlook Tasks or Outlook Calendar on the Project Web Access tab in the Options dialog.
Double-click the assignment for which you want to record progress.
The appointment form appears, showing assignment details.
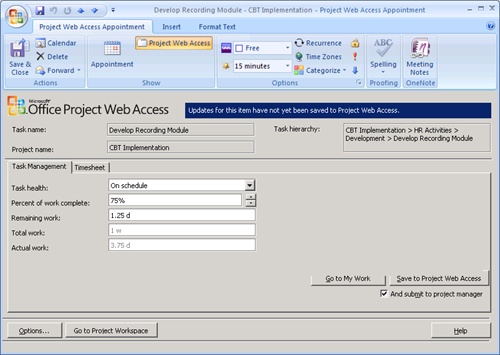
If you integrate with the Outlook Calendar, on the Project Web Access Appointment tab, in the Show group, click Project Web Access.
Depending on the tracking method configured for your project, enter the hours worked per time period, percentage complete, or actual work and remaining work (see Figure 23-22).
To save the updated information to your project server, click the Save To Project Web Access button.
To also submit the information so that your project manager can see a progress update, select the And Submit To Project Manager check box.