
With the Gantt Chart in your project file now full of tasks, it’s time to put these tasks in a logical order. It’s also time to add any forgotten tasks or delete duplicated ones.
To move a task from one row to another, follow these steps:
In the table portion of the Gantt Chart, select the entire task row by clicking the gray row heading, which includes the task number.
With your mouse pointer still over the row heading (the pointer should appear as a black crosshair), drag the task to the location in the Gantt Chart where you want to place it.
A gray line along the row border follows your mouse movements, indicating where the task will be inserted when you release the mouse button.
Release the mouse button to insert the task in the new location.
To add a new task to other existing tasks, follow these steps:
You can copy one or more tasks to use as the basis for other tasks. The following list describes the various copy techniques:
Copy a single task name. Click in the Task Name field and then click Copy Cell on the Standard toolbar. Click the Task Name field in a blank row and then click Paste on the Standard toolbar.
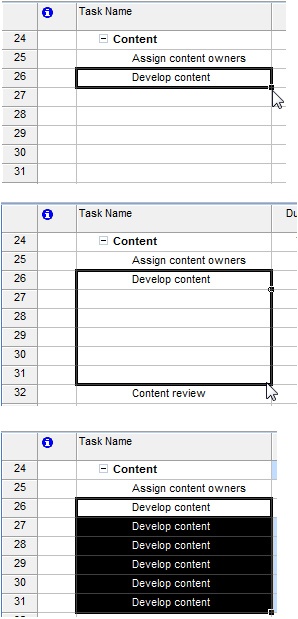
Copy multiple adjacent task names. Click the first task name you want to select, hold down the Shift key, and then click the last task name. All task names between the first and last are selected. Click Copy Cell. Click the first Task Name field where you want the selected tasks to be pasted and then click Paste. You can also simply drag to select the tasks. If you want to copy the selected tasks to empty rows directly under a particular task, drag the fill handle in the lower-right corner of the cell into those empty rows (see Figure 3-18).
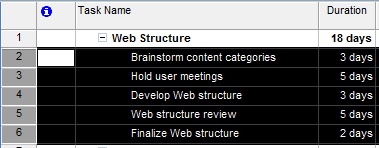
Copy multiple nonadjacent task names. Click the first task name you want to select, hold down the Ctrl key, and then click any additional task names you want to add to the selection (see Figure 3-19). Click Copy Cell. Select the Task Name field where you want the selected tasks to start to be added and then click the Paste button. The tasks are added in the order that you selected them.
Copy a single task and its task information. Click the row heading of the task you want to copy, which selects the entire task and its associated information. Click Copy Task. To add the task into an empty row, select the row and then click Paste. To insert the task between two existing tasks, select the lower task and then click Paste. The copied task is pasted into a new row inserted above the selected task.
Copy multiple adjacent tasks and their task information. Click the row heading of the first task you want to copy. Hold down the Shift key and then click the row heading of the last task (see Figure 3-20). Click Copy Task. Select the task above which you want the copied tasks to start to be added and then click Paste.
Copy multiple nonadjacent tasks and their task information. Click the row heading of the first task you want to copy. Hold down the Ctrl key and then click the row headings of all the tasks you want to copy. Click Copy Task. Select the task above which you want the copied tasks to be added. Click Paste. The tasks are added in the order that you selected them.
To delete a task you don’t need, select the row heading and then press the Delete key.
When you click a task name (rather than the row heading) and then press the Delete key, the Delete indicator appears in the Indicators column. Choose whether to delete the entire task or just the task name (see Figure 3-21).
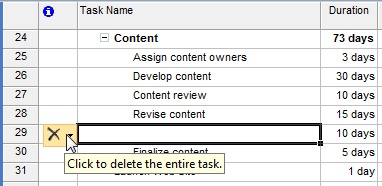
If you want to delete the entire task, click the indicator. If you simply want to clear the task name, press Enter or click elsewhere in the view.
With previous versions of Microsoft Project, you can undo only the last edit. New in Microsoft Office Project 2007 is the ability to undo multiple edits. To undo recent edits, press the Undo button on the Standard toolbar. Each time you press the Undo button, the previous edit is undone in the reverse order it was done.
Other ways to work with the Undo command are as follows:
You can click Edit, Undo or press Ctrl+Z to reverse the last edit.
To undo a series of edits all at once, click the arrow next to the Undo button on the Standard toolbar. Select the point to which you want to undo. All edits between the current state and the selected edit are undone.
To redo an edit that you’ve undone, press the Redo button on the Standard toolbar.
You can also click Edit, Redo or press Ctrl+Y to redo undone edits.
To redo a series of undone edits all at once, click the arrow next to the Redo button on the Standard toolbar. Select the point to which you want to redo the edits. All edits between the current state and the selected edit are redone.
You can redo only edits that you have previously undone. The Redo command does not repeat commands or edits.
You can set the maximum number of undo operations. Click Tools, Options and then click the General tab. Under General Options For Microsoft Office Project, enter the maximum number of undo operations you want in the Undo Levels box. The default is 20 and the maximum is 99.