
- Microsoft® Office Project 2007 Inside Out
- SPECIAL OFFER: Upgrade this ebook with O’Reilly
- A Note Regarding Supplemental Files
- Your All-in-One Resource
- Acknowledgments
- About the CD
- Conventions and Features Used in This Book
- I. Project Fundamentals
- 1. Introducing Microsoft Office Project 2007
- 2. Understanding Projects and Project Management
- II. Developing the Project Plan
- 3. Starting a New Project
- Focusing the Project Vision
- Creating a New Project Plan
- Entering Tasks
- Sequencing and Organizing Tasks
- Organizing Tasks into an Outline
- Setting Up Your Work Breakdown Structure
- Adding Supplementary Information to Tasks
- 4. Viewing Project Information
- 5. Scheduling Tasks
- 6. Setting Up Resources in the Project
- Understanding the Impact of Resources in the Project Plan
- Adding Resources to the Project
- Removing a Resource from the Project
- Identifying Tentative, Generic, or Budget Resources
- Setting When Resources Are Available for Work
- Adding Detailed Resource Information
- 7. Assigning Resources to Tasks
- 8. Planning Resource and Task Costs
- 9. Checking and Adjusting the Project Plan
- Working with the Critical Path and Critical Tasks
- Bringing in the Project Finish Date
- Reducing Project Costs
- Balancing Resource Workloads
- Changing Project Scope
- Reviewing the Impact of Changes
- Obtaining Buyoff on the Project Plan
- 3. Starting a New Project
- III. Tracking Progress
- 10. Setting a Baseline and Updating Progress
- 11. Responding to Changes in Your Project
- IV. Reporting and Analyzing Project Information
- 12. Reporting Project Information
- Establishing Your Communications Plan
- Using Views to Report Project Information
- Generating Text and Visual Reports
- Running Reports for Your Requirements
- Summarizing with Overview Reports
- Focusing on Tasks with Schedule Progress Reports
- Using the Unstarted Tasks Report
- Using the Tasks Starting Soon Report
- Using the Tasks In Progress Report
- Using the Completed Tasks Report
- Using the Should Have Started Tasks Report
- Using the Slipping Tasks Report
- Using the Baseline Report in Visio
- Using the Baseline Work Report in Excel
- Using the Task Status Report in Visio
- Using the Budget Work Report in Excel
- Analyzing Budget Status with Cost Reports
- Using the Cash Flow Report
- Using the Cash Flow Report in Excel
- Using the Cash Flow Report in Visio
- Using the Baseline Cost Report in Excel
- Using the Budget Report
- Using the Budget Cost Report in Excel
- Using the Resource Cost Summary Report in Excel
- Using the Overbudget Tasks Report
- Using the Overbudget Resources Report
- Using the Earned Value Report
- Using the Earned Value Over Time Report in Excel
- Evaluating Resource Allocation with Assignment Reports
- Using the Who Does What Report
- Using the Who Does What When Report
- Using the To-Do List
- Using the Overallocated Resources Report
- Using the Resource Availability Report in Visio
- Using the Resource Work Availability Report in Excel
- Using the Task Usage Report
- Using the Resource Usage Report
- Using the Resource Work Summary Report in Excel
- Using the Resource Remaining Work Report in Excel
- Using the Resource Status Report in Visio
- Revising a Built-In Report
- Building a Custom Report
- Saving Project Data Fields
- 13. Analyzing Progress Using Earned Value
- 12. Reporting Project Information
- V. Managing Multiple Projects
- 14. Managing Master Projects and Resource Pools
- 15. Exchanging Information Between Project Plans
- VI. Integrating Microsoft Project with Other Programs
- 16. Exchanging Information with Other Applications
- 17. Integrating Microsoft Project with Microsoft Excel
- Copying Between Microsoft Project and Excel
- Embedding Between Microsoft Project and Excel
- Linking Between Microsoft Project and Excel
- Importing and Exporting with Excel
- Producing a Visual Report of Project Data in Excel
- 18. Integrating Microsoft Project with Microsoft Outlook
- 19. Integrating Microsoft Project with Microsoft Visio
- VII. Managing Projects Across Your Enterprise
- 20. Understanding Enterprise Project Management
- 21. Administering Your Enterprise Project Management Solution
- Logging On and Off
- Managing Users and Permissions
- Administering the Enterprise Resource Pool
- Establishing the Enterprise Portfolio
- Standardizing Enterprise Project Elements
- Setting Up Team Member Work Pages
- Managing Pages, Views, and Reports
- Managing and Maintaining the Server
- 22. Managing Enterprise Projects and Resources
- Connecting to Your Project Server
- Working with Enterprise Projects
- Building Your Enterprise Project Team
- Finding Resources to Meet Your Needs
- Adding Enterprise Resources by Name
- Identifying Resource Attributes Using Custom Enterprise Fields
- Using Generic Resources as Placeholders
- Adding a Team Assignment Pool to Your Project Resource List
- Finding Enterprise Resources That Meet Specific Criteria
- Replacing an Existing Project Resource with an Enterprise Resource
- Matching an Existing Project Resource
- Matching and Replacing Generic Resources
- Proposing Tentative Resources
- Assigning Tasks to Enterprise Resources
- Finding Resources to Meet Your Needs
- Collaborating with Your Project Team
- Creating Proposals and Activity Plans
- 23. Participating on a Team Using Project Web Access
- Getting Started with Project Web Access
- Working on Your Assignments and Updates
- Submitting Text-Based Status Reports
- Logging Time Using Timesheets
- Setting Up E-Mail, Reminders, and Calendars
- Managing Resources in Project Web Access
- 24. Making Executive Decisions Using Project Web Access
- Getting Started with Project Web Access
- Viewing Project Portfolio Information
- Working with the Project Portfolio
- Working with Resource Information
- Analyzing and Reporting on Project Information
- Setting Your Alerts and Reminders
- VIII. Customizing and Managing Project Files
- 25. Customizing Your View of Project Information
- Customizing Views
- Customizing Tables
- Customizing Fields
- Working with Outline Codes
- Customizing Groups
- Customizing Filters
- Sharing Customized Elements Among Projects
- 26. Customizing the Microsoft Project Interface
- 27. Automating Your Work with Macros
- 28. Standardizing Projects Using Templates
- 29. Managing Project Files
- 25. Customizing Your View of Project Information
- A. Installing Microsoft Office Project 2007
- B. Online Resources for Microsoft Project
- C. Keyboard Shortcuts
- D. Index to Troubleshooting Topics
- E. About the Authors
- Index
- About the Author
- SPECIAL OFFER: Upgrade this ebook with O’Reilly
You can save sets of fields or all fields in the current project file. This can be useful if you want to display or analyze project data in another application such as Excel or Microsoft Office Access 2007.
Six OLAP cubes contain combinations of field data for the current project file. These OLAP cubes are:
Task Usage
Resource Usage
Assignment Usage
Task Summary
Resource Summary
Assignment Summary
If you customize an OLAP cube with a different set of field data, you can save it as a separate cube file. To save a cube file, follow these steps:
Click Report, Visual Reports.
Click the Save Data button at the bottom of the Visual Reports – Create Report dialog box.
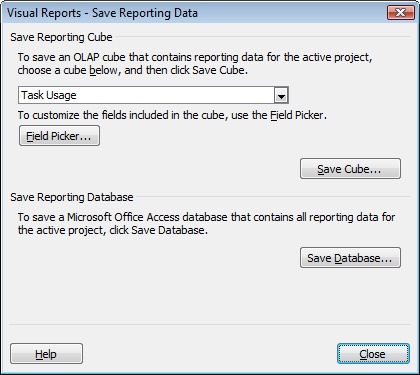
The Visual Reports – Save Reporting Data dialog box appears (see Figure 12-35).
Under Save Reporting Cube, click the cube you want to save.
If you want to change any of the fields in the cube you have selected, click the Field Picker button.
The Selected Fields box lists all fields in the selected cube.
Change the fields included in the cube as needed.
To add fields to the cube, select fields in the Available Fields box and then click the Add button.
To remove fields from the cube, select fields in the Selected Fields box and then click the Remove button.
To add custom fields to the cube, select fields in the Available Custom Fields box and then click the Add button.
Click OK.
In the Visual Reports – Save Reporting Data dialog box again, click Save Cube.
In the Save As dialog box, browse to the location where you want to save the cube file. Give the file a name if necessary and then click Save.
The data in your selected fields are gathered, the cube is built, and the cube file is saved. You can open a cube file (with the .cub file name extension) in Excel, where you can then create a PivotTable with the imported fields.
In Microsoft Office Project 2007, the ability to save project fields to a database has been removed from the Save As dialog box. Saving a project file in XML format essentially saves all contents of all fields that make up the project file database.
However, you can save reporting data from a project file as an Access MDB file through the Visual Reports dialog box. To do this, follow these steps:
Click Report, Visual Reports.
Click the Save Data button at the bottom of the Visual Reports – Create Report dialog box.
Under Save Reporting Database, click Save Database.
In the Save As dialog box that appears, browse to the location where you want to save the database. Give the file a name and then click Save.
The reporting data in your project file are gathered and saved as an Access (MDB) file. You can then open the file in Access.
Troubleshooting
You can’t save project information as a Web page
In previous versions of Microsoft Project, you could save selected project information as a Web page—that is, an HTML file—for subsequent posting to a Web site.
This functionality was essential for posting project information to your organization’s intranet or other Web-based project information system to allow for communication with stakeholders.
In Microsoft Office Project 2007, the Save As Web Page command is gone. However, it has been replaced by the ability to save the project as an XML file, which is more flexible to use. You can then apply your XSL style sheet to the XML file and post it to your Web site.
To save your project as an XML file, follow these steps:
Open the project plan you want to save as an XML file.
Click File, Save As.
In the Save As Type field, click XML Format.
In the Save As dialog box, navigate to the location where you want to save the new XML file.
In the File Name box, type the name for your new XML file.
Click Save.
The file is saved. You can now open it in a markup language editor, apply style sheets, and prepare the information for publication on the Web. If you simply want to publish a particular view to the Web, click Copy Picture on the Standard toolbar. Make sure that the For Screen option is selected. Specify the details about what you want to be copied and then click OK. Open a graphics application such as Microsoft Paint and click Edit, Paste. The picture of the Microsoft Project view appears. Manipulate the image further as needed, and save it as a JPG file, or whatever format you prefer. You can then publish the image to the Web page.
If you use an application which creates PDF files, you can print a view or report as a PDF and make it available for download from the Web page.
-
No Comment