
You are now able to create, load, and render maps with Tiled and Libgdx. However, we have only been capable of showing backgrounds and little more. What about dynamic elements such as enemies, items, the player starting position, the level exit, and so on?
When designing a level, it is very typical to add special objects to represent events or dynamic entities. Once the level is loaded, the game code will have to query the map to retrieve this metadata and populate the world with the aforementioned special entities.
In this adventure around metadata land, you will learn how to add objects and set properties on them as well as load them later from a Libgdx game.
For this recipe, you will also need the Tiled editor and the following two tilesets: data/maps/tileset.png and data/maps/backgrounds.png. The data/maps/tiled.tmx map file will be needed as well. We will also use the data/maps/sprites.atlas file and the data/music/song_1.mp3 audio file.
Additionally, we will work with the samples projects as usual.
Once again, we are going to split the process in two: Tiled editor and Java code.
Run the Tiled editor and follow these steps:
- To make things easier, click on File | Open, and select
data/maps/tiled.tmx. - Remove the coins, key, and chest from the foreground layer, and we're going to replace them with objects.
- Click on the new layer icon in the Layers panel and select Add Object Layer. Do this twice and name them
objectsandphysicsrespectively. - We are going to use objects to define the player starting position, enemies, items and trigger areas. Triggers are a mechanism to fire events when the player enters their area of effect: exit, checkpoints, cinematic sequences. Use the Insert Rectangle button to place these elements.
- Since we need to retrieve these objects later, it is necessary to give them meaningful names. To do so, right-click on them, select Object Properties and fill in the Name field:
- Player starting position:
player - Items:
item.type, for example,item.coinoritem.key - Enemies:
enemy - Triggers:
trigger.name, for example,trigger.exit
- Player starting position:
- Almost any element has a set of properties in Tiled that can be set from the editor and retrieved at a later date from the game. This is useful to further configure our levels and entities. Perform the following steps:
- To add map properties, click on Map and then on Map Properties. In this case, we will add a
musicproperty pointing to thedata/music/song_1.mp3file. The game will read this information and play the song after loading the level. - To add layer properties, right-click on the layer and select Layer Properties.
- To add tileset properties, click on the Tileset Properties button in the Tileset panel.
- To add tile-specific properties, right-click on the tile and select Tile Properties.
- Finally, for objects you have to right-click on it and select Object Properties.
- To add map properties, click on Map and then on Map Properties. In this case, we will add a
- We are not going to process the
physicslayer in code just yet but you can experiment with the possibilities of the approach. Try to add shapes to model the solid areas of the level. - When you are done, click on File, then on Save As and then select
data/maps/tiled-objects.tmx.
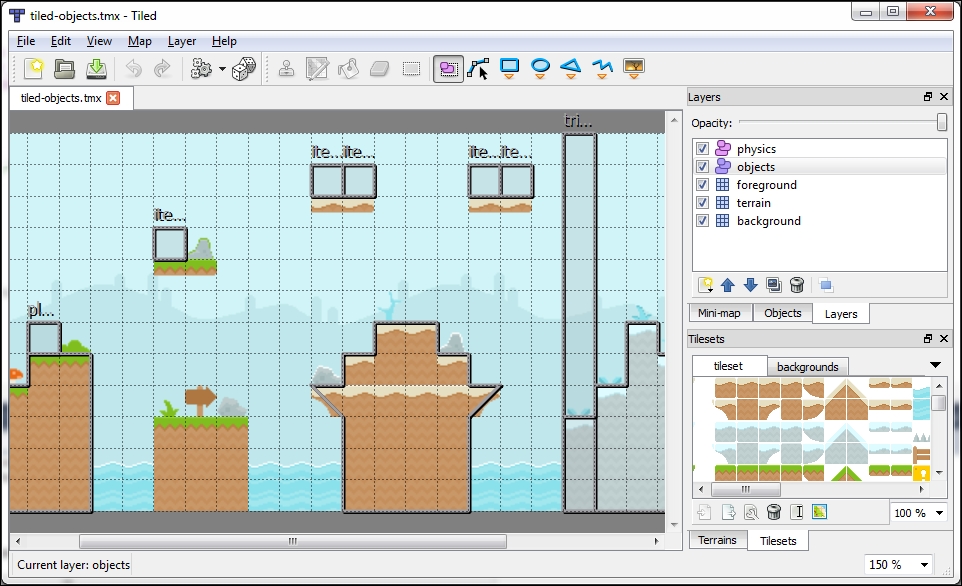
This is how your Tiled editor should look at this point:
Allow us to direct your attention towards the TiledMapObjectsSample.java file. Here we load and render the data/maps/tiled-objects.tmx file very much like in the previous recipe. Additionally, we place the player, enemy, and items sprites as well as show the position and dimensions of triggers as per the map's objects. Finally, we also play the audio file in the map's properties.
This way you will see how easy it is to retrieve this information from a map object.
The TiledMapObjectsSample class simply adds code to TiledMapSample. Let's begin with some new members, arrays of sprites for the enemies, items and triggers, the player, a texture atlas, and a Music instance:
private Array<Sprite> enemies = new Array<Sprite>();
private Array<Sprite> items = new Array<Sprite>();
private Array<Sprite> triggers = new Array<Sprite>();
private Sprite player;
private TextureAtlas atlas;
private Music song;
Our create() method calls a private processMapMetadata() function, responsible for querying all the information from the level. We start off by retrieving the music property. Every object that has a set of properties (see the UML diagram in the previous recipe) will offer a getProperties() method. The get() method takes the property key, an optional default value, and the class of the value referenced by the key. The level song will serve as an example:
String songPath = map.getProperties().get("music", String.class);
song = Gdx.audio.newMusic(Gdx.files.internal(songPath));
song.setLooping(true);
song.play();
See the complete MapProperties class reference at http://libgdx.badlogicgames.com/nightlies/docs/api/com/badlogic/gdx/maps/MapProperties.html for more details and also how to add, remove, or modify the existing properties.
From a map, we can get a MapLayers object using getLayers() and then get individual layers by index or name with get(). We can even get all the layers of a given class with the getByType() method passing in the desired class. It is possible to iterate over all the layers using iterator() or a combination of getCount() and get(). You can find the full documentation at http://libgdx.badlogicgames.com/nightlies/docs/api/com/badlogic/gdx/maps/MapLayers.html.
Once we have a layer, we can retrieve its name, properties, opacity, visibility, and collection of objects. You can learn more about MapLayer at http://libgdx.badlogicgames.com/nightlies/docs/api/com/badlogic/gdx/maps/MapLayer.html
In our case, we want to get the list of objects contained in the objects layer:
MapObjects objects = map.getLayers().get("objects").getObjects();The next step is to iterate over all the objects in the layer. Since our naming convention involved using . to separate between entity type and subtype (for example, item and coin), we need to split the name string. All our objects were rectangles, so we cast them to RectangleMapObject and retrieve the internal rectangle. Be careful because this code will crash if you bump into a nonrectangular object. Refer to the objects' documentation at http://libgdx.badlogicgames.com/nightlies/docs/api/com/badlogic/gdx/maps/objects/package-frame.html for more information.
Depending on the object name, we will create a sprite with a different region and add it to its corresponding collection. Note that we place the sprite at the (x, y) coordinates pointed by the object:
for (MapObject object : objects) {
   String name = object.getName();
   String[] parts = name.split("[.]");
   RectangleMapObject rectangleObject = (RectangleMapObject)object;
   Rectangle rectangle = rectangleObject.getRectangle();

   if (name.equals("enemy")) {
      Sprite enemy = new Sprite(atlas.findRegion("enemy"));
      enemy.setPosition(rectangle.x, rectangle.y);
      enemies.add(enemy);
   }
   else if (name.equals("player")) {
      player = new Sprite(atlas.findRegion("player"));
      player.setPosition(rectangle.x, rectangle.y);
   }
   else if (parts.length > 1 && parts[0].equals("item")) {
      Sprite item = new Sprite(atlas.findRegion(parts[1]));
      item.setPosition(rectangle.x, rectangle.y);
      items.add(item);
   }
   else if (parts.length > 0 && parts[0].equals("trigger")) {
      Sprite trigger = new Sprite(atlas.findRegion("pixel"));
      trigger.setColor(1.0f, 1.0f, 1.0f, 0.5f);
      trigger.setScale(rectangle.width, rectangle.height);
      trigger.setPosition(rectangle.x - rectangle.width * 0.5f, rectangle.y + rectangle.height * 0.5f);
      triggers.add(trigger);
   }
}
Fantastic! Now you are able to define your game entities inside an editor and instantiate them at run time. It will be extremely easy to change their location, properties, and so on.
Objects and properties are also stored as XML inside the map .tmx file. Object layers are represented by the objectgroup tag, while rectangles use the object tag, as shown in the following code snippet:
<objectgroup name="objects" width="30" height="12">
   <object name="player" x="63" y="126" width="21" height="21"/>
   <object name="item.chest" x="147" y="63" width="21" height="21"/>
   ...
</objectgroup>
Polylines are very useful to represent collision areas; they are represented by a combination of the object and polyline tags:
<object x="0" y="168">
   <polyline points="0,0 63,0 63,-21 105,-21 105,84 0,84 0,0"/>
</object>
When an element has set properties, it will contain a properties tag with a list of property entries:
<properties>
   <property name="music" value="data/music/song_1.mp3"/>
</properties>
Simple!
As we mentioned before, in a real-life situation, we would like to spawn game entities by name. Imagine some sort of game-specific IEntityFactory interface implementation. A create() method would take the entity archetype name, its position in the world, and maybe a collection of properties. The factory would then instantiate an entity of the desired archetype at the right position with the appropriate configuration.
Using it would be quite comfortable; just iterate over your entities layer in the level and call the create() method for each object you find:
public interface IEntityFactory
{
   public Entity create(String name, Vector2 position, Properties properties);
}
Factory is a well-known design pattern. Read more about it at http://en.wikipedia.org/w/index.php?title=Factory_method_pattern&oldid=608667321.
Furthermore, you could have an entities.json file with the serialized prototype of all the entities in your game. Your EntityFactory interface would read this file and keep an instance of each type of entity and clone the corresponding one every time create() is called. This would make your entity tweaking completely data-driven.
At this point, you should have enough maps knowledge to achieve great things but surely you want more! Carry on reading to find out about the following recipes:
- The Developing your own map loaders and renderers recipe
- The Building a physics world from level data recipe in Chapter 10, Rigid Body Physics with Box2D, to integrate your levels with Box2D