
Lights have a huge influence on the final appearance of your game as they are always present in a person's day-to-day life. They enrich the visual interaction that the player receives by adding some dynamism to the scene and, therefore, catch his or her attention.
Box2DLights was created by Kalle Hameleinen relying on Box2D for raycasting, so it can understand the geometry and OpenGL ES 2.0 or above for rendering through shaders.
In this recipe, we will explore the library, explaining how to endow your game with a significant visual improvement.
The code for this recipe is concentrated on one single file named Box2DLightsSample.java. Make sure that you add the following dependences to the build.gradle file as explained in Chapter 1, Diving into Libgdx.
To the core and the Android project, add the following:
compile "com.badlogicgames.box2dlights:box2dlights:1.2"
To the web project, add the following:
compile "com.badlogicgames.box2dlights:box2dlights:1.2:sources"
At the end of this section, you will have a working example of where different types of lights interact with their environment. To focus on the use of the library, a proper explanation about the elements that compound this scenery is provided in the next How it works... section.
Do not forget that you need to create a Box2D World so that raycasting can be performed. The design and creation of an interactive environment is assumed, so you can refresh your mind by referring to Chapter 10, Rigid Body Physics with Box2D. Perform the following steps:
- To begin with, you must declare
RayHandlerso all lights in the physics world can be easily managed. We will also addLight, which will turn on whenever the user touches/clicks on the screen:public class Box2DLightsSample extends GdxSample { ... private RayHandler rayHandler; private Light light; ... - Instantiate
RayHandlerby passing a Box2DWorldinstance to its constructor. In addition, a faint ambient light will be set in order to globally illuminate the scene. Light colors will accept RGB plus an alpha notation but values need to be normalized to [0-1]:rayHandler = new RayHandler(world); rayHandler.setAmbientLight(0.2f, 0.2f, 0.2f, 0.25f);
- The next step is to define the type of light that will appear at user's clicks, for instance,
PointLightwith 32 rays (you will see what the rays are for later in this recipe):light = new PointLight(rayHandler, 32);
Notice that its constructor demands a
RayHandlerinstance in order to manage the light.Since we want the light to not be enabled at the start, we must disable it in order to avoid wasting resources:
light.setActive(false);
We can also customize the color and the distance that will cover the light's influence:
light.setColor(Color.PURPLE);
light.setDistance(1.5f);
- To make your light responsive to clicks or touches, add the next two lines of code within the overridden
touchDown()method:light.setPosition(cursor.x, cursor.y); light.setActive(true);
In the same way,
touchUpmust turn the light off:light.setActive(false);
Finally, you must also consider a response to the users' drags within
touchDraggedby updating the light's position:light.setPosition(cursor.x, cursor.y);
- The previous light can move along the screen because it is intended to be dynamic. However, we can also instantiate any type of light and set it as static. This way, its derived calculations become much cheaper, if and only if, it is not updated for every frame. This is the way to go when interacting with static geometry:
Light conelight = new ConeLight(rayHandler, 32, Color.WHITE, 15, SCENE_WIDTH*0.5f, SCENE_HEIGHT-1, 270, 45);
conelight.setStaticLight(true);
Notice that, in this case, we are using a constructor that demands the color, the distance, the position, the direction and the angle, apart from
RayHandlerand the number of rays that we have already seen. By passing theRayHandlerinstance, you are adding the light to the world. - After creating your lights, they need to be updated and rendered. This can be achieved by specifying our camera projection to the internal lights renderer within
RayHandlerand asking it to do the rest:rayHandler.setCombinedMatrix(viewport.getCamera().combined); rayHandler.updateAndRender();
Notice that this will not update static lights unless any of their parameters have been set. Static lights are intended for lights that must collide with static geometry but ignore dynamic bodies. You can set a light as static in this way:
light.setStaticLight(true);
- Do not forget to get rid of the
RayHandlerinstance:rayHandler.dispose();
The final result will look like what is shown in the following screenshot:

You can observe that there is an area in the middle that is not illuminated. This is due to a square body that I have added to the sample. Why don't you try it for yourself and play around with it?
The code that you have just implemented is a good practice to obtain a quick overview as well as to get some familiarity with the library. However, some key concepts must be explained more deeply.
Box2DLights revolve around the core RayHandler class since it is in charge of the lights' whole life cycle. But that is not its only mission since it allows us to enable/disable culling, blurring, shadows, and ambient light through its setter methods.
In the same way that happened with Box2D bodies, all lights can be filtered so their influence will be null to certain bodies. The following method will create a new contact filter:
rayHandler.setContactFilter(short categoryBits, short groupIndex, short maskBits)
Take a look at the Sensors and collision filtering recipe from Chapter 10, Rigid Body Physics with Box2D, if it looks unfamiliar to you.
The Light class is the first in the class hierarchy of the library, followed by its daughter, PositionalLight. Both are abstract and will hold common parameters for the instantiable light classes.
So far, you have the tools to set values for setColor, setDirection, setDistance, setPosition, setActive, and setStaticLight among others that might require some explanation:
attachToBody: If this is enabled, the light (needs to bePositionalLight) will automatically follow a body, keeping a given offset.setXray: If this is enabled, the lights will go through bodies and, therefore, they will consume less processor time.setSoft: If this is enabled, lights will be decorated at the end of the rays. The next screenshot makes clear the difference between using this feature and not using it: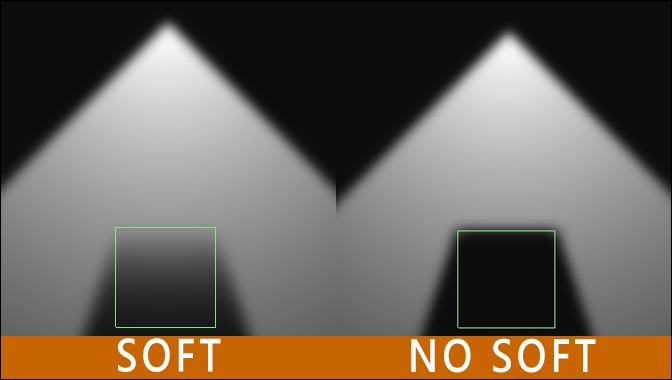
The preceding explanation is purely theoretical as they are not instantiable classes but their properties and behaviors will serve as base for the next light types:
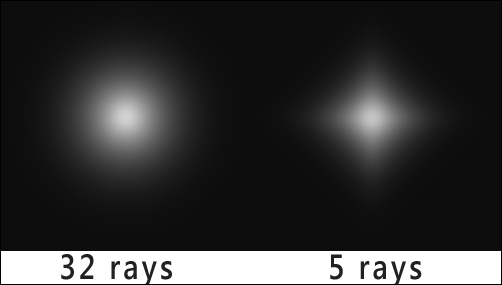
- Point light: This is composed of all the aforementioned attributes and its shape is circular although the number of rays passed will define the circle precision. A good outcome can usually be achieved by setting a value within the range [5,128]. Refer to the following screenshot:
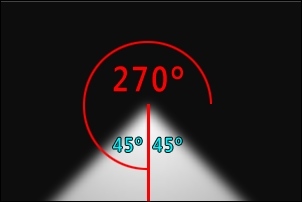
- Cone light: This is very similar to the previous one but with only a part of the full circle. This cut is marked by two additional attributes: direction and cone degree. The first will orientate the heading of the light and the second the angle of influence at each of the sides.
The previous sample code makes use of this class, setting the direction to 270 and the cone degree to 45; the resulting light is shown in the following screenshot:
- Directional light: This simulates the effect of the sun light since direction, which must be provided, and intensity are uniform. It does not extend
PositionalLightand therefore, does not have a position (nor can it be attached to a body).
Without a doubt, Box2DLights is powerful enough to take your game to the next level with awesome effects and light simulations. However, it can take up a lot of resources in the hands of a greedy and incautious programmer. That is why it is strongly recommended that you have several considerations in mind:
- Use the minimum number of rays that allow you to get your expected smooth grade.
- Make proper use of dynamic and static lights.
- Disable unnecessary lights, or even reuse them.
- Do not abuse softness; disable it if not needed.
- Enable culling.
- Set the frame buffer object (
fbo) size to a small value. This can set through a secondRayHandlerconstructor:public RayHandler(World world, int maxRayCount, int fboWidth, int fboHeigth)
You can read more about FBO at http://en.wikipedia.org/wiki/Framebuffer_Object.
This advice and the optimizations are simple to carry out, but if you plan to squeeze every last drop of lights performance, you should visit the official Box2DLights Libgdx wiki section.