Once the Create a new course link has been selected from the Course categories screen, Moodle directs you to the page where course details have to be entered. We already came across this screen in Chapter 3, Courses, Users, and Roles when we introduced the concepts of users, courses, and roles, respectively.
The following settings are available in the General and Description sections:
The fields, Course
full name, Course short name and Course ID Number, can be modified by a teacher, by default. You can disallow this by changing the appropriate permissions for the Teacher role by navigating to Users | Permissions | Define roles (search for capabilities starting with moodle/course:change, using the Filter box). We are going to deal with this in Chapter 6, Managing Permissions – Roles and Capabilities.
The following section in the course settings lets you choose a so-called course format. A course format dictates the way course content will be presented to the learner. Moodle ships with four formats, but more can be installed (see Installing third-party add-ons section in Chapter 8, Moodle Plugins). Once you have selected a course format, the screen has to refresh in order to load the respective course format settings:
- Single-activity format: This shows only the selected activity in a course, for instance, a Sharable Content Object Reference Model (SCORM) package, assignment, forum, quiz, and so on
- Social format: This is one main (social) forum, which is listed on the main course page, for example, a notice board
- Topics format: This is similar to the weekly format, except that each week is called a topic and no time restriction applies
- Weekly format: In this format, a course is organized week-by-week, with a start and a finish date
The remaining options in the Appearance, Files and uploads, Completion tracking, Guest access, and Groups sections are as follows:
|
Setting |
Description |
|---|---|
|
Force theme |
A theme that is to be used for this course is forcibly applied through this option. This requires course themes to be enabled in Appearance | Themes | Theme Settings (see Chapter 7, Look and Feel). |
|
Force language |
If this is set, the selected language is used throughout the course and cannot be changed. |
|
News items to show |
This determines how many recent items appear on your course home page in the news section (if any). Set this to |
|
Show gradebook to students |
This determines whether students are shown the Grades link in their Settings block. You can set this to |
|
Show activity reports |
This determines whether students can see their own activity reports (see Chapter 10, Moodle Logging and Reporting) via their profile page. |
|
Maximum upload size |
This setting limits the size of a file a user can upload into this course. |
|
Enable completion tracking |
Once completion tracking is enabled sitewide (Advanced features), it has to be activated at course level. |
|
Group mode |
This sets the group mode of the course to:
|
|
Force group mode |
If this is set, the selected group mode is used for every activity, and group settings in individual activities are ignored. This is useful when the same course is run multiple times with separate batches of students. Also, if group mode is forced and set to No groups, the Groups link will not be shown in the course administration menu. |
|
Default grouping |
If grouping is enabled and used within the course, the one that is to be used as default can be selected. |
Once a course has been created, you can assign users to various roles in the course (such as, enrolling students and assigning teachers); we have briefly covered this in Chapter 3, Courses, Users, and Roles and have dedicated the entire Roles management section in Chapter 6, Managing Permissions – Roles and Capabilities to roles, and will therefore be ignoring the Role renaming part, for now. The same holds for an optional Tags section, which is dealt with in Chapter 9, Moodle Configuration.
For most parameters, you can specify the course default settings when creating new courses; you can find these in Courses | Course default settings. The fields and values are identical to the ones we have described in the preceding screenshots.

Only the administrators or course creators (or any other role with course creation rights) are allowed to create new courses. In order to streamline the procedure for requesting courses, especially in larger organizations, Moodle offers a course requesting facility. This has to be enabled by going to Courses | Course request.
You have to specify Default category for course requests, which is where the courses created upon request will be placed. You can also enable Enable category selection, if your users are familiar with the course category structure. As the courses have to be approved, you can specify who will receive Course request notification:

As soon as the feature is enabled, each teacher has the ability to request new courses (via the Request a course button at Home | Courses). The information that has to be provided is:
- Course full name
- Course short name
- Course category (if selected above)
- Summary
- Reasons for course request
A new item, Courses | Pending requests, appears in the Site administration section. On selection, a list of requested courses is shown, which you can then Approve or Reject by selecting the appropriate button.

When you approve a course, the familiar course settings screen appears. This screen already contains the provided values of the course as well as the default or provided category specified in the system settings. Furthermore, the user who has requested the course will be automatically enrolled to the course and, by default, he/she will be assigned the teacher role. If you reject a course, a reason has to be given, which is then e-mailed to the requester.
So far, all the operations in this chapter have been carried out manually. However, in an organization with a large number of courses and categories, this process should be automated. In Courses | Upload courses, Moodle provides us with a powerful tool to manage courses in bulk. This not only lets us create new courses, it also caters for updating and deleting courses as well as restoring courses from backups and course templates.
In order to create courses in batch mode, you will need to create a CSV file, which contains the following fields (the full list can be found at https://docs.moodle.org/en/Upload_courses):
- Course information fields: These are identical to the fields on the course settings page, for example, short name, full name, and ID number.
In order to specify the category in which the course has to be placed, you have three options (in order of precedence):
category (internal ID)category_idnumber (ID number)category_path ( [category]<space>/<space>[subcategory]…).
The following is a sample file demonstrating all the three options:
shortname,fullname,category,category_idnumber,category_path
course1,Course One,4,,
course2,Course Two,,COMP-1,
course3,Course Three,,,Computing / Computing - Year 1
Tip
Categories cannot be created in batch mode; they MUST exist! Alternatively, make use of MOOSH, a Moodle Shell, which will be explained in more detail in Chapter 14, Moodle Admin Tools.
- Enrolment fields: These let you enable and configure enrolment plugins. We will be dealing with enrolments further down in this section, so here is a sample to configure self-enrolment:
shortname,fullname,category,enrolment_1,enrolment_1_startdate
course1,Course One,4,self,06/10/14
course2,Course Two,4,self,06/10/14
course3,Course Three,4,self,06/10/14
At the time of writing, only the enrolment methods manual and self are supported by course uploads. To monitor progress on this missing subfeature, monitor MDL-43127 in the bug tracker database.
- Role renaming: This provides a means to rename standard roles. We will be dealing with roles in Chapter 5, User Management.
In addition to these three types of fields, so-called course action fields can be specified in order to perform an action other than creating courses:
- delete: 1 to delete a course.
- rename: new shortname.
- backup file: absolute path of a backup file (
.mbz), which will be used as a source. This can potentially lead to performance problems (check out$CFG-> keeptempdirectoriesonbackupin the Appendix, Configuration Settings). - template course: shortname of an existing course which will be used as a source.
- reset: 1 to reset the course, that is to remove any user data.
Once a file has been uploaded, you will have to change the file format settings CSV delimiter and Encoding if they are incorrect. You can further specify the number of Preview rows. Then, the following import options can be configured:
|
Option |
Description |
|---|---|
|
Upload mode |
There are four self-explanatory options whether courses will be created or updated:
If any of the latter two options are selected, the following settings will become available. |
|
Update mode |
The modes specifies what data source will be used for updating fields:
|
|
Allow deletes |
Determines whether the delete field will be accepted or not |
|
Allow renames |
Determines whether the rename field will be accepted or not |
|
Allow resets |
Determines whether the reset field will be accepted or not |

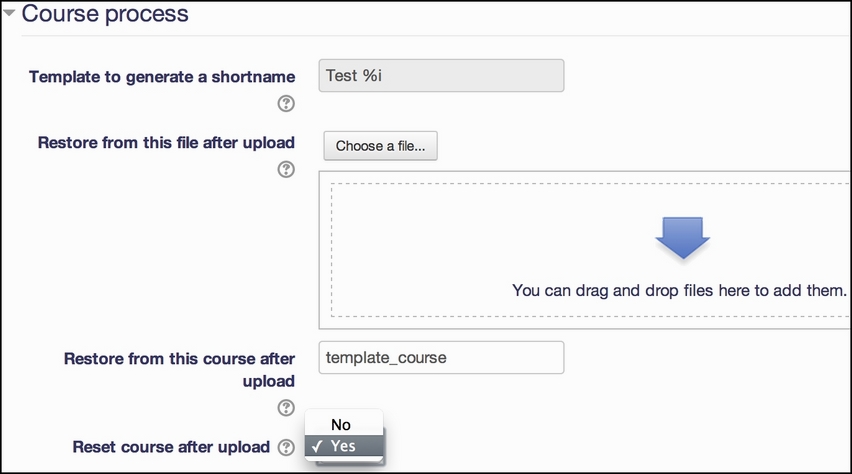
When in preview mode, you will see these import options again as well as the Course process settings and Default course values. The latter are the values used if not provided in the CSV file and an update mode is chosen that supports defaults. The course process supports two types of templates, which require some more explanation:
- Course name templates: If the CSV file does not contain a shortname column, you have the option to use template syntax to set the name, depending on either the idnumber (%i) or the fullname (%f). For instance, Template to generate a shortname is Test %i with Upload mode set to Create all, increment shortname if needed would result in the three courses
Test_1,Test_2, andTest_3with our previously used input file. - Course content templates: You can either specify the absolute path of a Moodle backup file or the shortname of an existing course as a content template for the newly-created course. We will be dealing with backup in Chapter 13, Backup and Restore, so for now, let's assume that they have a suffix, .
mbz. If either option is chosen, you need to select the Reset course after upload option to remove any user data that has been added in the source course:
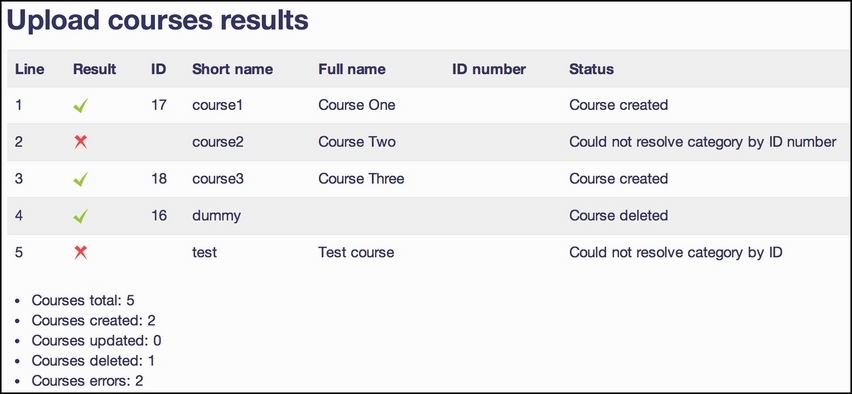
Once courses have been uploaded, you will see the summary of results, which is shown in the next screenshot:

There is also a CLI tool to perform course uploads from the command line. You can find it in admin/tool/uploadcourse/cli/uploadcourse.php. You will see all the supported parameters by calling the help mode:
sudo /usr/bin/php admin/tool/uploadcourse/cli/uploadcourse.php --help
Here is an example of its usage:
sudo /usr/bin/php admin/tool/uploadcourse/cli/uploadcourse.php --mode=createall –-updatemode=dataordefaults –-file=./courses.csv -–delimiter=comma
