
So far, we have looked at options for creating tests in Moodle. What we have not looked at yet are skill-specific tests, but we will now. The first skill we will be looking at will be listening. Testing listening is an integral part of many tests, especially in language courses. Listening tests are typically used to check comprehension of lectures, discussions, dialogs, speeches, and so on; to test for the ability to listen for details such as dates, time, names, or sounds, and so on; to test things like prediction; and so on. When we make listening tests in Moodle, these are the kinds of things we will be trying to do.
In this chapter, we will work through several aspects of setting up listening files and listening tasks and show you how to integrate them into the tests you are creating. We will look at:
- Downloading and setting up a recorder
- Uploading audio files
- Making the MP3 links
- Adding listening tasks to quiz
- Using forums with audio
- Multiple vs. single-play files
To create listening tests, we need audio. There are millions of places to get audio files. You can make them yourself, download them, link to them, or buy them. The first things we will look at in this chapter are how and where to get the audio you want to use in your site.
Creating your own audio files can be fun and rewarding. By creating your own files, you can make the content exactly what you want and you can build up a library of audio files, which can be used in later tests or for review. In addition, students listening to their instructor's voice can make the listening tasks easier since students should be used to the sound of your voice, which can help them focus on the listening task itself. However, you don't have to limit your audio recordings to yourself. You can use your students, your co-workers, friends, family, or anyone else.
Creating audio files in Moodle is easy. There is a variety of software packages out there that can be used to record audio. The one we will look at is Audacity, the recorder I use. It is free, it's open source, but best of all, it is very easy to use. First, you need to go to the Audacity website and download it. Go to http://audacity.sourceforge.net/ and download the latest version of Audacity. Once it is downloaded and installed, open it and you will see the next screenshot:
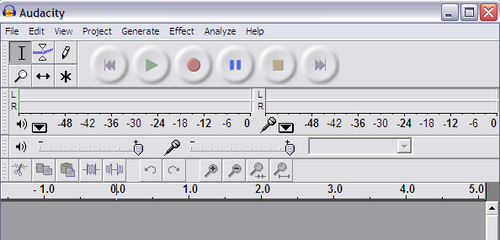
What we will be looking at now are six round buttons in roughly the center of the screenshot. The button with the circle in it is the Record button. When you have your microphone set up and you are ready to record, click on the button and begin speaking. When you have finished recording, click on the Stop button. To listen to your recording, click on the Play button and you will hear what you just recorded. If you don't like it, go to File|New to open a new recorder and try again.
When you have a file you like, then we need to save it. Go to File|Save Project As, then give the project a name and it will be saved. It is important to save your audio this way because it will allow you to go back and make changes to the recording later, should you need to.
Now that we have saved the audio file, we want to import it into our course. Unfortunately, as good as Audacity is, it can't do this alone. We need to download an MP3 encoder. Audacity uses the LAME MP3 Encoder, which can be downloaded for free via a link in Audacity's site or directly from http://lame.buanzo.com.ar/. Find the version you need based on your system and follow the instructions to install the LAME MP3 Encoder.
Once the LAME MP3 Encoder is installed, you will go to File|Export as MP3. This will open a Tag Box, which allows you to name and categorize the file. When you finish entering the information related to the file, click on the OK button and the file will be saved as an MP3 file. Once we have the MP3 file, we can then import it into Moodle. The first time you do import into Moodle, you will need to make the LAME MP3 Encoder work with Audacity. This is very easy to do and the instructions on how to do it are located at http://audacity.sourceforge.net/help/faq?s=install&item=lame-mp3.
Tip
The Tag Box
The Tag Box is a good way to organize your sound files. By creating specific Album Titles and adding descriptive Comments, such as Aboriginal Art Listening Task, you can easily pick out the files you want to use.
There are many other things you can do with Audacity. A few things you can do are alter the sound quality, add background music, and quickly edit tracks. As you can see, there is a lot to learn about this software package, but it is easy and fun to use. The more you play with it, the easier it will get to use. I'll leave you to explore all the options Audacity offers on your own.