
Hot Potatoes is probably one of the best-known activity creation programs used with Moodle. Hot Potatoes is a Quiz-type module that offers some additional question formats like JCloze, mentioned earlier. However, Hot Potatoes looks like it is going to be replaced by Gordon Bateson's QuizPort in upcoming Moodle versions from 2.1. QuizPort, which will be renamed TaskChain, is also available for use in pre-2.0 versions.
QuizPort allows you to create a set of activities that are viewed as a single entity and are given a single grade. The design of QuizPort, which is similar to HotPot, allows you to use several different item creation tools. You can use Qedoc, Hot Potatoes, and HTML to make quizzes. We will work with Hot Potatoes activities, since so many people use it. To start with, we will look at the options available in QuizPort, but first, we need to install it.
To install QuizPort, you need to first download it. To download it, go to Moodle's Downloads and Plugins page at http://download.moodle.org/. Once there, go to the Download tab and select Modules and Plugins. Once you are on this page, click on the Search tab and in the Name textbox, enter QuizPort. Click on the link and you will be taken to the download page. The file you download will be a ZIP file titled quizport-module.0.9.x. Click on this file and add it to your mods folder and unzip it there. Once it is added, the site admin needs to log in and click on the Notifications link on the site admin page. Once this link is clicked, the module will begin installation. Once it is installed, go to your course and in the Add an activity drop-down, select QuizPort. This will open the module and you will see the QuizPort editing page. The first part is titled General.
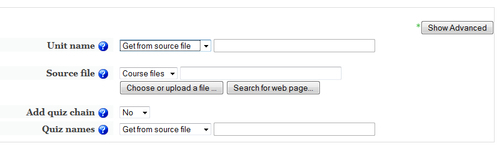
Here, we make decisions about the naming and the activities to include in the QuizPort.
QuizPort offers several ways to name the activity. The drop-down menu lists four options for naming.
Using this option will name the QuizPort activity the same thing as the name of the file being used.
If this option is used, QuizPort will use the file path to create a name for the activity. Any backslashes in the path will be replaced with spaces.
This setting determines which activity the students will be using in the QuizPort. For example, you can use a Hot Potatoes activity, a Qedoc activity, or even a URL. There are two ways to select the files you want to use. As an instructor, you only have the option to choose files from your course; however, if you have administrative authority, you can also choose files site-wide.
This is an optional feature and is only seen if the Show Advanced feature is selected. This setting is used to format QuizPort settings to mimic another activity's settings. For example, if you had another QuizPort set up in a way you wanted to use again, this would be a way to easily do that.
The configuration depends on the activity and the settings used in the configuration files, and will override the source file settings. Here, you have the option of locating the file by uploading and choosing a file or by locating an HTML file.
This is where we decide whether we want to create a single quiz or if we want to create a chain of them.
If Yes is selected, you can begin to create the chain of quizzes that the students will work through. Depending on the activity to be added, different things will happen.
If a folder is selected, all the activities in the folder that can be utilized as quizzes will be added to the QuizPort chain of activities, all of which having the same settings.
If a Unit file is selected, all the quizzes associated with the unit will be added and made part of the chain of activities. All the activities will have the same settings.

This section is where we can determine how the QuizPort will look, whether or not it will have an Entry page or an Exit page, and what the next activity in the chain will be.
The view seen previously is the Basic View, with only the options you need to create a QuizPort. However, clicking on the Show Advanced options button, reveals many more useful options.
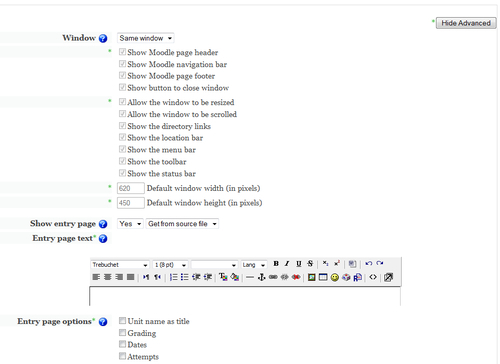
This option shows how the QuizPort will be delivered. If you leave the setting at the default, the QuizPort will be completed in the same window that is already open.
If you change the setting to New window, the QuizPort will create a new window with the activity. If New window is selected, there are many options you can apply, all of which are listed here. You have the option to allow the page to be resized, get rid of navigation tools, show the toolbar, and other options seen in the previous screenshot.
This Yes/No drop-down determines whether or not the QuizPort shows an Entry page to the student. If No is selected, then there will be no Entry page and the student will begin the test immediately.
If Yes is selected, an Entry page will be shown to the student before the quiz begins. The Entry page text and the contents are determined based on your selections in the Entry page options located under the Entry page text.
The text, images, or audio files entered here will be seen by the students on the Entry page. This is a good place to give instructions, background, or any other pertinent information the students will need to know before going on with the QuizPort.
Each of the four options listed here will display the associated information to students on the Entry page. To use any of the options, simply click on the box to activate it.
If this option is selected, the name of the unit will be given as the title of the page.
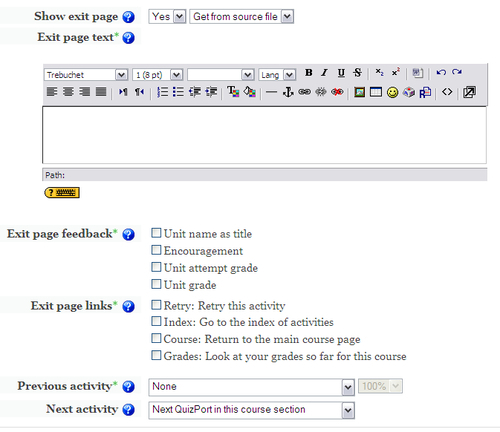
This is another Yes/No drop-down menu. If No is selected, there will be no exit page and the student will return to the course page or move on to the next activity.
If Yes is selected, there will be an Exit page with settings determined by the options selected.
The drop-down menu next to the Yes/No determines where the name of the Exit page is taken from.
The text, images, or audio files entered here will be seen by the students when they complete their final activity and move on to this page. This is a good place to give instructions on what to do next, offer comments on the assignment, or to give any additional information to your students.
Here, you make decisions about what information—in addition to your text—will be displayed on the Exit page.
Here, as in the Entry page, if you select this option, the name of the unit will act as the title of the page.
If you would like to offer some feedback based on the student's performance, you can offer it here in a general sort of way. The feedback is determined by the score the student achieved. Greater than 90 percent will receive "Excellent!" Greater than 60 percent will receive "Well Done". Greater than 0 percent will see "Good Try", and a student receiving 0 percent will see "Are you okay?"
If this option is selected, the student will be shown their score for the activity that was just completed.
The options available here are used by students to continue on after they have finished with the QuizPort activity.
If you have allowed multiple attempts on the QuizPort, then the students will see an option to retake the QuizPort. If a student has already used up their allotment of attempts they will not have this option.
If this option is used, students who reach the Exit page will see a list of links to activities in the QuizPort.
This drop-down allows you to set requirements for attempting the QuizPort. Using this setting will allow you to select which activity the student must have completed before attempting the QuizPort. You are able to select a specific activity or you can use one of the preset options: Previous activity in this course, Previous activity in this section, Previous QuizPort in this course, and Previous QuizPort in this section.
If you decide to use this setting, there is a second drop-down with percentage scores to the right of the activity menu. You are able to set the percentage the student must have achieved in the activity selected before they are able to move on to the QuizPort.
This acts in a similar fashion to the Previous activity described earlier. Here, you are able to set what activity the student will need to complete next in the QuizPort. You have the option to move students on to a specific activity, or you can use one of the four preset options: Next activity in this course, Next activity in this section, Next QuizPort in this course, and Next QuizPort in this section.
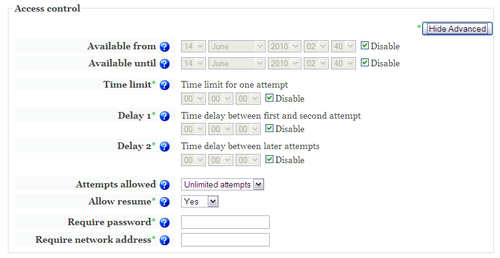
This section deals with how and when students can attempt the QuizPort, and contains several features that will help control the access to the test.
These two settings are the same as we have seen before. They allow you to set the date and time the test will be made available as well as when it will stop being accessible to students.
Enabling this setting will limit the time a student has to complete the test. This time limit applies to a single attempt.
If you have allowed multiple attempts on the test, this setting will allow you to create a delay between the first and second attempts.
This functions just like Delay 1, except this setting deals with every attempt following the second one.
This drop-down menu offers eleven options for setting the number of attempts. You can either set the number of attempts from one to ten or you can allow unlimited attempts.
This setting determines how attempts that are incomplete are handled. There are three options here: No, Yes, and Force.
Choosing Yes will give the student two options. The first option allows the student to continue to work on their previous attempt. The second option allows them to make a new attempt.
This option will only allow those with specific network addresses to make an attempt on the test. This is useful if you want to ensure that only the students working in your lab or classroom are able to access the test.
Limiting access to the test is a critical part of testing. Only those who are intended to use it and those delivering it should have access, and only those delivering it should see it before it is given. This is something that can be less or more important depending on the type of testing you're working with, but is something that should be kept in mind. Using this setting can go a long way in improving test security.
There are several ways to set this up:
- Full IP Address: 123.456.78.9—Limits the access to a single computer
- Partial IP Address: 123.456—Limits access to any computer with those numbers at the beginning of its IP address
- IP Address Range: 123.456.78.9-15—Limits access to any computers running IP addresses in the range, in our case 123.456.78.9 to 123.456.78.15
- Classless Inter-Domain Routing (CIDR): 123.456.78.9/10—Limits access by only allowing certain IP subsets access
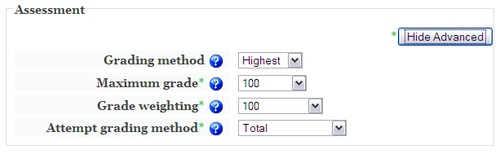
In this section, the scoring of the assignment is determined. It contains four categories: Grading method, Maximum grade, Grade weighting, and Attempt grading method.
This setting determines how the final grade for the test will be decided. The drop-down has four options: Highest, Average, First, and Last.
- Highest—This will use the highest score out of all attempts to determine the grade.
- Average—This will take all the attempts and average them to determine the final grade.
- First—This will use only the first attempt to determine the final grade.
- Last—This will use the last test taken to determine the final grade.
This allows you to set the maximum score possible. The scores range from 0 to 100. The score you select will be included in the Gradebook.
This setting is used to let you determine how the grade from a single unit attempt will be calculated. There are several settings available.
- Total—This will use the total of the weighted quiz scores.
- Highest—This will use the highest weighted quiz score.
- Last—This will use the last test's weighted quiz score.
- Last (Completed)—This will use the last completed quiz's weighted score.
- Last (Timed-out)—This will use the last timed-out or the last completed quiz's weighted score.
- Last (Abandoned)—This will use the last timed-out, completed, or abandoned quiz's weighted score. It will not use any test that is 'In Progress'.