
So, let's say we are teaching a Turkish language class and we are interested in testing our students' ability to make descriptive statements about places in Turkish. We will be asking our students to listen to an audio file and then they will need to record their response, using complete sentences.
The first thing we need to do is record our audio file. Our question is going to be very simple, "Please look at the image. I want you to tell me about five things you see in the image. Please use complete sentences and descriptive words. When you are ready to record, click on the Record button and start speaking. When you are finished, click on Stop" We can use a number of recording methods; however, I'm going to use Audacity like we did before.
Once the audio file is set, I'm going to get a picture to use. I'm going to go to one of the free photo sites online and choose an image that will be a good challenge for my students. I have gone to Wikimedia Commons at: http://commons.wikimedia.org/wiki/Main_Page and selected an image that requires I credit the photographer, which is what I will do.
Now that we have the audio file and the image ready, we will create our NanoGong activity. Go to the Activities drop-down and create a new NanoGong. On the NanoGong Edit page, we will give it the name 'Talking about Things'. In the description we will include the audio file and the image just like we did in the chapter on the Quiz module.
For fun, let's say we also want the NanoGong to be a shade of blue. We will choose a color that we like using the Hexadecimal system. We will use #2E9AFE, which is a light blue color.
We will leave the Maximum number of recordings set to 0. We will set the Maximum length of the recording to 240 seconds (four minutes), which should be much more than needed. We will also set the Maximum score to 10 points. We will score the sentences in one of three ways. We will give full credit, two points, for a complete and correct sentence. We'll give half credit, or one point, to a sentence with a couple of small mistakes, and an overall good effort. We will give no credit to sentences with multiple errors.
We will leave the Common module settings as they are. Once we are finished, we will click on Save. We will see the MP3 player, the image, and a list of students enrolled in the course. Since none of them have made an attempt at the NanoGong yet, there is not much to see.
Now, we will log into one of the student accounts I created and see what it looks like from the perspective of one of our students. You will want to use the Switch role to option to achieve this result. Here is what they will see when they open the activity. For spacing purposes, I have placed the images side-by-side, however, on the page they would be seen with the audio and image at the top and the NanoGong recorder at the bottom.
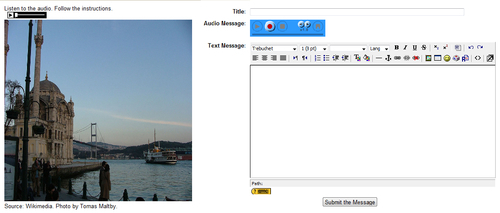
As you can see, our students will see the MP3 player and the image. They will listen to the audio and then they will create their own message responding to our instructions.
They will create a title for their post, then click on the red circle button and record their message. Once they have finished their recording, they click on the square Stop button. They can then listen to their recording by clicking on the Play button. If they are unhappy, they can repeat the process, which will overwrite the old version. When they are happy with the recording, they can then enter some text in the rich text editor if they'd like. This may be useful for adding additional information related to the recording, like references, their thoughts about the assignment, and so on. Once they finish recording their messages, they click on the Submit the Message button. Once the recording is submitted, the student is taken to the front of the NanoGong activity where they can see their work and have the option to make another recording if they'd like.
Now that there is a recording added to the NanoGong, go to the course page and click on the assignment titled Talking about Things. Here you can see which students have submitted work, listen to their recordings, and read their comments, if any. This is shown in the next screenshot:
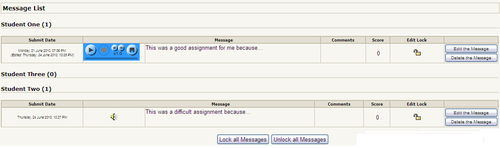
As seen in the previous screenshot, we have a list of the students enrolled in the course on the left, with the time they recorded their message, and a time of student editing, if any. Next to this you will see a speaker, looking something like you see next to Student Two Submit Date. Clicking on the speaker will load the NanoGong player, as done for Student One. Clicking on the Play button will allow you to hear the student's recording. You are also able to speed up or slow down the player by using the left and right arrows to the right-hand side of the Stop button. This can be useful to listen for specific sounds, for transcription or for several other reasons. Next to the recording, you see the Message column, where you or your students can leave text-based messages. Next to this is the Comment column, where comments you may have can be entered. Next we have the Score column, and here is where you are able to see the score the student received for their work. The Edit Lock column shows you whether or not editing is available in the NanoGong. This can be useful for many reasons, especially if you are testing and don't want any changes made after the initial recording by the student. To lock the messages, click on the Lock all Messages button at the bottom of the page. To enable editing, click on the Unlock all Messages button. The final column has two buttons. The top button allows you to edit the message and enter your own comment for the students. The bottom button will allow you to completely delete the recording from the activity.
When you click on the Edit button, you will be taken to a page similar to what the students see, where you will be able to enter your own recording by recording over the student's recording, enter a message to the student, enter the score, and make your own comments on the student's performance. This is shown in the next screenshot:
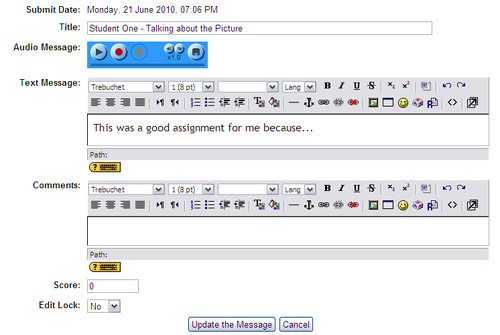
One concern when using this for testing is that you will be recording over the student's original comments. To alleviate this concern, you can click on the Save icon on the right-hand side of the recorder, the button that looks like a floppy disk, and keep the files for later reference.
When you have made your recordings, comments, and given your score, click on the Update the Message button and the information entered will be saved and available for student review.