
These questions are used to create problems with variables. They give you the ability to create an x+3=y type of problem by substituting random numbers into the x variable. Remember the wildcard mentioned previously? We will be using it again here to create what are called datasets from which the variables we use will be drawn from.
These items are particularly useful to math and science teachers, especially if you want your students practicing on the same formula multiple times. These items require a bit of practice, and are spread over three pages, but for the most part, they aren't too difficult to put together.
What we are going to do with this question type is create a simple problem with a single variable to have our students practice with.
The first thing that we are going to do is set up a new quiz. We'll call it Calculated.
Once we have done that, we are going to create a new question. The Calculated question creation is similar to the other types, but there are some new options. In fact, the first thing on the page is a Category drop-down and a button called Update the Category. This function allows us to share wildcards from across categories, if any are available. We have not created any, so we have none to access. We will see how to this later.
Now, we need to give the question a name and write the question text. We're going to be starting with a very simple formula. Let's say we are teaching our students simple, single multiplication and we want them to practice their new skills. We'll name the question and enter the question text as the same thing, What is {x}*2?
Now that we have a question title and a question, we need to make an answer for it.
In the Answer section there are a few options available to us, all of which are new. Here is what the Answer section looks like and a brief description of each of the functions.

This is where we will put the formula for the correct answer. It will contain at least as many wildcards as there are in the question itself. Do not include the equal sign in the formula.
This setting allows us to enter a response tolerance range. By entering a number here, we set the range of answers that will be considered correct. The larger the number here, the larger the range of acceptable answers.
There are three Tolerance Types available in Moodle: Relative, Nominal, and Geometric.
Relative tolerance sets the upper and lower tolerance range by multiplying the correct answer by the number in the Tolerance (that is, Correct Answer*Tolerance). So, if our correct answer was 100, and our tolerance was .25, the result would be 100*.25=25. Therefore, the range of acceptable responses would be between 75 and 125 (100±25=75, 125).
Nominal tolerance is very simple. It takes the Tolerance and adds and subtracts from the correct response (that is, Correct Answer±Tolerance). So, using our previous example, if we had a correct answer of 100 with a .25 Tolerance, our correct response range would be 99.75 and 100.25 (100±.25=99.75, 100.25).
Geometric tolerance is the most complex, but it is still easy to use. The upper-end of the acceptable range mirrors the Relative formula. The bottom-end range, however, is different. Instead of simply multiplying by the Tolerance, we use this formula Correct Answer/(1+Tolerance). So, once again using our previous example, if our correct answer is 100 and our Tolerance is .25, the range of acceptable answers would be 80 to 125. (that is (100/(1+.25)=80) for the low range and the Relative Type formula for the high range.
This option shows the number of decimal places or the number of significant digits the answer will display, depending on the selection made in the following Format section.
This drop-down menu has two options, decimal and significant digits which determines whether the answer will display decimals or significant digits. Decimal will leave the answers exactly as they are, up to the predetermined number of places selected. If significant digits is selected, the response will only give that number of digits, leaving all remainders as zeros. For example, 5.678534 with a format of decimal and a correct answer shows 4, will return with this: 5.678. If you had selected significant digits instead of decimal, the result will look like this: 5.678000.
Now that we understand the functions of each of these sections, we will begin to enter in the information. Our question again is basic multiplication with a single variable, What is {x}*2? In the Correct Answer Formula= we will enter {x}*2. All variables that need to be replaced by Moodle, such as x must be placed in curly brackets.
In the Grade drop-down, we want to give 100%. In the Tolerance, we are going to change the default number to 0, because there is only one correct answer and we are working with simple arithmetic. For the Tolerance Type, we are going to leave the setting at the default, Relative, because with the Tolerance set to 0, this setting won't do anything. In Correct answer shows we are going to make it 0 and for Format, we will leave it at the default, decimal. Once all this information has been entered, we will see the following screenshot:

Tip
Multiplication
One quick note when using multiplication, if you enter {x}2, 2(x), 2x, or any other normally accepted multiplication form, the formula will not work. You must use the '*' for all multiplication.
We will now scroll down the page. The first thing we see is a button called Blanks for 1 More Choices, which will allow us to enter an alternative formula, if one is needed (I'm not a math teacher, but I'm sure there are many cases where this is done!).
You will also see a new section called Unit 1. You are able to enter in a unit of measurement here, such as grams, meters, or widgets. So, if the question is something like What is the total length of Xm+Ym+Zm? you could enter 'm' in the Unit textbox and a response of XYZm or XYZ would be accepted. There is also an option for more units to be added. So if we had a question like What is the length of Xcm+Ymm+Zm? we might want to allow students to answer in a variety of ways. We might want to add all three units (mm, cm, m) to allow the students to respond with whichever they want. For now, we are going to leave this option blank, but we will use it in our next question.
Now, we need to click on the Next Page button at the bottom of the page.
After clicking on the Next page button, we will see a page called Choose Dataset Properties. This is where we need to select which dataset we will be using. What is a dataset? A dataset is the set of values that Moodle will use to replace the variable, in our case that means a set of numbers that will replace {x}. The larger the dataset you create, the less chance there is of question duplication. We don't need a huge dataset for our drill, so we are going to create one that has 20 possibilities.

We really only have a simple choice here, we can either select will use a new shared dataset or will use the same private dataset as before.
If we choose will use a new shared dataset we will create a new set of numbers that can be used by the same variable, in our case x, in any other question in the quiz. This can be a useful feature, especially if you are creating a number of similar questions.
The second option is the will use same private dataset as before. This means that the numbers created for the variable will only be available for this question. We are going to select this option, simply because I want us to practice entering the datasets more than once. So, we select this option and click on the Next Page button at the bottom of the page.
Now that was have decided on the dataset we want to use, we will be adding numbers to the {x} variable we created. There are two ways to do this in Moodle. One is manually adding numbers and the second is allowing Quiz to do the work for us. We'll look at both.
Now, looking at this page we see a lot of new options. It looks a little daunting at first, but don't worry, we'll go through it together. There are two sections on this page, one is called Item to Add and the other is called Add. Here is what the Item to Add section looks like, as shown in the next screenshot:

You might first notice the ERROR message at the bottom. This is because a randomly generated value, in this case 3.7, has been given as {x}, and since we set our Tolerance and Correct answer shows options to 0, this error message is normal. Now, let's take a look at the options here.
This button is located just above the Item to Add section. When clicked, it places a new, randomly generated number in the Param{x} textbox.
Here, we can manually enter the numbers that we want to use. We simply need to type in the number that we want to use for the variable and click on the Save changes button at the bottom of the page. There is a limit of 100 entries.
Instead of manually inputting all the numbers, you are also able to supply Moodle with an acceptable range of numbers and it will randomly generate numbers within that range.
This feature allows you to set the number of decimal places used in the question. It ranges from 0 to 10.
In this drop-down menu there are two options, one is Uniform and the second is Loguniform. If you select Uniform, all numbers in the range are given an equal chance of being generated. If you select the Loguniform option, numbers at the lower end of the scale are more likely to be generated.
This is how the Add section looks. Again, there are a few new things to look at, as shown in the next screenshot:

If you have deleted a number from your list of values, you can use the reuse previous value if available to replace the deleted number when creating new ones. Moogle will automatically add the deleted number and the new number to the dataset. We can't see the Delete button yet since we haven't created any items. Refer to individual items to use the fieldset just discussed.
The force regeneration function is used to automatically generate new values in the dataset.
When you have selected the option you want, click on the Get New Item to Add Now button and a new item will appear.
This is the button you click on to create the new item. Next to the button you can see a drop-down menu. This menu contain the numbers 1 to 100 in multiples of 10. You can create one question at a time if you are using the manual way. You can create 10, 20, or more questions at a time if you are using the automated way.
If you want to manually add in the numbers to be used, here is how you do it:
- Type in the number you want in the Param textbox.
- Go to the Add section below and click on the Add button. Don't change the number next to the button, leave it at 1.
This is all you need to do to add a number to the variable. You can keep doing this until you have all the numbers you want.
If you want to make it easy on yourself, you should go ahead and use the Range of Values.This is how it is done:
- Enter the lowest number in the acceptable range in the left box and add the highest number in the acceptable range in the right box.
- Change the decimal places to suit your needs.
- Select the Distribution you want.
- Go to the Add section and in the Next item to add section change the button from reuse previous value if available to force regeneration.
- Go to the Add button drop-down menu and select the number of variations you want.
- Click on the Add button.
This is all you need to do to create a range of numbers for the variable.
So, what are we trying to do from here? Well, we want to create a simple, single-variable question. We are creating this question with a single variable for our students to drill basic substitution. We want to have 20 separate values for that variable. The easiest way for us to do this is using the automated way and having it create the 20 values we want for the variable {x}.
Now we are going to determine the kinds of numbers we will allow to be added to the dataset. We don't want the results to be less than 2 or greater than 100. Because we are multiplying by 2, the lowest number we want to use is 1 and the highest is 50, because those numbers will deliver us a range of responses somewhere between 2 and 100.
We need to change the Range of Values to 1 50. Then, we're going to change the Decimal Places to 0. Next, we are going to set the Distribution to Uniform.
Once the new parameters are set, I will go back to the top of the screen and click on the Update the datasets parameters, which will place a new number, one within the newly outlined parameters, into the Param textbox.
Going to the Add section, we will set the Next Item to Add to force regeneration. We want a total of 20 values available, so we change the drop-down menu next to the Add button to 20. Here is what our screen looks like.
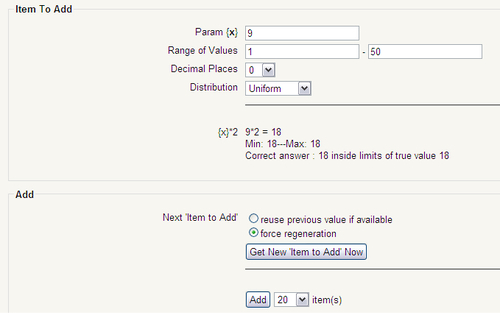
As you can see in the previous screenshot, the number 9 has been added to the Param. Under the Distribution drop-down, you can see that the number meets our requirements because it falls between the Range of Values that we have chosen.
Once this is done, we click on the Add button and 20 random items will be created directly below the Add button. The items are listed in reverse order, with the last number at the top. Here is what the newly created items look like:
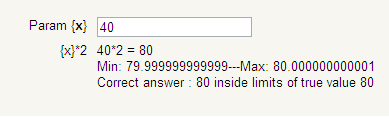
All of the numbers listed will be considered correct by Moodle. We will quickly scroll down to make sure they all are. When you do this on your own, you might notice a repeated number. If you want to change it to something else, simply type a new number in the Param {x} textbox.
Now that we have created our question, we want to see how the variable substitution works. We will save our work and preview the question. We'll be given one of the 20 items we just created and we will need to multiply that number by two, as shown in the next screenshot:
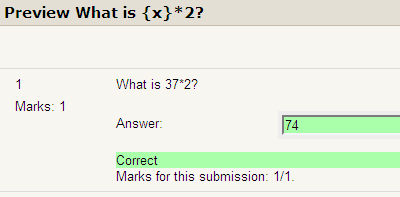
The item is working and we received the correct score. If you click on the Start Again button on the Preview menu, you will be given a new, randomly generated item from the list we created.
As you can see, we put together a single-variable item by creating a simple formula and dataset to replace the variable.
That is all there is to creating a single-variable, calculated item.