
Now, we are going to make our own QuizPort reading test. Our test will have two vocabulary tests and one reading test. We will have an Entrance page, a series of three tests, and an Exit page.
On the Entrance page, we will give our students a description of the activities and explain the test structure and content. Since we are making a reading and vocabulary test, we will also include our reading passage here. However, if you use QuizPort for some other type of test, you may want to adjust how you set up the Entrance page.
After the Entrance page, we will have three HotPot activities, a JCloze, a JMatch, and a JQuiz.
After the final activity, the students will be directed to the Exit page with a closing message from us.
For our QuizPort settings, we will do the following:
- Using the Specific text setting, we will name the QuizPort Dutch Masters Test. We will leave the rest of the first section alone for now.
- We will click on the Show Advanced in the Display section to display the options for the Entry and Exit pages.
- We need to set both Entry page and Exit page to Yes, since we want to use both of them.
- In the Entry and Exit page options, we will select each of the boxes, which will give students additional information about the test.
- In Access control we will set the number of Attempts allowed to 1 and we will change the Allow to resume setting to Force, since we want our students to finish everything.
- Finally we will confirm our QuizPort by clicking on Save and display.
Once you click on Save and display, you will be taken to the Preview page. Right now it is empty, but at the top we see four tabs: Info, Results, Preview, and Edit quizzes. The first thing we are going to do is click on the Edit quizzes button, which will bring us here:
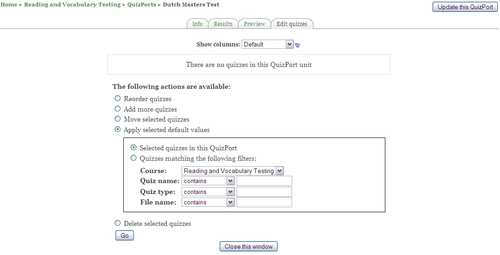
As you can see, there is a message telling us no quizzes have been added to the QuizPort. We will go to the available actions area and click on Add more quizzes. Once the button is selected, you will see a box with End of unit in it. It is the only option at this point, but leave it alone and click on the Go button towards the bottom of the page.
We are now taken to the Add a Quiz page. For Quiz name we will select Use source file name. In Source file, we will click on the Choose or upload a file button and select our first activity, the HotPot JCloze. We now go to the bottom of the page and click on the Save changes button. Once we do this, we will be returned to the previous page, but we will see the activity we just added at the top of the page. We will repeat this process twice more to add the JMatch and the JQuiz. You will note that when we click on the Add a quiz button this time, there are three options: Start of unit, End of unit, and After Quiz with a drop-down menu listing the currently available activities we have. You can place them wherever you'd like, but we will use After Quiz and set the drop-down to the JCloze already added. This will cause the new activity to appear after the first. We will repeat the process for the third as well, changing the drop-down menu to the appropriate activity, in this case the JMatch. When we finish, the tab will look like the next screenshot:
We are now taken to the Add a Quiz page. For Quiz name we will select Use source file name. In Source file, we will click on the Choose or upload a file button and select our first activity, the HotPot JCloze. We now go to the bottom of the page and click on the Save changes button. Once we do this, we will be returned to the previous page, but we will see the activity we just added at the top of the page. We will repeat this process twice more to add the JMatch and the JQuiz. You will note that when we click on the Add a quiz button this time, there are three options: Start of unit, End of unit, and After Quiz with a drop-down menu listing the currently available activities we have. You can place them wherever you'd like, but we will use After Quiz and set the drop-down to the JCloze already added. This will cause the new activity to appear after the first. We will repeat the process for the third as well, changing the drop-down menu to the appropriate activity, in this case the JMatch. When we finish, the tab will look like the next screenshot:
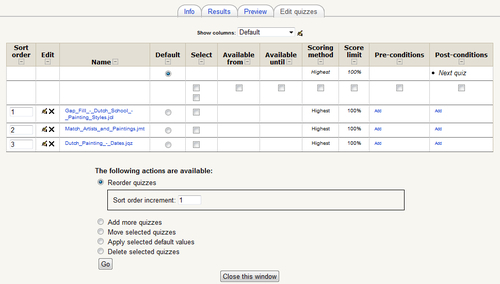
Note the Show columns drop-down menu. This drop-down will allow you to look at different aspects of the QuizPort setup in detail. The options are basically the same as the Edit QuizPort page: Default, General, Display, Access control, Assessment, Conditions, and All.
If a student went to the QuizPort now, they would be able to take any of the quizzes in any order. However, we want the students to take them in the order we placed them in the QuizPort, so we need to go to the Pre-conditions column and click on the Add button. This will allow us to force students to complete the activities in a specific order.
We want our students to complete the Gap Fill first, Matching second, and Dutch Painting third. To do this, we need to do two things. First we need to go to the Reorder quizzes radio button, seen in the previous image. Click on it and you will see a message reading Sort order increment. Now, go to the Sort order column and number the items in the order you want them displayed. Once this is done click on the Go button and the items will be reordered. Now that we have the items in order, we need to go to the Matching row and under the Pre-conditions, click on the Add button. This will bring up a menu as shown in the next screenshot:
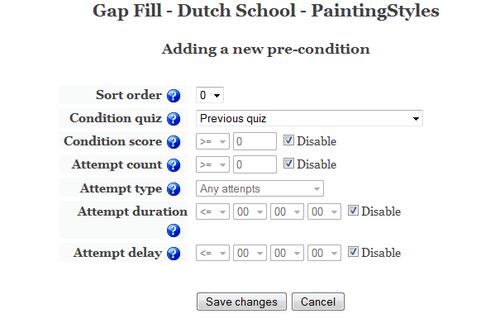
As you can see here, there are several pre-conditions we can set. In the Condition quiz, we see Previous quiz in the drop-down. This is the default setting and the one we will use. However, if you click on the drop-down, you will see a list of all activities in the QuizPort, which you can choose from as a pre-condition for taking the quiz. You also have the option to set the minimum score required, the number of attempts, and so on. We will only use the Previous quiz for now. All we need to do is click on the Save changes button. We will do this for Dutch Painting as well.
Now that we have our Pre-conditions set up, we also want to have our Post-conditions organized. In the Post-conditions column, click on the Add button in the Gap Fill row. This will bring up a similar menu, but instead of Condition quiz as we see in the Pre-conditions, we will see a drop-down titled Next quiz. We will select Next quiz from the drop-down for the first two. For the final quiz, Dutch Artists, we will select the End of unit option, which will bring us to the Exit page.
Here is what the page looks like with the Pre-conditions and Post-conditions added:

As you can see, students will begin with the first item, and after the first item is completed, they will be moved to the next item, and so on.
Now that we have set the parameters of the test, we will move on to Preview to see what we have. Once we click on the Preview tab, we will see the Entrance page. On the Entrance page we see the text we entered. Click on the Preview now button and we will immediately begin the first test. Once it is completed, we will be shown our score and moved to the next test. This will continue until we finish all the tests in the QuizPort and reach the End of unit. At the End of unit, we are shown the Exit page with our score, feedback, and the text we entered.
Now a student will see things a bit differently. For starters, they will not have access to the tabs along the top, and for them to start the test they will need to click on the Start new unit attempt button to begin the test. Once they finish, they will see the same thing as the teacher's preview, their final score, feedback, and the Exit page text entered. Students can also get more detailed information about their performance by pressing on the breadcrumb titled QuizPort, which will open the student results page.

This data is useful to students who want to follow their progress or to confirm they have completed all required work. If the student attempts to enter the QuizPort again, after their number of attempts has expired, they will receive a message stating that they have no remaining attempts available.
The final thing we'll look at in QuizPort is the Results. Going back to the Teacher's View, if we click on Results, we are shown all the student attempts on the QuizPort, their scores, the status of the test, the time it took to complete the test and the last time they attempted the test. This is shown in the next screenshot:
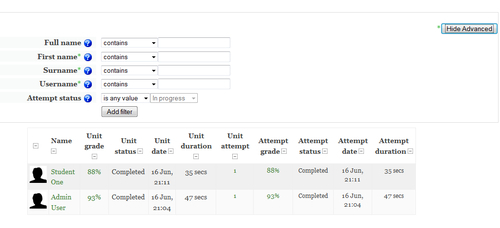
As you can see, the results are identical to the view the students receive. However, you are able to use the new filter section above the results to look through the data.
QuizPort offers some great possibilities for testing vocabulary and reading. In addition, the grades from the QuizPort will be exported to the Gradebook and added to the student's grade without any extra steps.