
The final aspect we will look at regarding Quiz is the Importing and Exporting of questions. This option is located under the Edit tab. We will look at Importing questions first, then move on to Exporting them.
The Importing Questions function is used if you have already created questions for different programs or systems. Here is what the Import page looks like.
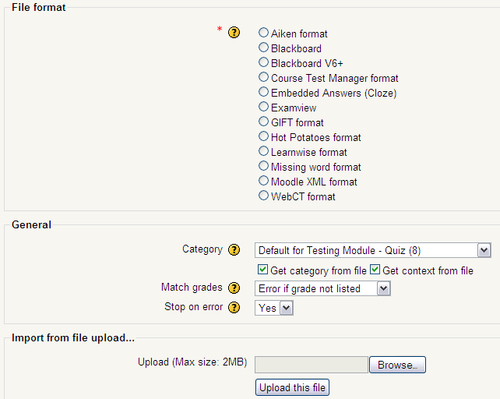
To use Import in Moodle, you must have the files you want imported saved as a text file. Moodle supports a variety of Import formats. The formats the Import function currently supports are listed in the previous image.
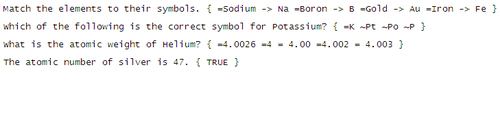
First, we need to create some questions to import. Using GIFT is good, because once you make a few items, I feel, it becomes easier to make them. While I don't have the space to explain exactly how to use GIFT, I will show you some sample items and how they look once they are imported. For more detailed information on how to create GIFT questions, see Moodle's documentation at http://docs.moodle.org/en/GIFT_format.
Let's say we have four chemistry questions from another test that we want to import to a test we are making: a Matching, a Multiple Choice, a Numerical, and a True/False.
The question will also be presented as the question name. If you would like a different question name, begin the coding with two colons, followed by the question name, followed by two more colons (::question name::). The information between the colons will be displayed as the question name in the Question Bank. After the name, continue the question as normal. The curly brackets {''} indicate the beginning and end of the responses. The = indicates the correct response, except for in True/False, which only requires a {TRUE}/{FALSE}, or {T}/{F}. When creating multiple questions in GIFT, you must separate them with an empty line. The text editor is shown in the next screenshot:
Now that we have our items ready and saved in our text file, we will use the Moodle Import page to import the questions to our test. Looking at the Import Page, we can see four sections: File format, General, Import from file upload, and Import from file already in course files.
This option presents is a list of the file types mentioned previously (GIFT, Aiken, and so on) with radio buttons to select the format for the file you are going to import.
Here, we have three options to work with: Category, Match grades, and Stop on error.
Here is where we select where the imported files will be sent. There is a drop-down menu with all the categories available to import to. Simply select the location where you want the items to go from the drop-down.
Under the drop-down, there are two checkboxes, Get category from file and Get context from file. If the Get category from file is checked and the category location has been specified in the file being uploaded, the file will be added to whichever category was specified. If the Get category from context is checked and if the file was created and exported from Moodle, it might have a category already associated with it. If this is the case, and the Get category from context is selected, the file will be added to the associated category. If you do not want this to happen, uncheck the checkbox. If a category doesn't exist when added, it will be created.
The grades assigned to imported questions must match the list of acceptable grades in Moodle. These grades are: 100%, 90%, 80%, 75%, 70%, 66.666%, 60%, 50%, 40%, 33.333%, 30%, 25%, 20%, 16.666%, 14.2857%, 12.5%, 11.111%, 10%, 5%, and 0%. Negative percentages are also acceptable.
The Match grades drop-down menu has two options, Error if grade not listed and Match to nearest grade. If the Error if grade is not listed is selected and a grade has not been assigned, an error will be generated and the item will not be imported. If the Match to nearest grade has been selected, Moodle will assign the item a grade based on the nearest matching grade.
This is where we can select files with questions in them from our computer and upload them to our test. Click on the Browse button and locate the file. Once you have located it, click on the Upload button and the file will be added to the quiz.
We have selected the file we created and uploaded it to the quiz. The first thing we see is the parsing page, where the questions are being verified. All the questions are correct, and we click on the continue button. This action will move all the questions to the Question page. The question will be displayed as a long line of text, but don't worry.
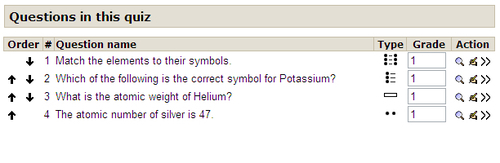
Now, we'll click on the Quiz link and we will see the Question Bank with our new questions. We will select all the new questions and click on the Move button to place all the new questions in the quiz. The questions appear as shown in the next screenshot. We can see the Question Type icons are accurate, so they have been imported as the proper type. Now we will preview them all, and make sure they all work. Previewing shows that they are all correct, the format is correct, the responses are correct, and the scoring is working.
This procedure is only one way to import files to Quiz, but it is an extremely useful one, and you may find it faster to create questions using this format. Please take the time to look over the other formats to see if one of the other methods is a better match for you.
If you already have a file in Moodle that you want to transfer from one place to another, all you need to do is click on the Choose or Upload file button and the Quiz Files pop-up menu will appear, listing all the possible files you have available. If you see the file you want, you simply need to select it by clicking on the Choose link and it will be placed in the Choose a file textbox. Once the link is there, click on the Import from this file, going through the same procedure as described in the previous section.
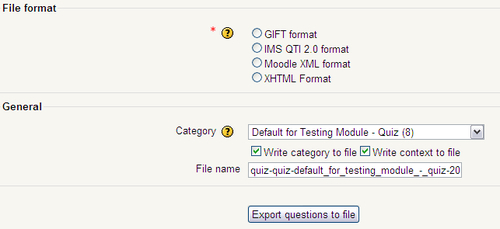
Occasionally, you may want to export your files for some reason, backup data, for example. When exporting, all the items in the category will be exported as text files. Moodle has the capability of exporting files in four formats: GIFT, IMS QTI 2.0, Moodle XML, and XHTML.
The Export page is simple compared to the Import page, with only two sections: File format and General.
Here, we see the four file formats along with their corresponding radio buttons. We use the radio buttons to select the file format we want our questions exported as.
Here, we have four options to work with: Category, Write category to file, Write context to file, and File name.
The Category drop-down menu allows us to choose from where we will be taking our questions. Any subcategories contained in the category will also be included.
This option, if selected, will include the category in the file, so if it is imported from to another Moodle site, the file has the ability to recreate its Category.
This option is similar to the Write category to file. However, instead of recreating the category associated with the question, this option will recreate the context it was in (that is, the course). Refer Chapter 2 for more information on Context.
This is the name the file will be saved as.
The Export Page appears, as shown in the next screenshot:
Once you have made your selections, click on the Export questions to file button and the questions will be saved to the backup/quiz folder. Here, you also have the option to download the file. This is all you need to do to export question data from Quiz.
Tip
Special Characters
Importing to Moodle requires ASCII characters (a, b, c, and others). If any of the text in your file contains any non-ASCII characters such as ä, ç, or ě, the text must be reformatted and saved as UFT-8, or the Import function will not work. Reformatting can be easily done using whichever text editor you use, however, Microsoft Unicode is not the same as UTF-8.