
Of course, testing speaking skills is best done when actually interacting with your subject in real time. Using computers takes away the physical face-to-face component of this interaction, but we can still have synchronous conversations, like on the phone, and we can still see our conversation partners if we have the correct setup. One of the modules that allows this is the Skype module.
Skype allows real-time conversations to take place over the Internet for free with other users of Skype or for low rates to non-users. The Skype module for Moodle allows you to set up video conferences with your students or have them video conference with each other. They can also chat and send files. The Skype module offers teachers the ability to engage their students in real conversations from anywhere. In a lab setting, this allows the teacher to interact with specific students and assess their skills while the rest of the class is working on some other assignment. This is one of the best methods available for real-time, synchronous assessment of speaking.
One thing to be aware of before using this module is that all students and teachers who want to take part in the module are required to have Skype installed on their computers and create a Skype account. It is easy and free and takes about five minutes or less. To download Skype and to create your Skype account, go to Skype.com. Once you have an account, you need to go to your Moodle profile and in the Optional section towards the bottom, click on the Advanced button, which will show a list of additional, personal, and contact information. One of the options is Skype ID. In the Skype ID textbox, enter your Skype ID. If you do not do this, you will not be able to access the Skype module. Make sure all the students that you want to take part in the activity have also done this. Once everyone is part of the activity, you can go forward and create it. The setup screen for the module is shown in the next screenshot:
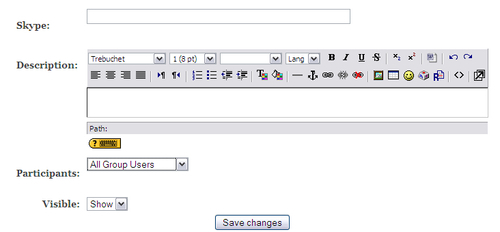
As shown previously, it is very simple to set up.
- In the Skype textbox, add the name you want the students to see.
- In the Description, give instructions for how the activity will run and any other pertinent information the students will need to know.
- In the Participants section you have the option to leave this at its default setting, All Group Users, which will allow everyone in the course access to the Skype activity, or you can change this setting to All Course Teachers, which will only allow the teachers to access the activity.
- The Visible option, as before, simply shows the activity or hides it from students.
- Once you click on the Save changes button, you will be directed to a page where you can initiate the activity.
What you will see is shown in the next screenshot:
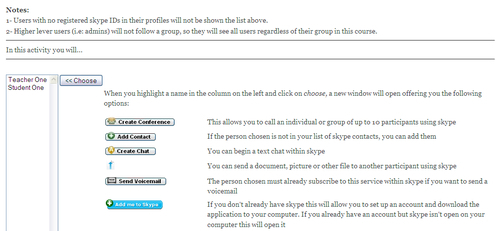
There are a lot of options and information on this page, but the one we are going to look at is the Create Conference button.
To begin your speaking test with your student, you will click on the student's name, in our case, Student One, and click on the Choose button. This will open a small window with each of the module options available. In this window, you will click on the Create Conference button. A second window will open, this one asking which application to launch. Skype should already be selected, so you should simply have to click on OK. If for some reason Skype is not shown, click on the Choose button and locate and select Skype, then click on OK. Once you do this, Skype will open and the conversation can begin.
In addition to teacher to student or student to student conversations, you can create groups of up to ten users who can all be active participants by using the Create Conference call feature. This can be very useful in assessing dynamic speaking skills such as speaking strategies or group fluency and interactions.
If you want to grade this student, you will need to create an offline assignment to grade it. You may also want to record the conversation to review later. There are many ways to record conversations on Skype. CallBurner, which can be found at http://www.callburner.com/, and HotRecorder, found at http://www.hotrecorder.com/, are two programs that allow you to do this. Both of these are easy to use and free and can be set up in minutes.
Skype is an easy way to do real-time conversational or speaking assessment in Moodle. If you are looking to test your students' speaking ability, this module is highly recommended.