
There are other places where we can test our students' writing skills. The following activities are particularly useful in one-time assignments, such as essays.
Remember the Quiz module Essay item type? In Quiz, this is the easiest way to create writing prompts and give students writing tasks.
This item type is particularly useful for writing-prompt type questions, for example, something like 'Explain how solar panels work.' or 'Why is the sky blue?' The student reads the question or prompt and then sets to work on composing his/her response.
Once the students have submitted their work, you will need to enter the quiz, read and assess their work manually, using the Manual Grading tab, then enter a grade.
Assignments are an integral part of Moodle and one we have not looked at yet. There are four basic Assignment activities available: Offline activity, Online text, Upload a single file, and Advanced uploading of files, which is great for writing assignments with multiple drafts.
This type is used for activities that are not completed online. Typically, this is used for explaining assignment to students via Moodle as well as adding a grading place in the Gradebook, which we will look at in the next chapter. For testing writing, this could be used to provide an essay prompt, to explain the assignment parameters, and the like. So, students access the assignment in their Moodle course, then complete the assignment using their own resources. When the students complete their work, they will physically turn in their writing to the instructor. Once the instructor has completed the assessment of the writing, he/she can go in and add a score to the Gradebook, which the student will then be able to see.
In this assignment type, students upload a single file to the course. Once a file is uploaded, instructors are able to access the file and assess it. Like the Offline activity, this will also include a grade slot in the Gradebook. The setup for this is very simple. The setup page is shown in the next screenshot:.
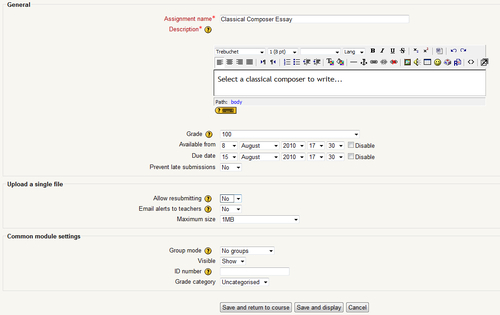
As you can see, in the general section we have the standard name, description, grade, dates, as well as the ability to prevent late submissions.
In the Upload a single file section, we have the ability to allow students to resubmit their work and e-mail teachers when the work has been submitted, as well as to limit the size of the files uploaded.
When the student accesses the page, he/she will see the description of the assignment at the very top. If you have enabled the date settings, directly under the assignment description, students will see the date the assignment is available from and when it is due.
Under this, they will see an Upload a file textbox, where they can manually enter the file location or browse to locate it. Once they have added it, click on the Upload this file button. This is shown in the next screenshot:

Once the Upload this file button is clicked on, the student will be taken to a screen telling them if the file has been uploaded successfully or not. If the file has been uploaded successfully, they will see a continue button, which when clicked on will bring them back to the assignment, where they will be able to see the uploaded document.
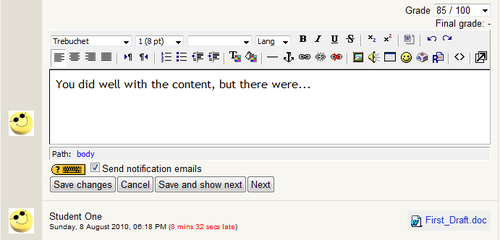
When the instructor logs in to the assignment, they will see all the assignments that have been submitted. Clicking on the View submitted assignments link in the upper right-hand corner, will bring the instructor to the Submissions page. From here, the instructor will be able to see the uploaded assignment and open it by clicking on the document link. This is what the instructor will see when they first open the page:

Once the teacher has read the assignment, they click on the Grade button in the status column. This will bring up the grade and feedback menu. At the top right-hand side of the screen, you will see a drop-down containing all the grade options available. Choose the grade desired from the drop-down menu. This will be displayed to the student in the Gradebook. There is also a large textbox for assignment feedback, which can be used to give comments and observations on the quality or any other aspect of the work. The menu is shown in the next screenshot:
Clicking on the Save changes button will return you to the Submissions page. This will be updated with the grade, comments, the time the assignment was reviewed, and the option to update again. Note the Send notification emails checkbox under the rich text editor. Uncheck it if you are working on feedback and just want to save it without having an e-mail sent to the student. Here's what the Submissions page will look like after the assignment has been assessed:

The Online text assignment type is an option for creating journals that allow teacher-student communication as well as assignments that will have multiple rewrites before being assigned a final grade. It can also be used as a place for collaboration and reflection. There are many options available with this form of assignment, and ultimately how useful it is and how it is used will depend on your situation.
The setup for this assignment type is very similar to setting up the Upload a single file assignment type. The difference is that instead of an Upload a single file section we now have an Online text section. This is shown in the next screenshot:

In this section, we see one new option, Comment inline. The e-mail alerts and resubmitting options are the same as shown previously.
Comment inline is a useful feature when grading or editing student work. The default setting for this is No, which will display the same grade and feedback menu as in the Upload a single file activity.
If this option is set to Yes, the student's work will show up in the feedback textbox as well as below it. This allows you to make comments directly in the text, while simultaneously keeping an unedited version visible below. You can choose to highlight text, strikethrough, delete, or any of the other options that you have while writing. This can prove a valuable tool for both the student and the teacher. The teacher can quickly highlight issues that each of his/her students have and help them focus on improving those areas. For the student, he/she can quickly and easily see where he/she has made mistakes in his/her writing, which allows him/her to focus on the changes needed.
Assuming that the Allow resubmitting option is selected, this can happen as many times as needed. Once the final version has been submitted, the final grade from the teacher will also be given. However, during the process of writing and rewriting, a grade can be given by selecting the score from the drop-down menu.
This assignment type is similar to the single file assignment type except that it allows students to upload one or more files. Using this assignment type will allow you to work with students going through first drafts, rewrites, and final drafts. There are three sections involved in creating this activity. The General and Common module settings are identical to those for the single file assignment. The difference between the two activity types is seen in the Advanced uploading of files section of the activity. This is shown in the next screenshot.
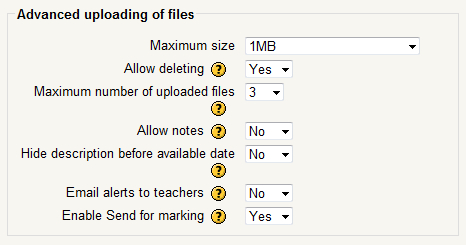
There are several new options here, so will go over each one individually.
This setting determines the largest file size the students will be able to upload. Keep it small if you want students to focus on content rather than formatting or images.
This allows students to delete files that have been uploaded. The default setting is Yes, which will allow students to delete any files uploaded until the assignment deadline has passed or their work is submitted for a grade. If this is set to No, students will not be able to make any changes to the files that have been added.
To delete a file, students simply need to press on the X icon located to the right-hand side of the files that have been uploaded. Once they click on the icon, they will be prompted to confirm the deletion of the file. Clicking on Yes will delete the file from the course.
This determines the maximum number of files a student can upload. The number of files a student can upload ranges from 1 to 20. Also, students are not shown the maximum number of files they can include. You will need to indicate the number of files they will be able to upload somewhere in the assignment description.
The Allow notes setting determines whether or not students will be able to make notes in their textbox. You must inform the students about this, or they will not use it. The notes students are able to enter in the textbox function in the same way as in the Online text assignment. This can be useful for students so they can remember important points, things to come back to, or to communicate with their instructor.
This option allows you to hide the description of the assignment until the assignment is made available. The default here is No, which means students will be able to see the description of the assignment at any time. If there is a need to hide this description from students until the beginning of the assignment, change the setting to Yes.
This setting functions exactly as previously stated. By default it is set to No and this is where it is usually best to keep it. However, if you really want to receive e-mail announcements whenever students update or submit work, set it to Yes.
This allows the student to tell their instructor that they have completed their work and it is ready to be graded, but you must first teach the student how to use it. To be able to Send for marking, students must first upload a minimum of one file. Once a file has been added to the course, at the bottom of the assignment page, they will see a new section entitled Final submission for assignment marking. Students click on this button to send their work for grading. After clicking on the button they will be brought to a confirmation page where they have the option to confirm or cancel their submission. Clicking on Yes will submit the assignment for grading and the students will no longer be able to do anything to the attached files.
There is also an option for you to change the assignment back to an unfinished assignment by clicking on the Revert to draft button on the feedback and grading page. An example of what the feedback and grading page looks like in the Advanced uploading of files assignment is shown in the next screenshot:
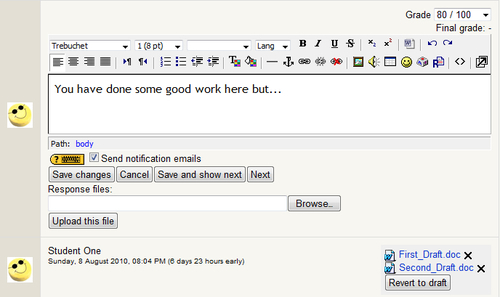
As you can see on the bottom right-hand side, you have the option to delete the drafts or to revert to a draft form. In addition, under the rich text editor you have the option to include additional files for review by the student.
Adding a grade and feedback and clicking on the Save changes button will bring you back to the Submissions page and a screen identical to the one seen in the Upload a single file assignment.
Using this assignment type for essay writing or extended writing projects is a very good way to assess students. It allows you to keep all files in a central location and review them at any time. It also allows you to follow the progress of the students from the beginning of the project until the end. Note that no peer review is possible unless you override the student permissions on the assignment.