
Voiceboard is a new module for Moodle that is still in its beta stages, but offers some excellent options for testing speaking as well as offering self, peer, and teacher evaluations. The setup for this activity is very basic and is very similar to the NanoGong activity we just looked at. The difference between Voiceboard and NanoGong is that the Voiceboard activity offers the ability to record multiple audio files and track the comments. The recordings will all be kept in order, under the student's name, so it allows the instructor and student to easily follow a series of speaking assignments. You can see all the posts in context and are able to go back and review previous interactions and keep track of when items were posted. Here is the setup page, which as you can see is very simple in its design as shown in the next screenshot:

Now we will take a look at the General settings for the Voiceboard module.
Enter the title of the Voiceboard activity here. This is what will be seen on the course page and how the students will identify it.
Here, you can describe the type of discussion that is going to take place, give directions, grading explanations, and so on.
This is the default format for your text entry, and something we have looked at before. You shouldn't need to do anything here.
This drop-down offers two grading schemes. The first is the typical 1 to 100, where you will assign a numerical score based on a set of criteria and how well the students completed the assignment based on the criteria given.
The second method offered is called Scale: Separate and connected ways of knowing. This grading pattern is based on the idea that there is a separate and a connected system of knowledge. There are three possible 'marks' that can be given if this grading scale is selected: Mostly Separate Knowing, Mostly Connected Knowing, and Separate and Connected. These ideas require some reading up on if you are to make use of them. One place you can get a short overview of the topic is at http://docs.moodle.org/en/Separate_and_Connected_ways_of_knowing. These 'marks' are not added to the Gradebook and have no bearing on the students' grade. The value in using these scores is to help the students see how they use their knowledge and how it affects their interactions and communication skills.
These settings have all been looked at earlier and function in the same way as in the prior activities.
We are going to be carrying on a discussion with our students in Turkish. We will cover a variety of topics based on what they have studied in class. Once we have the Name, Summary, Grade, and have selected our player (in our case we will be using NanoGong) we click on the Save and display button. The screenshot is as follows:

As you can see, since no one has made any recordings, there is nothing here yet. What we do see is the way the recordings will be organized and a tab for us and the students to make recordings.
We will now go to the Record audio tab at the top of the page to record the first message in the Voiceboard. A screenshot of the Record audio page follows:
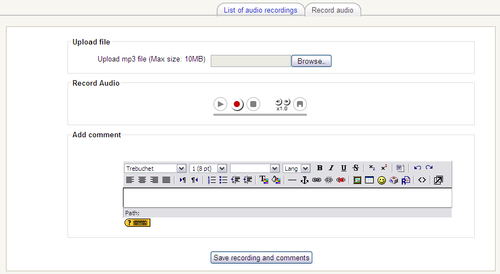
As you can see, we have the option to Upload file. This can be useful if we already have an audio file with the instructions or whatever other audio we want, for example, if we wanted to use a file that we have previously recorded on Audacity and exported as an MP3. If we have this file ready, we simply click on the Browse button and locate the file on our computer.
You can make a comment regarding the recording here. This comment will be displayed in the Comment column on the List of audio recordings page.
We will not upload a file, but we will make our own recording using the NanoGong player. Again, every new recording will overwrite the previous one, and recordings can be reviewed by using the Play button. Once we have finished and are satisfied with the recording, we will add a comment then click on the Save recording and comments button. When you click on this button, you will get a small message on the top right of your screen telling you that the recording was saved and will be moved to the List of audio recordings page.
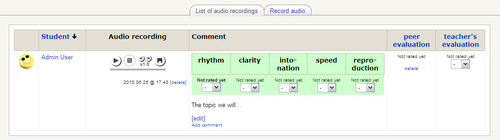
Once we are on the List of audio recordings page, we will see our new entry. This is shown in the next screenshot:
Now that we have some information in the columns, we can talk about them in more detail.
This column, and the column to the left-hand side of it, show the student's name and a profile picture, if there is one.
This column holds the NanoGong player. Clicking on the Play button will allow you to listen to the recording.
Under the player, the date and time of recording are noted. There is also a Delete button. Clicking on it will allow you to delete the audio file. This could become necessary at some point, for example, if a student were to use profanity or something else offensive, but for the most part, you won't want to delete these files.
This is the where we can grade and comment on the student's work. As you can see, there are several categories available for assessing the student's performance. These categories are: Rhythm, Clarity, Intonation, Speed, and Reproduction. Each of the categories has an associated drop-down menu with numbers ranging from one to five, one being the lowest score possible and five being the highest.
These categories are used for self-evaluation and can be very helpful for teachers. Students who self-assess correctly are often hard on themselves and the scores they give themselves can offer you an insight as to where they feel they are lacking in skill. This can help you focus on helping them feel more confident in those areas or offering additional instruction or practice in the target sub-skill.
Students also have the option to edit their comments or even add an additional comment.
As an instructor in the course, you have the option of adding an additional comment as well. This comment will be displayed underneath the student comment and will be set off by a black border, so the student will be able to spot it immediately.
A student's work is also available for peer review. Another student in the course is able to listen to the recording and offer their own evaluation of the student's work. This can be a useful tool both for students and instructors.
Depending on the number of students making peer evaluations, this number will adjust. The first evaluation will always be a whole number because the drop-down menu where you select the score only shows these options. However, when a second student adds their score, the numbers will be added to the first score and averaged. The students will not see any individual scores, only the total. They will also not be able to see who evaluated them, which increases the chances of honest reporting.
As an instructor, you also have the option of removing obviously malicious or seriously flawed evaluations.
Here is where your grade for the student's performance will be displayed.
If you feel afterwards that the evaluation you gave was incorrect, simply click on the Edit link and you will be able to change the score.
A completed assessment with comments and recordings is shown in the next screenshot:

As seen in the previous screenshot, three people took part in the activity. They recorded audio, completed self-evaluations and commented on their performance. Each participant received peer and teacher evaluations as well as teacher comments.
This has the potential to be a very useful addition to your Moodle site, especially if you are interested in self and peer evaluations of student speaking skills. In addition, by keeping these items available for students over the course of a term or year, the students will be able to see progress in terms of their speaking abilities.
This is still in beta, so there are a few issues that still need to be worked out. The first one is that the categories for evaluations are set. You can't make any changes to the category names. To get around this, in your Summary, you could tell students that the grade for the Intonation category will be used for X. This is something that has been noted by the developer and something they are considering changing. However, the intended use of this module is not the way I have presented it here. It was intended for language students to practice their speaking using pre-scripted material.
The second issue is the way the Grading drop-down functions. In most drop-down menus, you have the option of making adjustments to your grade if you decide later that you evaluated the item incorrectly. This is very important because there are times when this happens. However, in the Voiceboard, the choices once made are locked. There is a way around this, but it requires a couple more steps than is really necessary. If you make a mistake, you need to click on the Edit link under self evaluation, which will take you to the recording page. Clicking on Save recording and comments will keep the recording and comments as they are, but will bring you back to the List of audio recordings page. The other option available is logging out and back in, which will allow you to revaluate the assignment.