
Time is such an important commodity for all of us. Using tools to help us manage and organize our time is important, especially when our lives can be so full. The Lotus Notes calendar can assist us in managing our time and can be an integral part of our busy lives.
Our calendar can contain our dentist appointments, birthdays and anniversaries, reminders to pay our bills or even pick up the dry cleaning. Calendars help keep our personal lives organized and, in today's business, the calendar is a very important tool. The calendar assists us in managing our time, especially with meetings, as often in the corporate world we are very meeting driven. We can invite people, check their availability, and even find a room to meet in. There are other tools such as group calendars, calendar overlay (where we can overlay another person's calendar on our calendar), and repeating calendar entries (that really benefit us in working with others.)
To Dos, known in some other applications as Tasks, are great for creating an electronic To Do list. My favorite feature of To Dos is being able to assign tasks to others!
This chapter explores the calendar and To Dos in depth; the topics we will cover are:
- Calendar tour
- Using our calendar
- Adding to our calendar
- Responding to meeting invites
- Managing meetings—be the chair!
- Calendar preferences
- Rooms and resources
- Printing the calendar
- Calendar tools
- Group calendars
- To Dos
Before we venture into the details of the calendar, let's take the time to explore the different areas and ways to navigate around it the calendar.
As you may have noticed in Lotus Notes, there is typically more than one way of doing things.
To open the calendar, do one of the following:
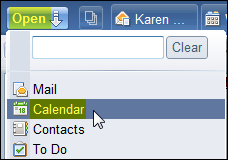
- Click Open and then select Calendar as in the next screenshot:
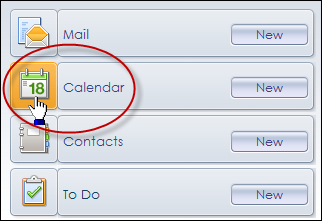
- Click the Calendar from the Home page.
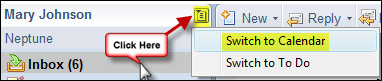
- From Mail or To Do, we can switch to the Calendar by clicking on the icon next to our name.
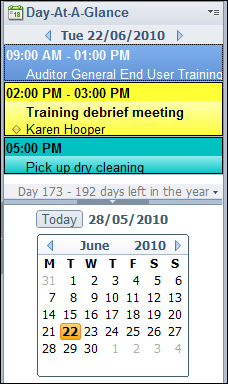
We can also see what is on our calendar in the Day-At-A-Glance panel in the Lotus Notes sidebar. This is a really handy option for viewing our calendar as we can be anywhere within Lotus Notes and see what is on our calendar for that day. The Day-At-A-Glance panel has already been discussed in detail in Chapter 1,
The calendar side navigator allows us to navigate to the different areas within the calendar. The side navigator can be split into three distinct areas. First is the calendar picker, second the calendar views, and third the MiniView. First, let's look at the calendar picker.
This is located at the top left-hand corner of our side navigator. As the name suggests, it is a calendar where we can pick dates and there are some cool features that will save us time.
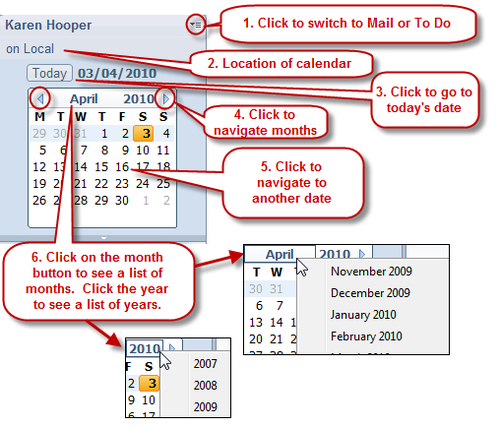
- Click to switch to Mail or To Do (1): When we click here, we see a choice to switch to Mail or To Do. I always find it easier to use the Open button though.
- Location of calendar (2): The location "Local" indicates our PC. If there was a name of a mail server here, it would be an indication that we are accessing our mail on a server.
- Click to go to today's date (3): If we have been navigating to different dates within our calendar and we want to go back to today's date, click the Today button.
- Click to navigate months (4): The left-hand arrow when clicked takes us to the previous month, whereas the right-hand button when clicked takes us to the next month.
- Click to navigate to another date (5): We can click on a date to change our calendar to that date.
- Click on the month button to see a list of months. Click the year to see a list of years (6): When we click on the month, it shows a drop-down list of other months to select from. When we click on the year, it shows a drop-down list of other years to select from.
This is where we can select different views such as days, weeks, or months. The default view for the calendar is the One Week view. If we change to another view and open Lotus Notes, we will return to the last view that we switched to.
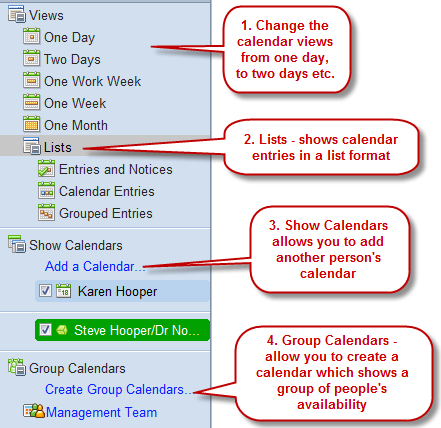
- Views Change the calendar views from one day to two days etc. (1): We have different choices on how many days we want to view in our calendar.
- Lists shows calendar entries in a list format (2): Typically when we look at our calendar, it looks similar to a paper calendar. If we select one of the options under Lists, we can see our calendar entries in list format.
List option
Description
Entries and Notices
Lists everything we have added to our calendar plus meeting invites and responses from invitees. We can use this area to accept a meeting we previously declined or find a meeting we have accepted, and so on.
Calendar Entries
Lists everything we have added to our calendar.
Group Entries
Groups together repeating appointments and also groups meeting invites with all the responses (acceptances or declines).
- Show Calendars - allows you to add another person's calendar (3): We can overlay another calendar over our own. When adding them, we select a color and each calendar will show in the color we selected for it.
- Group Calendars - allows you to create a calendar which shows a group of people's availability (4): A group calendar shows the availability of people who we have added as members of the group calendar. We will discuss group calendars later in this chapter.
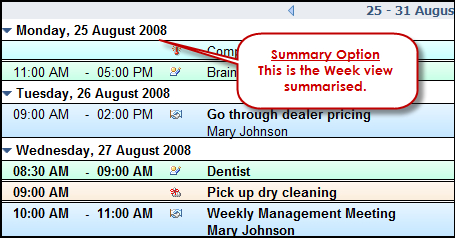
In this section we will explore the options we have for viewing our calendar. There are different preview options as well—for example, we can filter the calendar entries to show only meetings. My personal favorite is the Summary option that shows our calendar entries in an agenda-type format.
Click on the Show button to enable Preview on Bottom or Preview on Side. Once enabled, we can preview our calendar entries. We can select Hide Preview to disable previewing.
We can also select the option to Filter what is on our calendar to easily find entries.
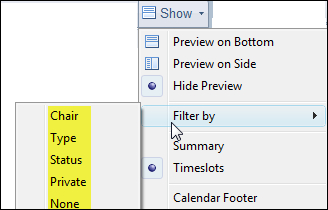
The filter options are shown in the preceding screenshot and explained next:
- Chair: We can show meeting entries only where we are the Chair. This means we have created the meeting and invited others.
- Type: We can show meetings by Type such as showing only reminders or anniversaries.
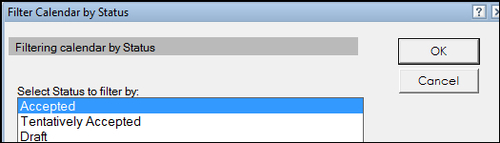
- Status: When we select to filter by Status, we will be prompted with another dialog box to select which status we want to filter by. This option shows the status of meetings that we have:
- Accepted
- Tentatively Accepted
- Draft
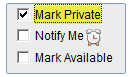
- Private: This option will show only calendar entries that we have marked private. A calendar entry that is marked private means that only we can see the details of the calendar entry; if we have an assistant or another person who accesses our calendar, they will not be able to see the subject or content of the calendar entry. When we create a calendar entry, we will have the option to Mark Private.
- None: Turns off the filter functionality and shows all calendar entries.
By default, the calendar shows timeslots on every view except the Month and Lists views. There is an option to view by Summary that changes the calendar to show only times or days that have calendar entries. It also shows them in a list format similar to how the Blackberry shows the calendar as an Agenda or the iPhone shows the calendar as a List.
There are several action buttons available at the top of the calendar views. From within calendar, if we right-click, we will see many of the same options available.
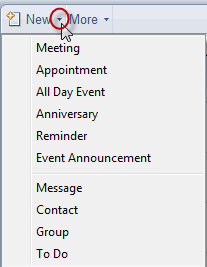
When we click the New button, by default an appointment is created. We can change this default in Calendar Preferences. Alternatively, we can click the arrow to the right of New to see a drop-down list explained in the following bullet list. If we have created the calendar entry and want to change the type, click in the Type field and select a different option.
- Meeting: Where we invite others including rooms and resources if required.
- Appointment: We can use this option if we are not inviting others.
- All Day Event: As the name suggests, we can use this for events that cover the whole day such as annual leave or seminars. It only provides a choice of dates, it does not include times.
- Anniversary: Birthdays or anniversaries such as a wedding anniversary. Automatically repeats for 10 years. It is set to Mark Available so that it does not block out our time and shows our time as available if people are trying to schedule a meeting with us.
- Reminder: Has date and time options. Does not block out our time. Shows our time as available if people are trying to schedule a meeting with us.
- Event Announcement: Allows us to invite people but not receive replies from them. The invitees can add the invite to their calendar. Great for inviting people to compulsory corporate-wide meetings or events such as a company BBQ where we want to let people know about the event but we don't need to know if they are attending.
- Message: Creates a mail message. We can use the keyboard shortcut Ctrl+M.
- Contact: Create a person contact in our contacts.
- Group: Adds a group (also known as mailing list) to our contacts.
- To Do: Create a task in our To Do.
The following is the drop-down list of choices when we click the down arrow to the right of New:
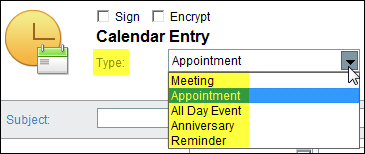
When we click the New button rather than the down arrow, our default calendar entry will be created; often this is a meeting or appointment. Once we have created the calendar entry, we can change the type. The following is a calendar entry with the Type field highlighted. Click in this field if to change the type of calendar entry we will be creating.
There are more options available when we click on the More button. From this menu we can select:
- Preferences: From this area, we can set defaults for our Calendar including setting times for our schedule, enabling alarms, setting favorite rooms, and giving access to our calendar to others.
- Out of Office: We can enable this to inform people of our absence. We can now allow a person whom we have given access to our mail to enable this on our behalf.
- Import Holidays: We need to select this option to import holidays that have been configured by our IT Department.
- Open Person's Calendar: Allows us to select a name so that we can open their calendar if we have been granted access.
- Create Group Calendars: From here we can create new group calendars or alternatively view any group calendars that we have created.
- Calendar Cleanup: It is a tool to assist with safely deleting past calendar entries including past repeating entries (but not future ones).
Many of these options will be explored in detail further on in this section. The Out of Office functionality has already been discussed in Chapter 6,