
There are several calendar preferences that are excellent in helping us manage our calendar and our inbox. In preferences, we can select whether we see invitations on the calendar that as yet we haven't responded to (this is known as unprocessed meeting notices), we can also set up our hours of availability and delegate access to our calendar to name a few.
Calendar preferences can be accessed from within the calendar by clicking the More button and then selecting Preferences from the drop-down menu. We can also access calendar preferences via File | Preferences | Calendar and To Do. In this section, we will learn about some of the key areas in our calendar preferences.
As we have mentioned, invitations to meetings come via the inbox as well responses to invites we have sent come into our inbox. There are preferences that we can set to manage the responses, which are known as notices.
- In the Calendar, click on the More button and then select Preferences.
- Select the Notices tab.
- Select preferences for the Calendar Notices in Mail Views section.

The choices available are:
- Display the following meeting notices in my Inbox: We can select to show none, or just invitations which is the choice All except responses (responses are replies to our meeting invitations such as acceptances, or All.)
- Remove meeting notices from my Inbox after I process them: This option is to remove meeting invitations once we have processed them, which is great as it keeps our inbox tidy. If we need to see the invitation, we can go to our Calendar and under Views select Entries and Notices. If it was an invitation we accepted, we will also see it as a meeting on our calendar. If we are a Smartphone user, this is also a great option as once we accept the meeting, the invitation is removed.
- Display unprocessed meeting notices in the New Notices MiniView: This is another great option. An unprocessed meeting is a meeting we have not responded to, that is, accepted or declined. We will cover this feature a bit later in this chapter as it is so good and highly recommended to be turned on. Here we are selecting to show unprocessed meetings in the MiniView; we will need to have the New Notices option selected to see the calendar entries as seen in the next screenshot:

- Don't display calendar documents in the All Documents mail view: All Documents is a fantastic view that contains all our e-mails that are in our Inbox, Sent folder, and our personal folders. It is a great place to search for e-mails. By default, calendar entries such as invitations, birthdays, and so on do not show in this view. Some people prefer to see only e-mails in this view and if they need to search for calendar entries in a view-like format, they go to the Views in the calendar.
- Don't display meeting invitations in the Sent mail view: When we Save and Send an invitation, we can select to have it displayed in the Sent folder.
Changes to these options are applied only to new documents created. So, if we enable any of these options after we have created calendar entries, we will still see them. We can remove them from the Sent mail view but not All Documents. To remove from the Sent mail view, select Delete and then select the option to Remove; be careful though, don't delete, only remove.
We can set Lotus Notes to automatically respond to meeting invitations from anyone or a selected person or group of people. We may have a manger who requires our attendance at every meeting, so rather than manually accepting every invite, we can have Lotus Notes do it automatically for us. Follow the steps given here:
- In the Calendar, click on the More button, then select Preferences.
- Select the Calendar & To Do tab, and then the Autoprocesing tab.
- Select the Respond automatically to meeting invitations option
- Select who you want to automatically respond to
- Select acceptance actions

The term "Free Time" can be an oxymoron in our frantic world; however, in Lotus Notes free time represents the hours we are available to be booked for meetings. It is different than whether we have something booked in our calendar.
When people are checking our availability via the scheduler and we have something booked at the time, the timeslot they are looking at will be red. The pink color represents time outside of our available hours. White represents our time is available free time! To set the hours that we are available, we can open our calendar preferences and set days and times.
Be aware that people can still invite us to a meeting even if they see that we are either already booked or the time is outside of our available time. I know of some executives who, when setting up their availability schedule, deliberately made themselves not available for a time period in the afternoon. Their aim was to have a meeting free time so they could use that time to catch up. This area is great for part-time workers as we can give people an indication of what days we work.
Follow the steps given next:
- From within our calendar, click More then Preferences.
- Click the Scheduling tab.
- Select the appropriate time zone from the Time zone list if necessary. Typically the default is Local time, which is our default time zone.
- Select the days that we are available and the hours for each day on the Scheduling tab.
- If we want Lotus Notes to prompt us if there is a conflict when we accept or create an entry, check the Check for conflicts when adding calendar entries option. This will prompt us when we have something already booked in our calendar.
- The next option we can select is if we accept or create an entry that occurs outside our available hours. I never set this option as I know my hours and often I need to accept meetings outside of my availability. I really only want to be prompted when I have something actually booked in my calendar.
- The last choice in this section is Inform me when I send invitations to non-Notes users.

- Click the Scheduler Display tab.
- Select the display for when we are creating a meeting and referring to the Find Available Time section. We can set the default to be either Details or Summary, which is Suggested best times for meeting.
- We can select if we want the scheduler to display in the 24-hour format.
Meeting invitations arrive in our inbox. In a busy inbox, we can accidently miss an invitation, a reschedule notification, or cancellation of a meeting. There is an excellent feature in our preferences where we can select to display invitations that we have not responded to in our Calendar and the Day-At-A-Glance. They will show in a gray color representing that we have not as yet "processed" the invite. All we need to do when we see one of these gray calendar entries is double-click to open and then either Accept, Decline, and so on. This saves us having to find the original invite in our mail. Having them grayed out on our calendar is similar to a mental note to prompt us to respond to the notice.
We can also set preferences as to how we want to process cancelled meetings. We can remove them from our calendar or Show as cancelled in calendar. I like the second option as often I like to check that the meeting was cancelled rather than realizing later that I have just missed it!

In this same area we can also select how we want our calendar to display, including the time of Start of work day and End of work day, plus time slot length and days in the work week.
Finally, we can decide how we want to display our To Do entries on our calendar. Check Display To Do Entries to see To Do on your calendar. Another option available is to Display overdue To Do items on the current day. If we select to show our To Dos on our calendar, be aware that they will follow us! If we have a To Do due today and we don't mark it as complete, it will be on our calendar until we mark it as complete. This can be a great tool to keep us aware of the To Dos that we need to complete; however, for some it can be overwhelming. Another option is to select to display our To Dos in the MiniView of our Calendar.
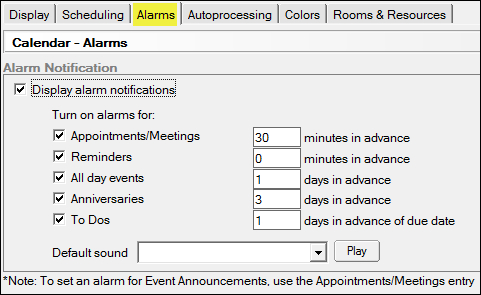
Within preferences, we can go to the Display tab and then the Entries tab. Here we can select default options for what entry type is created when we double-click on the calendar. We can also set the duration of meetings and appointments and how long our anniversaries repeat for. The default duration for meetings is 60 minutes; in the following screenshot I have changed the time to be 30 minutes.
If we want to use categories within our calendar entries, set them on this tab as well as information for conference call information.

I cannot live without alarms! In our calendar we can select to have alarms on by default for any of the different calendar entry types. We can also set the time. I turn my alarms on by default, and then when I create a calendar entry that doesn't need an alarm to be on, I turn it off for that entry. Many people work the other way and have alarms off by default and then turn them on for each individual entry. I highly recommend having alarms on for meetings, appointments, and reminders.
What is life without color! We can change the color coding for the different calendar entries in preferences. Simply go to the Colors tab and color away!

It is often necessary for us to allow colleagues to have access to our mail or calendar. Assistants typically manager the e-mail and the calendar on behalf of their manager and therefore need a high level of access. Others just want work colleagues to see what they have booked in their calendar but not to see their mail. Granting access will be varied.
There are two types of access to our mail, calendar, To Do list, and contacts:
- Via our schedule: Typically everyone in the organization has access to our schedule. Our schedule shows our available hours and what times we have available. It does not show people the details of what we have booked in our calendar.
- Via direct access to our mail/calendar/To Do/contacts: Typically no one has access to our mail or calendar except to view our schedule. We can give someone direct access to our mail or calendar via preferences.
We can give another colleague access to our calendar as well as our mail, contacts, and To Dos. Follow the steps given next to give a person or group of people access.
- Open Mail or Calendar, click the More button.
- Select Preferences, and then Access & Delegation.
- Select the Access to Your Mail & Calendar and then click the Add button.
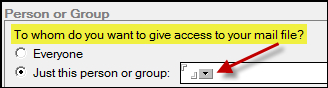
- Select the option to give access to Everyone or click the down arrow to open the address book to select name(s) or group(s).
- Select which components we want to give access to.

- If we select Mail, Calendar, To Do and Contacts, the following options will be available to select. Read each level below to determine the appropriate level we want to apply to the person we have added. Notice that the fourth access level is the highest level of access.

- If we select the option of Calendar, To Do and Contacts (mail in this option is omitted), the following options will be available to select. Notice there are fewer choices available. Read each level to determine the appropriate level we want to apply to the person we have added.

- Finally, select any Automatic Forwarding options we require then the OK button.

- At any time we can Remove or Change Access to delegates we have added.
When we book rooms or resources, we often book the same room/resource and we generally book them from the same site. In our calendar preferences, we can set a default site as well as favorite rooms and resources.
- In the Calendar, click on the More button and then select Preferences.
- Select the Rooms & Resources tab.
- Click on the Address Book button to select Preferred Site. We can select if we want to use the site as a default and/or if we want to be prompted when scheduling within another site.
- When we invite a new room in a meeting, we need to select if we want it to be added to the Preferred Rooms list. The available options are: Always, Never, and Always ask.
- When we invite a new resource in a meeting, we need to select if we want it to be added to the Preferred Resources list. The available options are Always, Never, and Always ask.
- Click the Manage List buttons to add or remove rooms or resources.
