Meetings have more options available as they involve inviting others as well as checking schedules. Earlier we learned how to create a calendar entry; all those steps still apply and in this section we will focus on the extra fields available in meetings.
The following are the instructions to create a meeting:
- Open the calendar, click the down arrow next to the New button and select Meeting.
- If we have given others access to our calendar, select Mark Private to prevent them from reading the entry. Those with access to our calendar can see the times and dates of private calendar entries but cannot see details of the entries such as the subject and description.
- Select Notify Me to set an alarm for the entry, and then set alarm options.
- Select Mark Available to keep the entry's time free in our schedule. This means the time allocated for this calendar entry will not show as being busy when people check our schedule. This option is not usually selected for meetings as we want our time to not be available so that we don't get double booked.
- Type a description in the Subject field.
- Specify date, time, and time zone information in the Starts field and, if necessary, in the Ends fields. The start date and end date cannot be greater than 24 hours. If we need the meeting to span more than 24 hours, we will need to create the meeting as a repeating entry.
- If the meeting will be occurring more than once, click Repeat and enter repeating details.
- We can select Response and Workflow options if required in our meeting. These fields may be hidden. If required, click the Display button and select Response and Workflow Options. Alternatively, these settings are available when we click the Delivery Options button or when we create an Event Announcement calendar entry.
- Do not receive responses from invitees: This means we will not receive an acceptance or decline. The invitee can only add the meeting to their calendar as there is no option for them to accept or decline.
- Prevent counter-proposals: This prevents an invitee from proposing a new time.
- Prevent delegation: As the name suggests, the option to delegate is not available.

- Required: Enter names of people who are required to attend the meeting. Click on Required to open the Corporate Directory to search for names or simply type the name of the person we want to invite in the field, using a comma to separate names.
- Optional: Required and Optional invitees receive a notice that includes response options such as Accept and Decline. When we check the scheduler to suggest meeting times, it prioritizes the free time of required invitees higher than the free time of optional invitees.
- FYI invitees receive a notice that does not include response options but includes the option to add the meeting to the calendar. Other invitees cannot see the names of FYI invitees and it is similar to the BCC functionality in e-mail.
- If rooms have been set up within Lotus Notes in our organization, click Rooms and select the room we require from the Corporate Directory or click Find Rooms, fill in the required fields, and then click the Search button; select a room from the Search Results. We may be prompted to add the Room or Site to our preferred list.
- If resources have been set up within Lotus Notes in our organization, click Resources and select the resource we require from the Corporate Directory or click Find Resources, select a Resource Category, fill in the required fields, and then click the Search button; select a room from the Search Results. We may be prompted to add the Resource or Site to our preferred list.
- Click Find Available Times to open up the scheduler. The scheduler has two main areas—Summary and Detailed. The Summary option gives suggested times when everyone is available. The Detailed option shows a graphical representation of people's availability. We will cover the scheduler in detail further in this chapter.
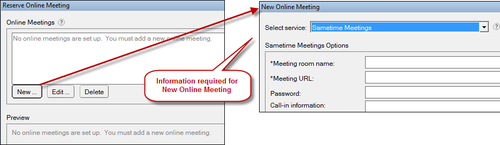
- If the meeting is an online meeting and we have Sametime enabled within our organization, click Online Meeting. This will open the Reserve Online Meeting dialog box where we can select an online meeting if there is one set up, otherwise add one by clicking the New button.
- Click Delivery Options to specify delivery options for the invitation, including if we require a Return Receipt, or if we want to prevent the invitees from counter-proposing or delegating their acceptance. We can also set security options such as sign or encrypt in this area.
- Select or type a category name in the Category field. This field can be hidden if not required by clicking the Display button and deselecting Category.
- Click on the Description tab. Add any additional information about the meeting, such as the agenda or the purpose for meeting; we can also add attachments such as a PowerPoint presentation, and so on.
- Select to Sign or Encrypt if required. This option can be hidden if not required by clicking the Display button and deselecting Additional Mail Options.
- Type any general location information for the meeting in the Location field; however, if a room has been scheduled and accepted, the room's location will show in the Location field.
- Either select Save as a Draft or click Save and Send Invitations.
- If prompted to create the entry despite a conflict with another entry or our availability preferences, click Yes to create the entry or No to cancel creating the entry. For information on conflict checking and setting our availability preferences, see the Setting our free time schedule section.
- Once the invitation has been sent out, we will receive responses from invitees.
We can also create a meeting with a person we have selected in our mail. We have discussed this in Chapter 6 under the Finding available time section.
- Select a message from a person in our inbox who we want to have a meeting with.
- Right-click on that message; we will see their name listed at the top of the right-click menu.
- Select their name, then from the extended menu select Find available time.
- The scheduler window will appear and show the first availability of the person we have selected and ourself.
- Click Create Meeting or Close.
Rooms can be varied—some are meeting rooms, some rooms have conference facilities, and others are training rooms. Resources are things such as projectors, laptops, cameras, and so on. In one company I did training for, they had cars as resources!
There are two ways to select a room and resources. One is by clicking Rooms, which opens the Corporate Directory. We would do this if we need a particular room for our meeting such as a room that has conference facilities near our office or a training room. If we hold our cursor over each room while we have the Corporate Directory open, we can see the particulars of the room such as the number of people it can fit, whether it has conference or training facilities, and so on. Typically we would add the people we want to invite, then the particular room that we need, and we will then check the availability of both by using the scheduler.
The second way to select rooms is to use the Find Rooms button. I would always ensure the people I have invited are available via the scheduler and then use the Find Rooms button. This opens a dialog box. Many of the fields will be populated; check that these values are correct and then click the Search button. The search results will be displayed as a list below the Search button. Check to select the room returned in the search.
Reserving resources is basically the same except that we need to select the resource category, as resources are grouped under categories such as Laptops or Projectors.
We can set preferences so that we can have preferred rooms and resources and set our default site. This will be discussed further in this chapter.
The following is the search options' dialog box for Rooms:

Using the scheduler when we are organizing meetings is very important. It is pointless to invite people to a meeting at a time when they are already booked! Using the scheduler allows us to see if they are available and, if we have been granted access to their calendar, we can actually see what they have going on.
Tip
We need to remember that if we grant someone access to our calendar, they can see all our calendar entries except the ones we Mark Private.
The scheduler can also give us suggested times if we are struggling to find a free slot. We can also deselect an individual if that person is too busy and see if everyone else is available.
The scheduler is a great tool and it should be used in every step of creating and updating meetings. When we create a meeting, we check everyone's availability, including rooms and resources if we have invited them. If we are rescheduling, we will see an option to Check Schedules; this will open up the scheduler to our proposed new time and we will be able to see everyone's availability. Even when we delegate, we need to check if the person we are delegating to attend the meeting is free. The scheduler will save time and assist us in being more efficient when managing meetings.
The Find Available Times scheduler has two sections—Summary and Details. Let's look at the Details first.
The Details section shows time slots with color coding, showing the status of availability of each individual invited including rooms and resources. The colors are explained here:
- White (Available): This color indicates that the person is free.
- Red (Already Scheduled): This indicates the person already has something booked in their calendar at the time we are suggesting.
- Pink (Unavailable): This indicates that it falls outside of their normal working hours. These hours are set up in Calendar Preferences and will be discussed later in this chapter.
- Blue (No Info): This indicates the scheduler does not have any information regarding that person's availability. We will see this if we are inviting a person from outside of our organization.
- Gray (Info Restricted): This indicates the person we are inviting has chosen to not make their availability visible to us.
Note
There is a difference between giving people access to see our availability and access to our calendar. If they can see our availability, all they see are blocks of when we are available or not available, and so on. If we give someone access to our calendar, they can double-click on the blocks, which in turn will open our calendar. By default, no one has access to our calendar and everyone has access to our availability via the scheduler.
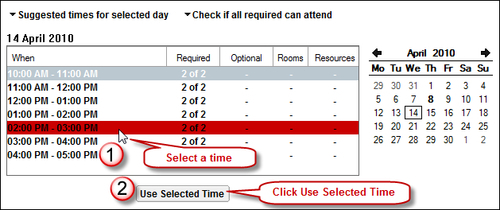
The following is an example of the Scheduler. The bar shows the time block for the meeting. If it is green, it means everyone is available, whereas a red color indicates not everyone is available. The bar can be dragged to a different time slot or we can select a different date from the calendar and then double-click, and the bar will appear at the new date. We can also resize the bar to make the meeting shorter in time span or longer.

To check availability on a date not showing in the Scheduler, click the Calendar Picker, select a date, and then double-click on a time slot.

Finally, we can tweak who we invite. Each invitee will have a checkbox to the left of their name. If a person is very busy, we might want to consider deselecting his/her name and checking availability of all other invitees.

The Summary section provides suggested times which we can select. Alternatively we can pick another date and see the suggested times for that date.
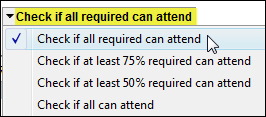
We can tweak the way the scheduler provides the suggested times as shown in the following screenshot:

We can also change the way the scheduler checks for the attendees—for example, we can Check if all required can attend or Check if at least 75% required can attend, and so on.