
Obviously we want to receive our latest e-mails, meeting invitations, and have our applications up-to-date. To do this we must replicate on a regular basis.
Our mail, calendar, and To Dos all reside in the one application. When we replicate our mail we are in turn replicating our calendar and To Dos. The following are the steps we need to perform to replicate mail, calendar, and To Dos.
- First, we need to open mail.
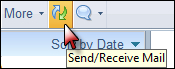
- Click the Send/Receive Mail icon in the action bar of our messages. Note this icon is only available in a local replica of mail.
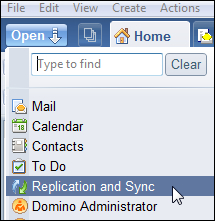
- Alternatively go to the Replicatiion and Sync page via the Open button.
- Click on the Start Now drop down and select Start Mail Only Now.

Previously we learned how to replicate our mail, calendar, and To Dos. We can replicate all our applications including mail. It is important to keep replicas up-to-date.
- Click on the Open button and select Replication and Sync.
- Click on the Start Now button and select Start Now.

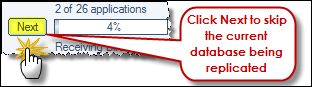
- The replication process will replicate each application listed starting at the top of the Replication and Sync Page and working down the list. We will see a status of each replication including the number of documents replicated and the time remaining before replication is finished at the bottom of the screen.
- If required we can stop the replication of the current application and skip to the next application in the list by clicking Next at the bottom of the replicator page.
- When we start replication, the Start Now button changes to a Stop button. Click the Stop button to stop replication if required.
There are times when we may need to replicate only a particular application. We can follow the steps given here to perform this task:
- Click on the Open button and select Replication and Sync.
- On the Replication and Sync page, select the application that we want to replicate, then right click. This will show a menu, where we need to select Replicate Selected Application.

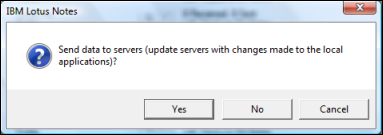
When we start Lotus Notes we can configure Lotus Notes to automatically replicate to prompt asking if we want to replicate. This is configured when we set a schedule, which we will cover next. The prompt asks if we want to Send data to servers (update servers with changes made to the local applications). This sends changes made in the local replicas to the replicas on the server. It will also send any changes that were done on the server replicas to the local replicas.
We can:
- Select Yes to replicate
- Select No to not replicate
- Select Cancel to stop shutting down Lotus Notes
When we view the options available on the Replication and Sync page, we can see columns and rows. Each row is an application that has a replica created locally. If we double-click the row, it will open the application; however, typically we will open applications via the Open button. The columns show which applications are enabled for replication when they were last replicated along with the number of documents sent and received.

The action buttons at the top of the Replication and Sync page enable us to start replication. We can also set specific replication options for individual applications and defaults for all applications by clicking the Application-Specific Options… button. We can also create a schedule by clicking the Schedule button.

At the bottom of the Replication and Sync page, we can see which application is currently being replicated and the time remaining. If we move away from the Replication and Sync page while we are replicating, we can see still the progress in the status bar.

