
We select different locations depending on where we are. We described the different locations earlier in this chapter. Here we discuss how to switch between locations.
There are four options for changing our location:
- When we log into Lotus Notes, we may be prompted with a login screen. From within this screen we enter our password and select our location.

- If we are not prompted by the login screen, then we may be prompted with a dialog box with a list of locations to select from. Select the location we require and then the OK button.
- If we are currently within Lotus Notes, we can change locations by clicking in the right-hand side of the Status Bar as below in the screen shot or by selecting File | Locations | Switch Locations.

- Select File | Locations | Switch to Locations, select the location we require, and then the OK button.
There are two ways that we can identify the location we currently have selected:
- Open our mail, underneath our name in the top left-hand corner, we will see either on Local or our home server's name. Typically local means we are working Offline (or Island), Home, or Travel. When the server name shows at the top of our mail, it is an indication that we working Online.

- In the far right of the status bar, we will see our current location. In the example below the current location is Offline.

We may want to create our own location. For example, we may be able to access our office via the Internet at our home but we don't want to use the Online location as we would prefer to access our mail and applications locally on our PC. We will create a location document for use when we can access via the Internet.
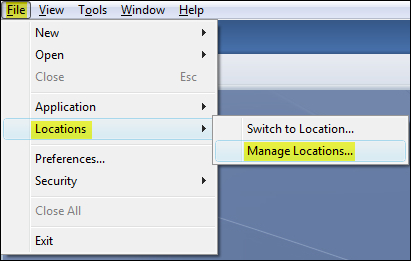
- Select File | Locations | Manage Locations.
- Click New, the following New Location dialog box will open.

- Enter a name for the location in the Location Name field. In this example let's call the location Internet.
- In the Location Type select an option. In our example select Local Area Network.
- In the next field, Internet mail address, we need to enter our internet e-mail address.
- Select any of the other options that are relevant on the Basics tab.
- On the Servers tab, enter Home/Mail server name and any other necessary server names. We may need to discuss what server names we need with our IT Department.
- On the Ports tab select TCPIP.
- On the Mail tab select Local for the Mail file location.
- Go with the defaults for the other field's values or change according to your preferences. Remember Local means our local PC.
- The last option on this tab is Transfer outgoing mail if XX pending. I enter the number 1, which means if I have one e-mail in the Outgoing Mail application it will send that one e-mail. If we enter 2then our mail will not get sent until we have two e-mails pending in the Outgoing Mail application.
- On the Internet Browser tab, we need to select our preferred Internet browser.
- To create a schedule to ensure replicas synchronize within a timeframe, click the Replication tab and the tick Replication is enabled for this connection. If we have scheduled replication and we become disconnected from our network, Lotus Notes will try to replicate and realize it can't and stop. It will give a message in the status bar saying it cannot find the server. It will not slow down or effect Lotus Notes. I have a scheduled enabled all the time on my Internet location and I use this location even when my network is not available at home.
- On the Advanced tab we can select an ID we want to switch to when we use this location. We may need to change to a different ID and we can use this option to switch to it easily.
- Once we have finished, click OK.
..................Content has been hidden....................
You can't read the all page of ebook, please click here login for view all page.