
Now that we have toured the calendar, our next step is to add those important dates to our calendar.
As we have seen, there are different types of calendar entries. The following steps take us through how to create and add them to our calendar.
- At the top of the calendar, click the New button to create our default calendar entry or click the down arrow next to the New button and select one of the six options available. Depending on which calendar entry type we select, we will have different options available.
- If the calendar entry created is not the one we wanted, click in the Type field to change it. Note, once the calendar entry has been saved or sent the calendar type cannot be changed. We would need to copy it into a new calendar entry and change the calendar type then.
- Type a short description in the Subject field.
- Depending on the entry type, specify date, time, and time zone information as necessary in the Starts field and, if necessary, in the Ends fields.
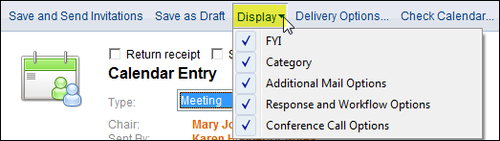
- Some fields may be hidden in the calendar form. If required, click the Display button and deselect or select fields we require or do not require. The following is the Display button expanded:

- Because the Meeting calendar is more complex, it has more display options as shown here:
- Enter values into the following fields if required.
- Click Repeat to create repeating calendar entries and then specify repeat options. We will cover repeating appointments further in this chapter.
- If we have given others access to our calendar but not our mail, select Mark Private if we want the calendar entry to be for our eyes only. Those with access to our calendar can see the times and dates of private calendar entries but cannot see details of the entries such as the subject and description. This is a great option for planning that surprise birthday party for our assistant! Note that Mark Private is different from Encrypt as an encrypted meeting would only be able to be read by the chair and those invited. Use the encrypt option for meetings and private for all other calendar entries.

- Select Notify Me to set an alarm for the entry. If we have alarms enabled, then to disable we need to click Notify Me and then check Disable an alarm notification before this event occurs.

- Select Mark Available to keep the entry's time free in our free time schedule. This means the time allocated for this calendar entry will not show us as being busy when people check our schedule. By default, Anniversaries are marked available so they do not block out our free time.
- Select to Sign or Encrypt if required. This option may be hidden; if required click the Display button and select Additional Mail Options. Sign adds a digital signature to ensure the receiver that the entry has not been tampered with. Encrypt allows only the chair or creator of the calendar entry and the invitees to see the details of the entry.
- Check calendar for dates by clicking the Check Calendar button.
- Type a location in the Location field. This will automatically be populated with the room name for meetings that have a room invited.
- Select or type a category name in the Category field. This field can be hidden if not required by clicking the Display button and deselecting Category. In the calendar side navigator, we can view calendar entries sorted by Category under Lists | Entries and Notices; click on the Category column header to sort.
- Add any additional information about the entry such as a description or file attachments, and add to the Description field.
- If the calendar entry type is Meeting, refer to the next section for further details. If we are creating a meeting, there are several more options available; we will discuss creating meetings later in this chapter.
- Click Save and Close.
- We may be prompted to create the entry despite a conflict with another entry or our availability preferences. Click Yes to create the entry or No to cancel creating the entry. By default, if we have something already booked in our calendar and we add another entry, we will then be prompted. We may also be prompted if the new entry falls outside of our times of availability, which we can set in calendar preferences.
..................Content has been hidden....................
You can't read the all page of ebook, please click here login for view all page.