
In the previous chapter, we navigated the basics of Lotus Notes mail. In this chapter, we will focus on the advanced features available and how we can best utilize them to assist us in being efficient with mail management.
Take the time to explore the available tools and you might be surprised to find that once we start using some of them, we might wonder how we ever lived without them. One of my favorite tools is Stationery —this is like a template for e-mails that I send on a regular basis such as a monthly report. Many colleagues I know have Stationery, which they have set up to send to their travel agent; it includes all their relative details such as frequent flyer numbers, passport details, and so on.
Another tool is Copy Into New … Memo/Calendar/To Do, which copies the text from a selected message into a new memo, calendar entry, or To Do. I use this to copy details within a memo into a calendar entry so that I have all the details of the information in the memo right there in the calendar, which means I needn't search for the original e-mail.
I also love the Find Available Time tool, which is a context menu option available on messages, calendar entries, and To Dos. You select a message, for example of someone that you would like to meet with, and as the name suggests, it automatically finds the first time we are both available and gives us the option to create a meeting invite. It is a few less steps than doing it from scratch in our calendar.
In this chapter, we will explore the following topics:
- Senders Colors and Recipient Icons
- Collaboration history
- Finding available time
- Copying into Tool Memo/Calendar/To Do
- Follow up Feature (flagging)
- Stationery
- Message recall
- Spell check
- Out of Office
- Managing Junk mail
- Rules
- Mail size indicators
- Archiving
- Mail Preferences
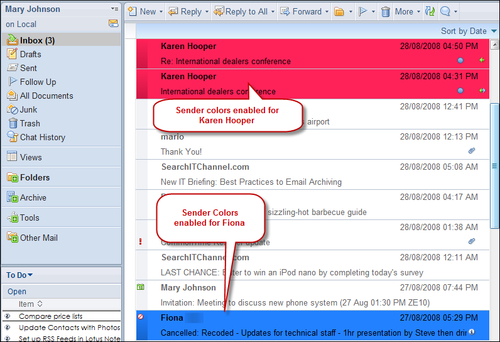
Often it is important for us to identify particular e-mails in our inbox quickly, specifically if they are sent only to us or we have been CCed, or if an e-mail has been received from a certain person. We can specify text and background colors to identify messages from particular senders. For example, we could use one color combination to identify co-workers on an important project, another color combination for our manager, and some other combination for personal messages from friends. We can specify several color combinations. In the following screenshot, background colors of red and blue have been selected for specific individuals:
We can also display icons that identify messages in which we are the only recipient in the To field or our name appears only in the Cc field.
We can follow the instructions given next to enable Sender Colors:
- If necessary, open your e-mail.
- Click the More button above the message list, and then click Preferences.
- Select the Sender Colors tab.
- In the first Sender names field, enter one or more names of people whose messages we want to display in the first color combination. Separate names by pressing Enter (rather than using a comma as a separator). To select names from a directory, click the down arrow next to the field.
- Select a background color and or text color.
- Click OK.
- To remove all color combinations, return to the Senders Colors tab in Preferences, click Restore Default Colors, and then click OK.

To Cc a person in a message typically means that the message content is for information and we may not need to respond or action anything. E-mail etiquette dictates that if we want a person to take action on an item we have included in the e-mail, we add their name into the To field. It is therefore handy for us to immediately identify an e-mail where we have been CCed or an e-mail where our name is in the To field. The following are the instructions on how to enable this feature:
- If necessary, open mail.
- Click the More button above the message list, and then click Preferences.
- Go to the Recipient Icons tab.
- Select one or more of the display fields to display solid-circle if Mail sent to me only, half-circle if Mail sent to no more than this number of recipients in the To field and then select the number, or empty-circle icons if Mail sent to me as a cc.
- To display the selected icons when mail is addressed to us with an alternate e-mail address or group name, specify one or more alternate addresses or group names in the field below, this step is optional.
- Click OK to save the settings.
