
Archiving, as mentioned above, is a great solution for assisting in decreasing the size of our mail. When we set up archiving it creates a copy of our current mail application and stores it locally on our computer. It creates a new directory in Windows Explorer called Archive. If we ever need to take a backup of the archive application, we will find it in the IBMLotus NotesDataArchive directory in Windows Explorer if the naming conventions have been kept as the default.
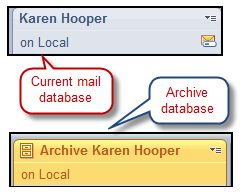
We can access the archive database from our mail file in the side navigator as shown here:

To open our archives, expand Archive in the side navigator and then select the archive we want to open. In the above screen shot the only archive available is Mail 2008. Once opened, the archive application is almost the same as our current mail excluding all the e-mails! It does look slightly different as the archive application is a yellow color and has a different title as we can see in the next screenshot:
Before we can archive, we must configure the archive settings, which we will go through shortly. We can have more than one archive database. Some people have an archive database for each year. Others prefer to only have one archive database. A consideration for how many archives we have would be size. If we want to back up our archive applications, we might need to control the size, therefore requiring us to have more than one.
Setting up archiving is quite simple, follow the steps given next:
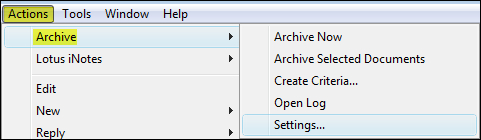
- Access the archive menu choices under Action | Archive | Settings.
- Click the Create button on the right-hand side.

- This will open the Create Archive Criteria dialog box. From within here, we have four sections that need to be complete:

i. Give a descriptive name for the archive database and check Enable this criteria. Enabling the criteria shows the link to the new archive in the mail side navigator as per our example, Mail 2008 in the screen shot earlier.
ii. Click the Selection Criteria… button to determine how often and which documents we want to archive. The default is Not modified in more than 365 days. We can change these options.
iii. We then need to decide What should happen with the selected documents. The default is to Copy documents into my archive application specified here, then clean up this application. The other option is to Just clean up this application without archiving however this is not recommended as there is no way to retrieve the deleted documents if there is a need to.
iv. Finally, How do you want to cleanup documents in this application gives two opportunities. The first choice is to completely remove the document from our current mail so that we will be able to access the document only from the archive application. The second choice is to leave a subset or summary of the document in the current mail application. This ensures we will see the archived document in our current mail file with a blue summary icon on the archived document, which represents that the document has been archived, and either the attachment has been removed or the attachment has been removed and 40KB of text remains in the original message. The great feature about this option is that we can open the archived document in our current mail file and select Actions | Open Archived Document; this opens up the original message that has all the original data which is now stored in our Archive application.

- Click OK to close. We will then be prompted with the information that to use the enabled criteria we must archive either by selecting the option to Archive Now under the ActionArchive menu or clicking the Yes button to schedule archiving. A schedule will automate archiving at the time we allocate.

If we select not to schedule archiving by clicking on the No button, then we will need to manually archive some documents before the archive application is created.
There are four ways to archive:
- Actions | Archive | Archive Now: This will archive documents that meet the archive criteria.
- Actions | Archive | Archive Selected Documents: This archives any documents we currently have selected.
- Let schedule archiving archive according to the archive criteria.
- Drag-and-drop documents into the archive database in the side navigator.
At any time we can Edit, Delete, or Disable our settings for each database by selecting the Actions | Archive | Settings.

In the Archive settings, we will see an Advanced tab as shown in the next screenshot:
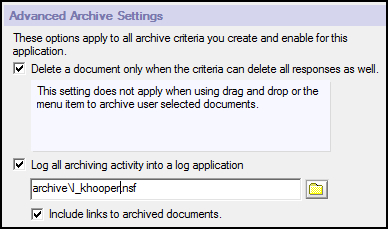
In this area, by default, archiving will delete documents only if it can delete all responses as well. An example of a response is a reply to an e-mail. By keeping this option checked, we will always be able to show the whole conversation.
There is also an option to Log all archiving activity into a log application option. This will give a report each time archiving occurs and can include links to the actual documents archived. The log is a separate application and is stored in the path listed in the Advanced tab.