
Suppose you are creating an explosion effect for a film. You might go out and shoot video of flames against a black background so you can mix that footage into the effect. For a one second blast you'd wind up with 30 or so frames, which is no problem in a film, but in a game, you have to handle all those frames. One method is to spread the frames from the explosion onto a single grid and then read off each square in the grid in series. In Cascade, the term SubUV refers to rendering part of a texture onto a sprite. You can combine textures onto a grid, such as 4x4 or 8x8, and tell UDK to use SubUV for the texture and it will parse each of the grid squares for content to render. This can be done by stepping through the grid squares in order (linearly) or randomly.
Furnishing a 1024x1024 SUBUV texture card grid:
- I'm going to assume the use of Photoshop for image processing in the book but you could use any equivalent image editor like GIMP from www.gimp.org. In Photoshop, create a 256x256 document. Fill the canvas with 50% gray. Press Ctrl + A to select all, then Ctrl + C to copy.
- Also create a new 1024x1024 document. If you haven't got rulers turned on, press Ctrl + R to turn them on. This is so view snapping (Shift + Ctrl + ;) can snap to guides coming off the rulers. The snap options by default include View | Snap To | Guides.
- Press Ctrl + V to paste the 256x256 gray square into the 1024x1024 canvas and align it up into the top left corner. It should snap there accurately. From the side and top rulers drag Guide lines to the edges of the pasted square.
- Press V to switch to the Move Tool, and move the square along to line up with the vertical guide. Add another guide line along the leading edge. Repeat this sideways to fill the page with four squares, then do the same going downwards.
- Clear the layer with the gray square when you are done, and you'll have an empty texture card layout. Save this as a template to Grid4x4.PSD for later use. A copy is also provided just in case: Packt_TextureCardBlank1024x1024.PSD.
If you use 3D software to create your textures, the rendered frames can be processed using contact sheet automation. For 32bit Photoshop, use Adobe Bridge. For 64bit Photoshop, you may want to check: http://sourceforge.net/projects/ps-scripts/files/ContactSheetX/ and get ContactSheetX which you can unpack then install by choosing File | Scripts | Browse. Choose the CSX install script, for instance InstallCSX-1_5.jsx. After installation, restart Photoshop; you'll then see the script available under File | Automate | Contact Sheet X; clicking this shows its dialog for processing a folder of rendered images into a grid directly.
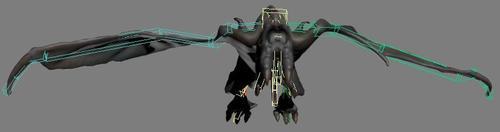
In this recipe, we'll be putting this 4x4 texture card concept into practice, making a flock of dragons for the background of an environment. The source for the dragon is an animation in the included 3ds Max file PACKT_Dragon_fly01.MAX, which has a 16 frame loop, from the side view, of a dragon flapping its wings.
Making the SubUV texture:
- The frames have been rendered to .TGA files which include an alpha in MonsterFlySide####.TGA. Open these in Photoshop, and your Grid4x4.PSD that you made previously, or if you didn't make the template, you can use: Packt_TextureCardBlank1024x1024.psd.
- From each monster image, press Ctrl + A, then Ctrl + C, then switch to the grid and press Ctrl + V. Position the images sequentially going first along the top line 1,2,3,4, then the second line 5,6,7,8, then the third line 9,10,11,12, and the fourth line 13,14,15,16. There are 16 frames, so the layout fits neatly. Save this to your UDK content folder as: Test_TextureMonster_Diff_1024x1024.PNG. The result of this is shown in the next image, already imported into UDK.
- We also need to generate a black and white cut out of the dragon frames. So go to the channels of the first .TGA monster image file and highlight the Alpha channel (so it appears selected) and press Ctrl + A then Ctrl + C. Now select the RGB channel and press Ctrl + V. The black and white content from the alpha channel will replace the colors.
- Repeat that with every .TGA file for the monster flying, to provide you with just the alpha component, then select, copy, and paste the alpha content into the template, as in step 2. Save the result to your UDK content folder as: Test_TextureMonster_Alpha_1024x1024.PNG. Again, the result is shown below in the Alpha channel of the UDK Texture Sample, which we'll set up next.
- In UDK, import Test_TextureMonster_Diff_1024x1024.PNG and Test_TextureMonster_Alpha_1024x1024.PNG, then create a new Material: YOURFOLDER.Material.TestDragonFlock_Mat.
- For the PreviewMaterial_0 node, set the property Material | Blend Node to Blend_Translucent. Set the Lighting Mode to MLM_NonDirectional, which will reduce the chance of the particle appearing unlit. And turn on Two Sided so we can see the dragon on the particle sprite no matter what angle it's viewed from (although it should be set to face the camera all the time anyway).
- In the browser, highlight your imported alpha image Test_TextureMonster_Alpha_1024x1024.PNG, hold T, and then click in the Material Editor to bring it in. Hook the resulting texture sample to the Opacity channel of PreviewMaterial_0.
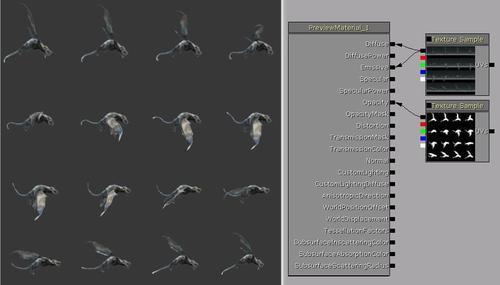
- In the browser, highlight Test_TextureMonster_Diff_1024x1024.PNG, the diffuse texture image, and hook it up to the Emissive and Diffuse channels of PreviewMaterial, as in the next screenshot. Compile the Material, and save your package.
Setting up the particle asset to use the SubUV
- The next step is to right-click in the content browser and choose New Particle System. At the prompt, set the asset to be YOURFOLDER.Cascade.TestDragonFlock.
-
The default particle system is not very inspiring, with a little upward jet of sprites with a DefaultParticle Material. Let's swap that texture for the TestDragonFlock_Mat you just made. Highlight that Material in the browser, then in the particle system, click on the Required module of the Emitter and in its properties expand Emitter to show the first channel Material. Here there is a green arrow [
 ] you can press to swap in your browser highlighted Material.
- Set the property Emitter | Sort Mode | PSORTMODE_ViewProjDepth, which will mean dragons closer to the camera will render in front of dragons further away.
- What you'll see is an upward plume of the texture sheet showing all the dragons in the grid, which may look kind of cool but isn't our goal. We need to tell the Emitter just to render part of the texture UV space. Scroll down in the properties to Sub UV. Set the Interpolation Method to PSUVIM_Linear, the Sub Images Horizontal to 4, and the Sub Images Vertical to 4. Now you will see lots of individual dragons shooting upwards.
- At present the dragons aren't flapping their wings. To activate that, right-click in the space under the Color Over Life module of the Emitter and choose SubUV | SubUV Movie. In its properties turn on Use Emitter Time, and set the Frame Rate | Distribution | Constant to a value between 20 and 30. This sets the frame rate the animation will play, which was originally a snappy 30fps.
- Move down from the Required module to the Spawn module. Set its Spawn | Rate | Distribution | Constant to 1 and Rate Scale | Distribution | Constant to 1.1. This changes the number of spawned dragons.
- Move down from the Spawn module to the Lifetime module and set the property Lifetime | Lifetime | Distribution | Min 16 and Max 16. This means that all the dragons will live the same duration, which prevents dragons popping out of existence along their path. We won't be showing the moment of spawning and death of the dragons. It will be hidden from the player by scene rocks.
- Move down from the Lifetime module to the Initial Size module and set the property Size | Start Size | Max:
X=100,Y=100,Z=100and Min:X=75,Y=75, andZ=75, which gives us a slight variety in the dragon sizes. - Move down from the Initial Size module to the Initial Velocity module, and change the property Velocity | Start Velocity | Distribution | Max to
X=35,Y=0,Z=5and the Min toX=30,Y=9,Z=5. This creates a sideways motion for the dragons so they fly along their facing axis. Then, the speed variation provides a touch of extra realism though you'll want values that aren't too extreme. You may need to swap the XY values to alter the direction the dragons travel.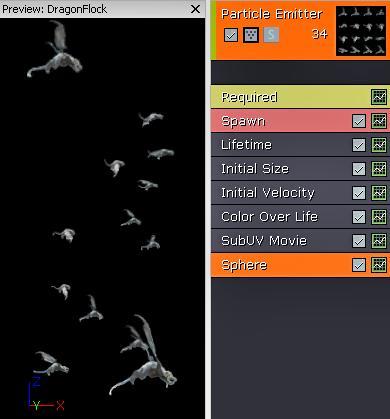
- At the moment, the dragons disperse in a line, all from the same point. Let's spread them out. Under the SubUV Movie module you added, right-click and choose Location | Sphere. In the properties for the Sphere module, set Surface Only to be ticked on. Set the Start Radius | Distribution | Constant to be 200 or so. This sets the area for the flock, so really that is up to you. Too small a radius will make the dragons appear to overlap too closely.
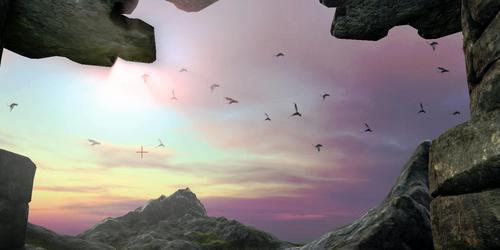
A demo scene is included in the provided content: Packt_07_SubUV_DEMO.UDK which includes the dragons flying against a sunset. They even react to the DominantDirectionalLight's light shafts, as shown in the previous screenshot.
SubUVs are generally used in situations where the particle content requires an animated source, such as flames, explosions, spinning objects, or flapping wings. In UDK the SubUV settings are a component of the Required module of an Emitter, but you also need to load an additional module of SubUV controls, called a SubUV Movie.
As we saw in Photoshop, the grid size must be a subdivision of the image resolution; for instance 64x64 goes into 1024x1024 16 times, which gives a 4x4 horizontal and vertical distribution.
You then set the type of interpolation for parsing the 4x4 grid. A sequential animation like wings flapping will be linear, while smoke might be random. Finally, we add a Location setting such as a sphere to situate the particle spawn points.