Bump Offset provides us with a way of doing a stacked effect within a Material so that the Material doesn't appear completely flat. It projects content based on a height value to simulate displacement. It is really good for enhancing bumpy surfaces like courtyard cobble stones. Still, on top of this, we can offset different elements in a Material so they float, or appear to, which can form the basis for a convincing holographic image.
The artwork for the texture is already provided. It is worth looking at the construction of it in Photoshop first. Open up MaskRGBA_DEMO.PSD and got to the menu Window | Channels.

Each channel includes a distinct image in black and white. UDK can access the channels of a texture individually, and this is really handy for mask usage, since masks are usually a single channel. The image also includes an Alpha, which is really just an additional channel. The 512x512 image has to be saved as a .TGA in 32bit format. Once imported, this texture will provide multiple elements to generate the holographic asset from.
- In the Content Browser, right-click and choose New Material. Call it Yourfolder.Material.Hologram_mat.
- Apply the Content Browser filter Texture, and search for Mask in the Packt content, and notice the textures available include Packt.Texture.MaskRGBA. Highlight this and in the Material you just made add it to a Texture Sample (hold T and click). Right-click on MaskRGBA in the Content Browser, choose Properties, and set the Texture2D | Address X and Address Y set to Clamp for both (which will ensure any later Rotator coordinate used with the texture will treat the corners correctly).
-
Set the PreviewMaterial so its Blend Mode is BLEND_Additive and its Lighting Model is MLM_Unlit. Switch the Material preview to display a plane using the icon [
 ] at the top of the Material Editor.
- Hook up the Alpha output of the Texture Sample into the Opacity channel.
- One by one, hook up the R then the G then the B output's of the Texture Sample to the Material's Emissive channel in order to verify how each looks. They show in black and white. To tint them we'll need to Multiply them by a Constant 3 Vector.
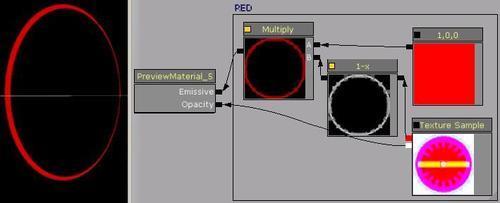
- Notice the 1-x (Math | New One Minus) used to invert the Texture Sample node's Red channel's black and white pixels.
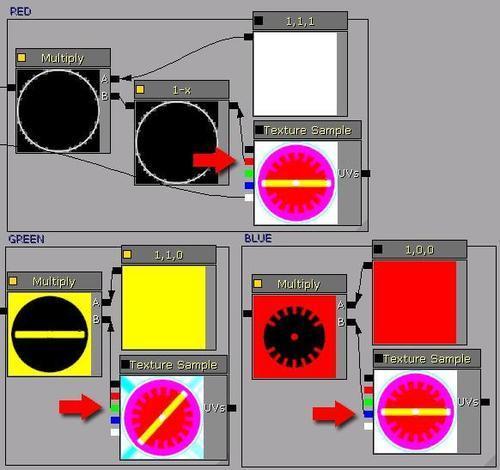
- Select, copy, and then paste this group, then change the Texture Sample output for the pasted group so that the Green channel feeds the value inverting 1-x. Repeat this once more to make a group using the Blue channel. In the next screenshot, the 1-x has been deleted from the Green channel's contribution:
- Let's add a Rotator to the Green group, so the horizontal bar spins. Do this by right-clicking and choosing Coordinates | New Rotator and hooking it into the UVs input of the Texture Sample in the Green group. Set the Speed property as you like.
- The next process is to add the nodes together. Hold A and click and feed the Red group's Multiply output into the A nub of the Add, and the Blue group's Multiply output into the B nub of the Add. Create another Add and feed the first Add's output into the new Add's A nub and feed the Green group's Multiply output into the B nub of the second Add. Send the combined Add into the Emissive channel of the Material.
- For the Bump Offset, right-click and choose Utility | New BumpOffset and hook its output to the Rotator in the Green group. Also, hold 1 and click to provide a Constant and name it Height, as it will give us a height value. Set the Constant to 0.66 and in the Bump Offset node's properties, set Height Ratio to 0.66 and Reference Plane to 0.5.
- Set another BumpOffset feeding the UVs of the Blue group's Texture Sample and give it a Height Ratio and Reference plane value of 0.33. Make sure to feed its Height input the Constant Height also, though you could also create a new Constant if you prefer a different value here.
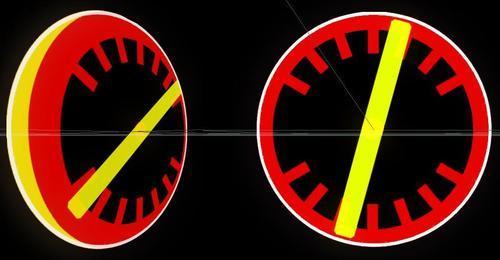
- For the colors used by the Red, Green, and Blue groups (which are called this because of the channel usage) you can set the Constant 3 Vector RGB values to whatever you like, but notice how they add together, since the PreviewMaterial has its Lighting Model as Additive. The next screenshot shows the result of setting up the network, then playing with color combinations so that each channel yields a distinct color. The impact of the Bump Offset can be seen by rotating the preview to the side, then to the front, where it appears to have a certain depth or floating quality.
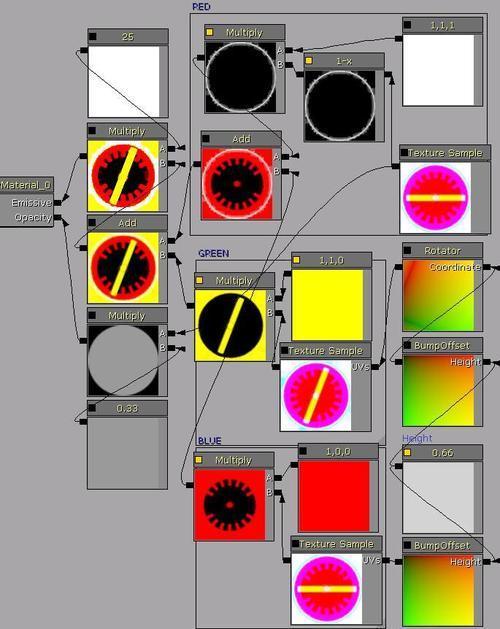
- To complete the Material you may want to Multiply the feed from the Texture Sample in the Red group by a Constant with a value of 0.66 or so. Then Multiply the Emissive feed by a Constant of about 25 to boost it up so it glows. An example is included in the Material Packt.Material.HologramBumpOffset.