
Sockets are handy to use because they can be called on in code no matter the actual object is that is active in the socket. Sometimes though, it's sufficient to just directly attach an object to another already in the scene. By default, objects attach to the target object's main pivot. You can also define an attachment to the pivot of a bone in a SkeletalMesh object's hierarchy. In the Attachment section of the Properties panel (F4) of the object you want attached, you can point to a Base Bone Name in the target's skeleton if you want the selected object to stick to it. To get a bone's name just open the SkeletalMesh in the AnimSet Editor and click on the icon Show Skeleton [ ![]() ].
].
- Start the map template Midday Lighting. In the Content Browser, find Packt_Character and drag the asset into the Perspective view.
- Find the particle Emitter SmokePlume in the browser. Drag SmokePlume into the scene also.
-
Press F4 with SmokePlume selected to access its properties, then Lock the properties using the padlock icon [
 ] at the top of the properties window. This lets you keep SmokePlume's properties displayed while selecting other objects.
- Expand the Attachment roll-out of SmokePlume's properties.
-
Now click on Packt_Character in the scene, and press the green arrow [
 ] of SmokePlume's Attachment | Base channel.
- In the Base Bone Name channel, type in b_head. In the scene, line up the two assets so the particles look like they are emitting just above the character's head. You may want to turn off Grid Snapping to do so, and also you may want to scale down the emitter slightly.
-
The properties for SmokePlume should still be exposed. Turn off Emitter | Particle System Component | Particle System Component | Auto activate. This will make the particle system stop emitting (assuming you had on the real-time playback icon [
 ]). Instead, we'll toggle the particles through Kismet. We'll also add some animation to the character.
- In the scene add a Trigger actor, from which we'll fire the action in Kismet. So you can see the Trigger when you play, press F4 and uncheck Display | Hidden.
-
With the Trigger selected, in Kismet [
 ] right-click and choose New Event using the Trigger_0 | Touch event and add a regular Toggle action (hold T and click).
- Connect the Touched nub of the Trigger_0 | Touch event to the Turn On nub of the Toggle action. Also, connect the Untouched nub of the Trigger_0 | Touch to a 3 second Delay action then run the Delay action's Out nub into the Turn Off nub of the Toggle.
- In the properties of the Trigger_0 | Touch, make sure the Max Trigger Count = 0.

- Select the SkeletalMesh in the scene, and press F4 to open its properties. Expand Skeletal Mesh Actor | Skeletal Mesh Component | Skeletal Mesh Component | Animations.
-
Here there are two channels we need to set. The first is the name of the clip we want to play, which is Anim Node Sequence | Anim Seq Name. Enter Kick, as shown in the next screenshot. The second is AnimSet. This needs to have its add entry icon [
 ] pressed.
-
Then you can highlight Packt_CharAnims in the Content Browser and assign it here using the green arrow [ ] into [0]. This is shown at the bottom of the next screenshot. If everything is good, you should see the character shift its pose in the viewport. It won't play just yet though.
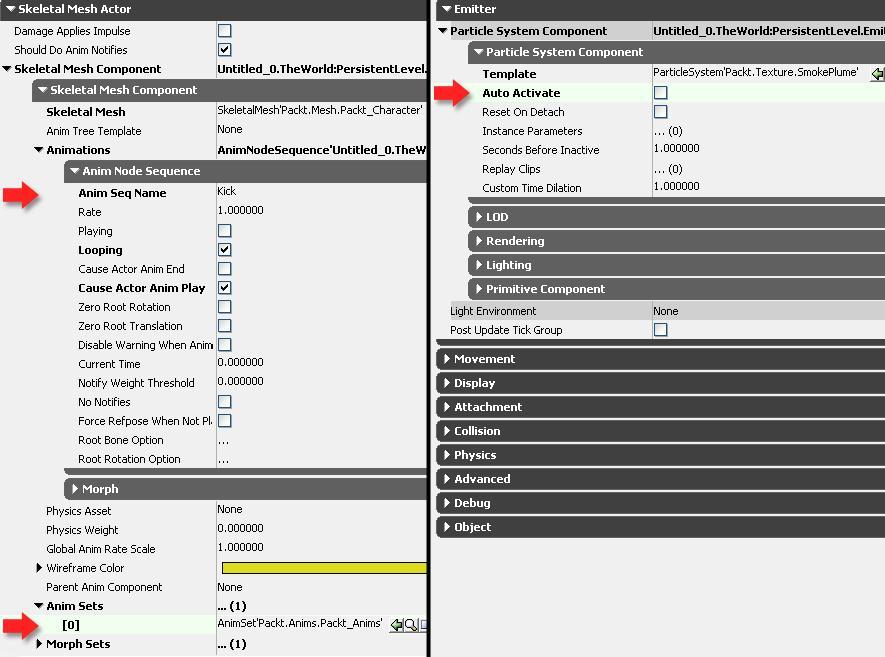
- This screenshot also shows (on the right) the tick box to set Auto Activate off for the Emitter.
-
Set the properties, then select both the emitter SmokePlume and the SkeletalMesh in the scene. In Kismet [ ] assign them as targets of the Toggle.
- In the next screenshot, you can see Kismet with the Trigger Touch event toggling both an Object Variable to which the Emitter is assigned and an Object Variable to which the SkeletalMesh is assigned, prepped to play the chosen animation. On the right, we see the result. Build and PIE, and you should be able to start and stop both the animation and the emitter by bumping into the Trigger.

..................Content has been hidden....................
You can't read the all page of ebook, please click here login for view all page.