
Suppose you have to guide an AI Bot from one location to another, but don't want to use a set path or ideal path based on PathNodes. The problems that can occur with having the Bot flexibly follow your position are as follows:
- The Bot can get stuck against geometry and lose its trace on you
- The Bot can block you as it encroaches on your position, in a corner especially
- The Bot may require respawning at its location and this can create a jitter
- The Bot can run out of the level trying to arrive at your location
If a level is flat, free of obstructions, and only needs a short time period, following behaviour will be easier to set up than if it involves climbing, moving obstacles and has interrupted or lengthy following times. Since there will never be a single way that will work in every case, we're going to focus on an example that provides an approach to each of the problems above. It not only requires the Bot to move to the player, but also has conditions to renew the Bot in the scene should it get stuck or be in a position we don't want, like encroaching too much on the player. The Bot is able to stop and resume walking, or, if we do manage to snag it, it can be unstuck just by walking up to it.
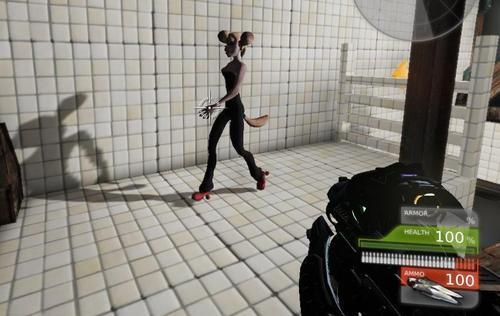
For this example, load the map Packt_05_Kismet_Following_Start.UDK and familiarize yourself with the scene by running around in it. The GameType for PIE is set to MyGame, so that will require you to set the config DefaultEngine.ini to point to +ModEditPackage=MyGame as in the previous recipe's Getting ready steps. There is a JumpPad, a ladder, and a swimming pool. The goal will be to lead the Bot from its spawn point up to a second room up the ladder without it getting stuck. All the actors and triggers that are in the scene have already been given their variables in Kismet.
Spawning the Bot and its guides
- Open Kismet and double-click on the Sub-sequence Spawns. Right-click and choose New Action | Misc | Finish Sequence. This creates a route out of this Sub-sequence. When you select items in Kismet and choose Create New Sequence the Finish Sequence action and Sequence Activated Events are added automatically based on the content. Since this procedure is reverse engineered, here they'll need to be placed by hand.
- Add a new Player Spawned event. Set its Max Trigger Count to 0. Also add a New Event | Remote Event and type LoopBack in its Event Name property. LoopBack won't go green just yet.
- Hook up both of these events to a new Actor Factory action. For this, set the property Factory as UTActorFactoryAI and the Controller Class as None, and the Pawn Class as MyPawnLookAtMorph. This is a MyPawn variant that stares at the player. Turn off the property Check Spawn Collision.
- For the Spawn Point nub, add a Named Variable BotLocator. This should go green because the variables already exist in the main sequence. For the Spawned nub add a Named Variable Bot.
- Following the Actor Factory, extend a new Attach to Actor action. Set its Target as the Named Variable Bot and the Attachment as the Named Variable BotLocator. Turn on the property Use Relative Offset.
- From the Out nub of this, hook up one of the Finish Sequence actions we made then name its Output Label property: BS_Out.
- Copy and paste the Finish Sequence action, and set the pasted one's Output Label to be PS_Out. Wire that up to the Player Spawned event, as shown in the next screenshot. Copy and paste the Attach to Actor action, and hook this up to the Player Spawned event. The Target should be the Named Variable BotLocator and the Attachment should be the Named Variable BotOffset. BotLocator and BotOffset both reference Triggers in the scene, but BotOffset is larger, so there's a certain distance between the two in terms of radius.
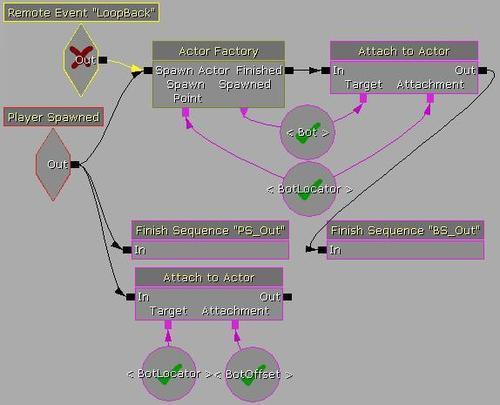
- All we've done is spawn a Bot in the scene and attach Triggers to it. Now the Bot is followed around by the Triggers we have a reference for its position in case we need to respawn it or in case we want to fire off some Kismet from the attached Trigger.
The PlayerLocator
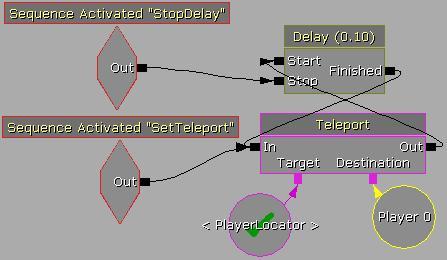
- In the Sequences Window, ensure the Sub-sequences list is expanded, then click on SetPlayerLocator. Inside it add two Sequence Activated events. Give the first the Input Label property: StopDelay and the select the other and give that the Input Label property: SetTeleport.
- From the event SetTeleport extend a new Teleport action. For the Teleport action's Target assign the Named Variable PlayerLocator and for the Destination hold P and click to add a Player Variable. Turn off the All Players property of that.
- Hold D and click to add a Delay and hook up the Out nub of the Teleport action to the Start of the Delay. Hook up the Finished nub of the Delay to the In of the Teleport action. Set the Duration property of the Delay to 0.10. Finally, from the Sequence Activated event PauseDelay extend a wire to the Stop nub of the Delay. This gives us a rapid loop which will always put a Trigger on the player's position, unless the loop is deliberately interrupted by the StopDelay.
Handling the ladder
In our scene there's a ladder, and bots are not that great at handling instructions while climbing ladders, so we need to make a special case for it that, once it starts to climb it will finish doing so, then resume following. It is useful to know how to break off an action, do something else, then come back to it. One can imagine however, that if your level has dozens of ladders, then you'd have to elaborate things considerably. If you are working with a technical developer, it would be possible to create a custom condition IsClimbing? and use that instead. This method is quite fast with a single ladder though. It just forces the Bot to move on the ladder without interruption, then resume following once finished.
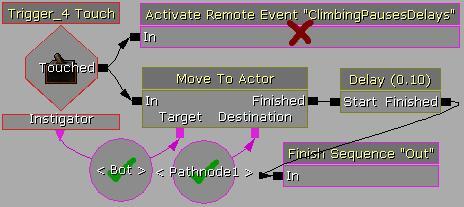
- In the scene, at the base of the ladder volume, there is a Trigger actor (Trigger_4). Select Trigger_4 then open Kismet and double-click on the Sub-sequence Ladder. In there right-click and choose New Event Using Trigger_4 | Touch.
- In the Trigger Touch event's properties, add as an entry to Touch Types | Class Proximity Types MyPawnLookAt from the list of available types. To find this fast, you can press M to jump to items starting with M.
- Add the Named Variable Bot to the Instigator nub of the Trigger Touch event, and make sure the property Use Instigator is on and Player Only is off. Set the Max Trigger Count to 0.
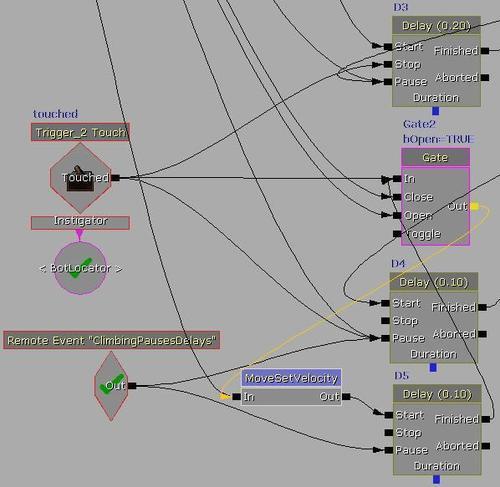
- From the Touched nub of the Trigger Touch event, extend a New Action | Event | Activate Remote Event. Set its Event Name property to ClimbingPausesDelays. We'll add the event this should be associated with later, so don't worry that it is marked red.
- Also from the Touched nub of the Trigger Touch event, extend a New Action | AI | Move to Actor. Set the Named Variable Bot as the Target, and assign the Named Variable PathNode1 as the Destination and Look At. This references an existing Object Variable in the main sequence which is based on an actor in the scene. If you feel like looking for it in the scene, you'll find it at the top of the stairs.
- In the properties of the Move to Actor action, ensure Interruptable is turned off (although it doesn't appear to matter, in theory it is just to let the Bot get from A to B without being told to do something else). Extending from the Finished nub of the action, add a Delay with a Duration of 0.10 and hook the Finished of the Delay to a New Action | Misc | Finish Sequence.
Teleporting locators
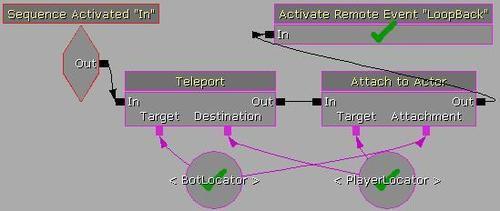
- In the sequences list find TeleportBottoPlayer and open it. In here, add a New Event | Sequence Activated.
- Extend from the event a new Teleport action, and extend from that an Attach to Actor action. Lastly, extend from that a New Action | Event | Activate Remote Event. Set the Event Name property for the last action to LoopBack. LoopBack should go green since we added the Remote Event it calls on earlier. Double-click LoopBack to step back and forth.
- Assign the Named Variable BotLocator to the Target of the Teleport action and also to the Attachment of the Attach to Actor. Assign the Named Variable PlayerLocator to the Destination of the Teleport action and also to the Target of the Attach to Actor, as shown in the next screenshot. In the properties of the Attach to Actor, turn on Use Relative Offset.
- Select the Sequence Activated Event and copy it by pressing Ctrl + C.
Bot stopping
- Open the Sub-sequence MoveSetVelocity and press Ctrl + V. Set the event's Input Label property to In.
- Extend from the event a New Action | AI | Move to Actor. Set the Named Variable Bot as the Target for this and set the Named Variable PlayerLocator as the Destination.
- Extend from the Move to Actor action's Finished nub a New Action | Actor | Set Velocity. Right-click on the Finished nub of the Move to Actor and choose Set Activate Delay, then set the value as 0.10.
- In the properties of the Set Velocity action, the defaults use zero for the Velocity, which is what we want. We just need to add the Named Variable Bot as the Target for the action.
- Lastly, extend a New Action | Misc | Finish Sequence, and set its property Output Label to Out.

The fun part—putting it all together
- We now have a range of Sub-sequences, but nothing connects. Go to the main sequence, and add seven Delay actions. Since there are so many, and we'll be wiring into them all over the place, comment them
D1,D2,D3,D4,D5,D6, andD7so they are easy to track through the steps that follow. - For
D3,D4, andD7set the property Start Will Restart. - Hold G and click to add a Gate, then add another. Comment them Gate1 and Gate2. These will also get a lot of connections. Next add a new Switch action.
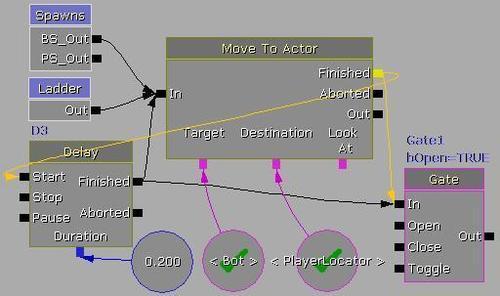
- Add a new Move to Actor action. Make the Target the Named Variable Bot, and make the Destination the Named Variable PlayerLocator. There are going to be three In wires for this and two Out wires. Send the first In wire back to the Out nub of the Sub-sequence Ladder node. Send the second In wire back to the BS_Out nub of the Sub-sequence Spawns node. Also, connect the third Move To Actor action's In nub over to the Finished of the Delay D3.
- The Delay D3 needs a Duration of 0.20 and should have the property Start Will Restart turned on.
- The Finished nub of the Move To Actor should extend to the In nub of Gate1. It should also extend to the Start nub of the Delay D3 as shown here:
Distance Check
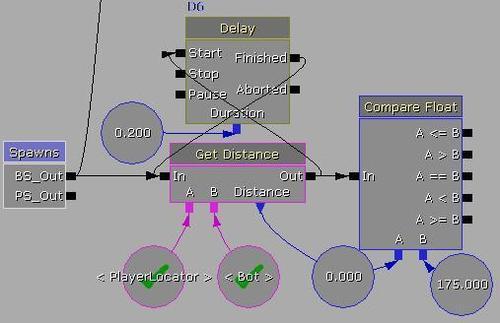
- Add a New Action | Actor | Get Distance. For this assign the Named Variable PlayerLocator to the A nub, and the Named Variable Bot to the B nub. Right-click on the Distance nub and choose Create New Float Variable.
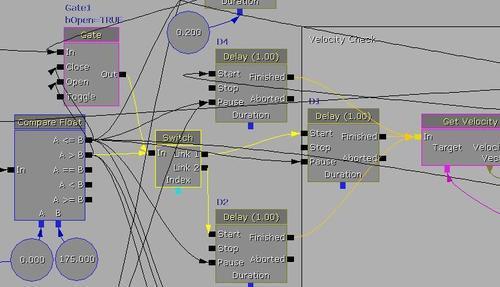
- Now add a New Condition | Comparison | Compare Float extending from the Get Distance action. Assign the Float Variable just created to the A nub of this Compare Float as well. Right-click on the Compare Float action's B nub and choose Create New Float Variable. Set its Float Value as 175, which gives us a fair approximation of the distance we want the Bot to get to the player to look like it is encroaching but not getting too friendly.
- The Get Distance needs a Delay loopback, so bring Delay D6 over to it, and set the Out of the Get Distance to the Start of the Delay D6, and hook up the Finished of Delay D6 to the In of the Get Distance. Set the Duration of the Delay D6 to 0.20.
- Wire back the In nub of Get Distance to the BS_Out nub of the Spawns Sub-sequence node.
- For the Compare Float action's A <= B output, follow the list given here (and notice they are mostly closing or stopping flow through the nodes they connect to):
- A <= B to Gate1 Close
- A <= B to Gate2 Close
- A <= B to Delay D1 Pause
- A <= B to Delay D2 Pause
- A <= B to Delay D3 Pause
- A <= B to Delay D4 Pause
- A <= B to Delay D7 Stop
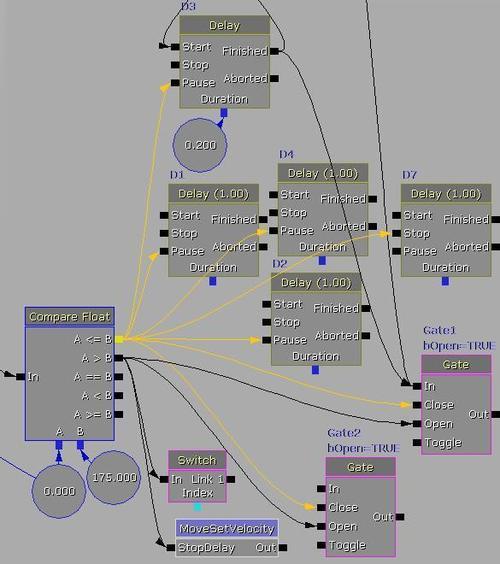
- Also, for the Compare Float action's A > B output, complete the links given next. Essentially, if the Bot encroaches on the player within 175 units, everything stops. If the distance is greater than 175, everything flows again (so these wires open things up):
- A > B to the Switch action's In.
- A > B to Gate1 Open
- A > B to Gate2 Open
- A > B to the Sub-sequence MoveSetVelocity into the input StopDelay.
- Those links above are shown in the following screenshot, though the layout is not necessarily that way, just the connections:
Velocity check
- Move the Delay D1 into some clear space. Extending from the Delay D1 Finished nub add a New Action | Actor | Get Velocity. For this set the Target as the Named Variable Bot. Right-click on the Velocity Vect nub and choose Create New Vector Variable. This takes the velocity of Bot along the directions XYZ, so now we know how fast it is going. We're only interested in the Y component, so extend a New Action | Math | Get Vector Components from the Get Velocity. Then assign the Vector Variable from the last step to the Input Vector of the Get Vector Components action. Right-click on the action's Y nub and choose Create New Float Variable. This draws the Y value from the XYZ Vector Variable, and the specific value is what we'll be checking.
- Extend the Get Vector Components action's Out nub to the In nub of a New Condition | Comparison | Compare Float. Assign the Float Variable from the last step that is capturing the Y value of the Vector Variable and hook it into the A nub of the Compare Float. Right-click on the B nub and choose Create New Float Variable, and adjust the resulting Float Variable so it has a Float Value property of 0.001.
- From the A < B nub of the Compare Float, extend out a new Attach to Actor action. Although this is called Attach to Actor we are going to use it as a detach by turning on its Detach property. Also turn on Use Relative Offset. Comment the action as Detach so you'll remember it has been set.
- Assign the Target of the action as the Named Variable Bot and the Attachment as the Named Variable PlayerLocator.
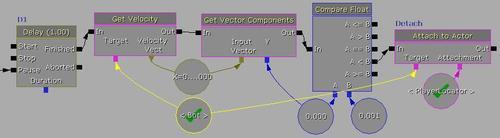
- From the A > B node extend a wire to the Start nub of Delay D4. From the Out of the Attach to Actor action, extend wires to the Pause nub of the Delay D3 and to the Start nub of the Delay D7.
- Select around the actions in the image above and create a Comment box called VelocityCheck. Now we have a method for telling the Bot to react if she's come to a stop which can help us avoid stalling issues. To solve the problem of stalling we're going to destroy and respawn our Bot. Since she'll be momentarily gone from the scene, enabling the Detach property of the Attach to Actor lets the guide that was following her stop doing so, and we use that subsequently as the re-spawn point for the Bot.
Putting it all together
- In the Global Variables section, find and select the Object Variable Trigger_2 which has the Var Name PlayerLocator. Right-click on this and choose Select Trigger_2 in Level. Then right-click on the canvas and choose New Event Using Trigger_2: Touch. This Trigger is joined to the player and it will be triggered by the Trigger joined to the Bot. So go into the event's properties and expand Touch Types | Class Proximity Types. Add an entry, and from the list choose Trigger. Make sure the Use Instigator property is on, and the Player Only property is off. Set the Max Trigger Count to 0. Set the Re Trigger Delay to 0. Set the Named Variable BotLocator as the Instigator under the Trigger_2 Touch event.
- The Trigger_2 Touch event connects to three nodes, the Stop nub of the Delay D3, the In nub of Gate2, and the Pause nub of the Delay D4.
- While we are here, it is important to note for this scene the Trigger actors in the level have their properties adjusted so they differ from the defaults. They all have the property Can Step Up On turned off. Trigger_3 (the Bot locator) has the Collision Type property set to COLLIDE_NoCollision. Trigger_2 (the player locator) has its Collision Type property set to COLLIDE_CustomDefault. It also has Block Rigid Body and No Encroach Check ticked. The other Triggers don't. Trigger_4, at the base of the ladder volume, has its property Trigger | AITrigger Delay set to 0.1, which helps fire the command to send the Bot up the stairs.
- Right-click and choose New Event | Remote Event, and give it the Event Name ClimbingPausesDelays. This is associated with an existing Activate Remote Event action in the Sub-sequence Ladder. Its purpose is to pause the Delay actions D4 and D5, so hook up its Out nub into their Pause nubs. Hook up the Finished nub of the Delay D5 to the In nub of Gate2. Also, hook up the Out nub of Gate2 to the In nub of the Sub-sequence MoveSetVelocity and hook up the Out nub of the Sub-sequence MoveSetVelocity to the Start nub of the Delay D5, as shown:
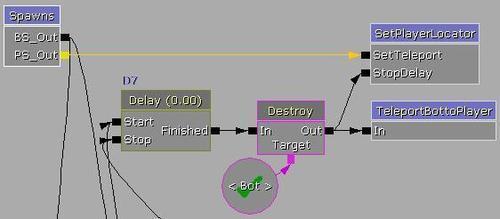
- The Sub-sequence Spawns has a so far unused PS_Out nub. Hook this up to the SetTeleport nub of the Sub-sequence SetPlayerLocator. This situates a locator on the player once the player spawns.
- After the Delay D7 add a new Destroy action. Set as the Target the Named Variable Bot. From the Out nub of the Destroy, extend to the StopDelay nub of the Sub-sequence SetPlayerLocator and also to the In nub of the Sub-sequence TeleportBottoPlayer, as shown:
- The Switch action we've already set so far has one input from the Compare Float action's A > B. Also add an input from the Gate1 Out nub to the In nub of the Switch. The Switch so far has one link output, which should hook up to the Start nub of the Delay D1. In the Switch properties set the Link Count to 2. From the new Link 2 output, hook up a wire to the Start nub of the Delay D2. Hook the Finished nub of the Delay D2 to the Get Velocity action's In nub, and also the Finished nub of the Delay D4 goes there, so now it should have three inputs. This is shown in the highlighted links here:
- You should now be ready to PIE. You can also check out the working demonstrations: Packt_05_FollowMyGame_DEMO.UDK or Packt_05_FollowUTGame_DEMO.UDK in the provided content. Open up both and have a look at the differing organization of the Kismet network.
- An interesting feature that can go along with the kind of attracting or following process discussed here is changing the speed at which the Bot or the player follows, particularly on ladders. Be sure to check out the recipe Changing the speed of characters in Chapter 6, Under the Hood.