
It is possible to generate efficient planar reflections on planar surfaces using Image Based Reflections, and these have their own actor type and process. This can include variable reflectivity, but is best for static lighting. For dynamic actors, a shadow plane must be included where the reflection will occur. In this recipe we will make a wet floor which reflects in some places more than others.
Enabling DirectX11
will be necessary for some users (depending on future updates to UDK). To do this, open in ConTEXT C:UDK~EngineConfigBaseEngine.INI, search for AllowD3D11, and if you find that it's set to False, change it to True. A couple of lines below that you'll also see AllowImageReflections=True, hopefully. If it isn't set to true, try setting it, but actually if it's not there could be a larger issue to solve.
In the properties for the icon which starts your UDK, for instance, in the Windows Start menu, in the Unreal Development Kit category, where it says UDK Editor, edit the Target command line
so that -D3D11 is appended to the line C:UDK~BinariesUDKLift.EXE editor -D3D11. It is helpful to append -log after it also.
When you re-launch UDK you will know what version of DirectX UDK is using by looking at the top of the editor where it says Unreal Development Kit (64 bit, DX11) … or DX9 . If it says DX9 perhaps you should look closely at your hardware and system.

Assuming that everything is okay on this score, open Packt_09_IBReflect_Start.UDK.
-
Ensure that View | Enable Translucent Selection [
 ] is toggled on in the editor, and that you're in Lit mode (Alt + 4).
-
Add a LightmassImportanceVolume around the room, by creating a BSP cube, scaling it to fit, and choosing [
 ] Volumes | LightmassImportanceVolume. This volume speeds up lighting calculation and is useful generally to bound any scene, but in this case it is required if you tick Enable Image Reflection Shadowing in the View | Lightmass | Lightmass Settings | World Info menu, which you should do to get a good shadow result from any SkeletalMesh that interacts with an image-based reflection.
- Select one of the lights in the scene, right-click on it, and choose Select | Select All PointLight Actors. Press F4 then scroll down the properties to turn on Light | LightComponent | Image Reflection | Use Image Reflection Specular.
- Create a Material called Yourfolder.Material.IBRTest_mat. For its Specular channel, hook up a Constant (hold 1 and click) and set the Constant's R property to 1.0. In the PreviewMaterial properties, expand the D3D11 section and turn on the property Use Image Based Reflections. Compile the Material. This is just a quick Material to cover the whole scene. In a game level you would have to include the above steps for every texture involved along with the rest of their settings.
- In the scene, select one of the StaticMesh actors, right-click, and choose Select | Matching Material. All the StaticMesh actors should select. Now drag the IBRTest_mat Material onto the objects to assign it to all of them at once.
- Press Ctrl + Shift + F and switch to the Actor Classes tab. From the list, add an ImageReflection actor. Don't confuse it with an ImageReflectionSceneCapture actor, which is something else altogether. The first requires you to set a texture to base the reflection on, which is great for things such as capturing neon signs, while the second captures the scene itself, within a bounding box that sets its range, and is heavier to compute.
- Also add an ImageReflectionShadowPlane. The shadow plane is needed so dynamic objects can cast shadows on the ground. It displays with the same icon as a Fog in the scene.

- The ImageReflection actor probably has a glowing circle icon, as shown in the previous screenshot. This will change once you apply your own texture to it. Note that the actor is one sided by default.
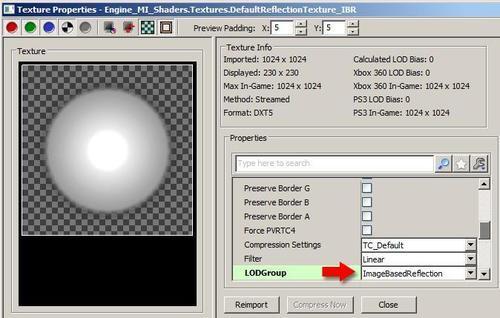
- The texture assigned to it has the LODGroup ImageBasedReflection in its properties. Any texture that you use with this actor should also have the same. You can set this by right-clicking on the texture in question within the Content Browser and choosing Properties and assigning this from the drop-down list, as shown on the right-hand side in the previous screenshot. The texture used must be 1024x1024.
- To make the surface that you're trying to get the reflection to show on look wet, the specular channel in the Material (for the floor or wall not the ImageReflection actor) should have a variable degree of Specular Power, so that some parts are glossy and some are not. You can even animate the specular power with a FlipBook or Panner. A bit of roughness from a normal map will contribute a lot too. For any grayscale texture you add to create varying glossiness, it is a good idea to also Multiply the input with a Constant (perhaps even a Parameter) so that you can moderate the intensity of the effect.
- The ImageReflection actor itself does not render in-game, it just displays in the editor. You will have to add a plane with the relevant Material on it to also render a source for the reflection, as shown in the next screenshot. A demo scene is provided: Packt_09_IBReflect_DEMO.UDK.
- If you want to have this method work with SkeletalMeshes in the scene, you'll need to add a ImageReflectionShadowPlane from the Actor Classes list in the Uncategorized category where the image-based reflection falls.

World Info has some properties that allow specifying reflections coming from an infinitely distant hemisphere over the level. This lets us add ambient reflections that appear like they are coming from the distance, and to bring out the detail that the shadowing methods provide. You have to set an ImageReflectionEnvironmentTexture , which is a panoramic environment texture for image reflections. It looks like a regular spherical environment map but the ground portion is cut off so that the image content's ‘horizon' is along the bottom of the image (V = 0) and straight up in world space is along the top (V = 1). The U direction of the texture then corresponds to rotation around the Z world axis.
The look of this kind of panoramic projection (which is a dome really) is something similar to the next screenshot. We've made a rough outline over the example that UDK provides in order to indicate the typical pattern that you'd see in this kind of projection.
