
One way to improve the integration of a character into a game is through their footsteps left in snow, sand, or mud, or their wet footprints from stepping in water or, as in this case, a trail of their blood on the ground when they are injured. In this recipe we'll make a sprinkling of blood that spatters on the ground when an injured character is moving. Then when the character dies we'll pool the blood around them. It is customary in games to fade this kind of effect over time to avoid rendering too many particles.
Open the map Packt_07_BloodTrails_Start.UDK and note that there is already a Kismet sequence set up. If you want an explanation of the functionality here, look to Chapter 4, Got Your Wires Crossed? Everything here is also covered there. We will be adding variables after we make the particle system.
- In the content browser, right-click and choose New Particle System, and call it Yourfolder.Cascade.BloodSplatter. In its Required module add the Material PacktFX.Material.BloodSplatter. Below, set the property Sort Mode to PSORTMODE_Age_NewestFirst.
- Below is the Material for the particle PacktFX.Material.BloodSplatter, which you can inspect in UDK too. The texture is PacktFX.Texture.Droplet. The shader simply has color, an opacity mask, and luminance so it doesn't appear black. Adding reflections and highlights in the Material might be a nice touch.

- Save the particle system. Place it in the scene where the Note actor is below the Bot's spawn point. The spawn point is set at the floor height. We'll spawn a blood pool from Kismet to handle when the Bot dies and is no longer moving. We could spawn the particles straight off the Bot location via Kismet, but for this example it suffices to just place the Emitter in the level. That way, you can see what is happening as we edit its base values.
- The first feature to set for the particles is their life time, which should be very long. When blood splatters appear on the ground they don't really fade out. Over a long time they might dry up to a black color, but by then you'd probably have moved on to another level in the game. Anyway, plausibility concerns out of the way, set the Lifetime module's Lifetime | Distribution | Min and Max properties to 55555 or some really high number.
- The second feature to set up for the particles is their movement and facing direction. How we'll get around the problem of the particles moving (blood droplets spatter and stick), is by adding an Orientation | Lock Axis module and deleting the default Initial Velocity module. Set the Lock Axis property, of which there is only one, to EPAL_Z.
- The Initial Size module sets the particle size, and really depends on how big your character and scene are. For the scene we're using, set the Size | Start Size | Distribution | Max XYZ to 6.0 and the Min XYZ to 3.0.
- Delete the Color By Life module. Add a Location | Cylinder(Seed) module, and turn off the check boxes for its Start Height | Positive Z axis and Negative Z axis. This will turn the cylinder we'll spawn the particles on to a disk.
-
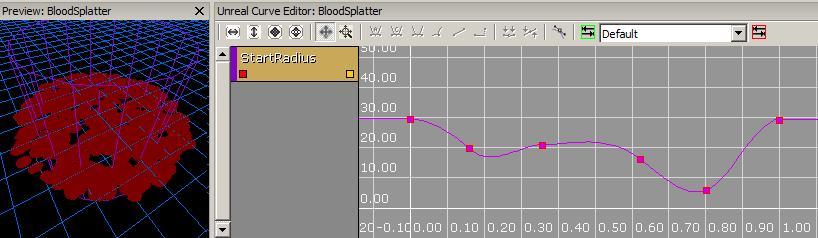
Down at the bottom of the Cylinder(Seed) module turn on the 3DDraw Mode so you can see the cylinder in the Preview window. Make sure the Start Radius | Distribution type is a Constant Curve. Expose the curves for this module in the Curve Editor and press Fit to View
[
 ]. Right-click and remove all the curves except StartRadius. We don't need to change those. Now press Ctrl + LMB click on the StartRadius curve a few times at even spacing and set the resulting keys so they range between 0 and 1 (which represents a percentage), so the radius of the cylinder changes, something like the following:
-
Last, set the Spawn module so it uses a Burst List rather than a Constant. The Spawn | Rate | Distribution |Constant should be 0.0 and the Rate Scale too. Set the Burst | Particle Burst Method to EPBM_Interpolated. Add two entries to the Burst List array by pressing the add entry icon [
 ]. For Burst List | [0] set the Count to 5.0 and for Burst List | [1] set the Count to 1.0 (these are values that varying will produce interesting varieties in the amount of blood, effectively with a high and low amount). Expand [1] and set its Time value to 1.0 so the spawn amount changes over time. Make sure Process Burst List is checked.
-
Now save your particle system. Check you have placed an Emitter actor for the particle system on the Note mentioned earlier, and select this. Open Kismet [
 ], and right-click on the Object Variable commented as EmitterScene in Kismet, which has the Var NameBlood. Choose Assign Emitter_# to Object Variable(s).
-
In the Content Browser, highlight the particle system that you've been making, then right-click and choose Create a copy... to duplicate it and name it Yourfolder.Cascade.BloodPool. Next we'll make it emit only one particle that grows over time. The system already has a long lifetime, so we don't need to change that. Its Initial Size is fine too. The Lock Axis module takes care of orienting the particle to the floor. So we only need to alter the Spawn module settings. Change Burst List[0] to have a Count value of 1.0 and delete the entry [2] since it's not needed here, by pressing the X icon [
 ].
].
- Right-click under the Lock Axis module and choose Size | Size Scale By Time and highlight it. In its properties, make sure the Distribution type is a DistributionVectorConstantCurve and add two entries to it. For Points | [0] | In Val enter 0.0, for the Out Val set XYZ to 1.0. For Points | [1] set the In Val and Out Val XYZ all to 12. A bit further down, turn off the check box for Enable Z.
-
In Kismet, highlight the Actor Factory at the end of the sequence called Spawn Emitter: BloodPool. In its properties, hit the Factory Selector icon [
 ] and choose ActorFactoryEmitter from the list. Then highlight your BloodPool particle system in the content browser, and click the assign icon [ ] in the channel in the Kismet properties (or right-click on the asset and choose Copy Full Name to Clipboard and paste it in the Kismet channel).
In Kismet, a Spawn Point for the BloodPool spawned Emitter is already set to the location of the BloodSplatter particles when the Trigger | Touch event that kills the Bot is fired. In a real game, this would have to be set so the particle appears when the Bot takes damage enough to kill them from any source not just a Trigger in the scene. This recipe is intended to reduce the complexity of the concept enough to illustrate the effect, but you'd probably want to build on it a lot more layers of integration such as disposing of particles after a while, or aligning the blood pool better, or adding footprints in the blood, and making the event that causes the blood based on player action. For now, when you build and PIE, you should see blood trailing the Bot which then pools around his body when he falls down. This effect is not highly polished but should get you going in terms of handling the particle modules.
An example is provided: Packt_07_BloodTrails_DEMO.UDK. This uses MyPawn rather than UTPawn, and when the injured pawn dies the spawned AI actor is destroyed and substituted for an unhidden SkeletalMesh actor driven by Matinee so it can fall to the ground as the blood spreads around it.