
In this recipe we'll introduce some AI handling concerns. We're setting up for future lessons where Bots will be used frequently. In this lesson, we'll just set up the Bot and make him fire at the player.
Open Packt_04_BotHandling_Start.UDK. Click in the View menu and choose World Properties; there set the Game Type for PIE to UTGame. This gives us a heads-up display in which we can see, amongst other things, the health changes this recipe involves.
-
Open the Kismet Editor by pressing the icon [
 ]. Hold P and click to add a Player Variable. Highlight this variable and in its properties turn off the tick box called Seq Var Player | All Players. This means the variable is specific to a single player. Every player can be given an Index to ID them. The default is 0.
- Right-click and choose New Event | Player | Player Spawned. In the properties for this event look for Max Trigger Count and replace the default value of 1 with 0. This means that the event can fire off unlimited times.
- Right-click and choose New Action | Pawn | Give Inventory. Connect the Player Spawned event's Out nub to the In nub of the Give Inventory action. Connect the Target nub to the Player Variable.
-
This action comes from a category which is specific to players and Bots. This Give Inventory action will put in the hands of the player whatever we specify in its properties. For the property Inventory List we need to add an entry. Hit the [
 ] icon to add an entry [ 0 ] will be added underneath. In this entry there's a roll-out list. From the list choose UTWeap_RocketLauncher_Content. Also tick on the properties below, Clear Existing and Force Replace, as shown here:

- Now the player is packing a heavy weapon, let's account for the fact you still might get killed. Right-click and choose New Action | Event | Attach to Event. The Attach to Event action lets you associate a player (or Bot) with another event. Right-click and choose New Event | Pawn | Death to add the event we're going to attach it to.
- Connect the nodes you've added as shown here:

- These steps have been a bit of preparation before adding the Bot, which is needed to just get things rolling. To create the Bot, we need an Actor Factory. Right-click and choose New Action | Actor | Actor Factory. This can be used to spawn all kinds of actors in the scene, not just Bots. But no matter what is spawned, it needs to start somewhere.
-
A PathNode, shown in the next screenshot, is provided to spawn a Bot. PathNodes include a cylindrical collision object, and when you press Build Paths [
 ], UDK attempts to draw a direct line between each pair. Bots can then use these to navigate the scene. The (white) line in the screenshot shows the calculated path, displayed by pressing P. In this case we only need one, since the Bot will just stand in place and shoot at us. Add one as shown here:
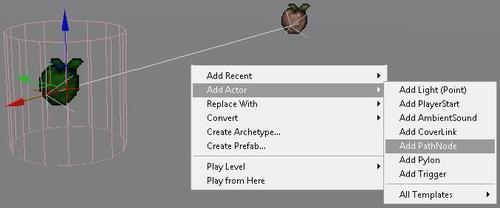
- In the scene, position the PathNode actor you added so it sits on top of the cube in the map. With this highlighted, in Kismet, right-click on the Spawned nub along the bottom of the Actor Factory action and choose New Object Var Using PathNode.
-
The Actor Factory doesn't automatically provision the actor it will produce. We set that in its properties. In the Factory channel, press the blue triangle [
 ] to expose a list of types of actor. The one we want is UTActorFactoryAI. Once this is added, expand the Factory channel and in the Controller Class property choose UTBot. In the Pawn Class property choose UTPawn. These point to classes in the UDK scripts folder that provision the actor with the desired mesh and animations and so on. If you want, type something in the Name field below.
-
How do we arm the Bot? You could just tick the checkbox for Give Default Inventory. This will assign the Bot a default LinkGun. Or, if you want a different weapon leave that unchecked and instead press the Add a new item icon [ ]; then, in the added entry [ 0 ], choose from the available options by clicking where it says None then making a selection, such as UTWeap_ShockRifle, as shown in the next screenshot:

- Our Bot needs to be referenced in Kismet once he's spawned, so right-click on the Spawn nub along the base of the Actor Factory action and choose New Object Variable. This displays a ??? node. The ??? doesn't mean it's an error, but just that it's not a specific scene actor, which is okay, since we're specifying what this Object Variable is from the Actor Factory.
- Hook the Out nub of the Attach to Event action to the In nub of the Actor Factory. If you PIE now, you'll see the Bot just standing still on top of the StaticMesh cube. Press Esc and return to Kismet. Later on, some of the actions we're going to add will require us to slightly delay the spawning of the Bot. So right-click on the In nub of the Actor Factory and choose Set Activate Delay and set the value to 1. This means you'll see the Bot suddenly blink into existence after you start PIE again. Later we fix this.
- The next screenshot shows what you'll have now. In the image the Actor Factory has had its unused nubs hidden. To do that right-click and choose Hide Unused Connectors, but be sure to right-click again and choose Expose Output | Finished, since next we'll be using this to tell the Bot what to do.

- Since we want the Bot to be our enemy, he should be told to shoot at us. To do this, right-click and choose New Action | AI | Start Firing At. Also right-click again and choose New Action | AI | Stop Firing.
- Hold D and click to add a Delay action. This we'll use to loop between the previous added actions. Highlight the existing Player Variable and press Ctrl + C, and under the Start Firing At action right-click and choose Paste Here (or press Ctrl + V). Connect the nodes as follows:
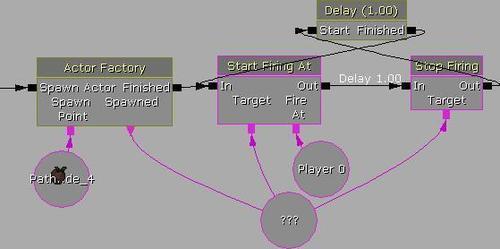
- The Delay action's Duration property defaults to 1 second (as does the Set Activate Delay duration going into the Stop Firing action). The duration moderates how frequently the enemy fires at the player. You can vary it to suit yourself. Later, when we want to permanently stop the Bot's attack, we can just fire off the Stop nub of the Delay from another action.
- If you PIE now and let the Bot win, when you respawn there will be an error, because our sequence is set up to spawn a new enemy just after the player spawns, however often. This is a problem because the previous Bot is still there. To remedy this, right-click and add a New Action | Actor | Destroy. Connect the Out nub of the Death event you added earlier to the In nub of the Destroy action. Set the Target of the Destroy action to the Object Variable ???, belonging to the Spawned Bot.

Adding the Delay for Start Firing At and Stop Firing isn't something that would be needed in every case for a Bot, it's just a simple way to set up a firing pattern where you can control the rapidity of the shots. In this sequence we introduced a Player Spawned event that recurs, and the need to Attach the player to the event of their Death. At the end of the sequence we added a consequence for that, which is to Destroy the enemy too, so we can respawn everything fresh. An important part of specifying the actor that is spawned was to set the Pawn class and Controller to use in the Actor Factory properties. For the Bot, we added a one second activation delay and because of this we see the Bot appearing out of nowhere after the level has begun. In the next recipe this will be disguised behind a wall that drops down to reveal the Bot.
This scene is demonstrated in the map Packt_04_BotHandling_DEMO.UDK.