
This recipe continues the previous one, although from this point you can begin using the provided content where noted in the steps. Where before we exported content, now we're going to import it into UDK and set up the character content there.
Importing SkeletalMesh content and animations in UDK:
- Open UDK. If you used ActorX for exporting the model and animation, and don't need morphs, you can import the
.PSKand.PSAfiles you exported already. If you didn't use ActorX, you can use the provided assetPackt_Character.PSKinUDKGameContentPackt. - The textures for the character are also available in the same location. You'll need to import them to your package too, though they are already in the Packt package: PACKT_Female_Diffuse.PNG and PACKT_Female_Normal.PNG.
- Select your folder in the UDK Content Browser's Packages List, and choose Import and load either the .PSK exported in the previous recipe to an asset called Yourfolder.Mesh.Test_Character. A fully finished example is also included, shown next:

-
In the Browser, double-click on the asset then, in the AnimSet Editor Properties panel, expand the Mesh tab's Skeletal Mesh | Materials component. In Materials [0] , with Packt.Material.Packt_CharMat highlighted in the Content Browser, press the assign icon [
 ].
].

- Right-click, select New Material, and call it YourFolder.Material.DemoMat. The Material Editor will open blank.
- Go into the browser and select a texture asset called Packt.Texture.PACKT_Female_Diffuse. In the Material Editor, hold T and click to add a new Texture Sample. This defines the texture. There's also a corresponding normal map, which you'll also want to add as a Texture Sample.
-
Allocate the Texture Sample node's black RGB output to the PreviewMaterial's Diffuse channel. The normal map is furnished the same way, as shown below. Press the Compile icon [
 ] and close the Material Editor. Save the package.

- A feature of the provided character's Material is the inclusion of a Physical Material, which plays different sounds and particle effects depending on where on the body the character receives hit impacts. The construction of Physical Materials can be learned in the recipe Getting varied hit impacts off models using a PhysicalMaterial in Chapter 9, The Devil is in the Details!
- Some imported models need to be adjusted to face along the viewer's X axis. The appropriate adjustment can be made in the properties section of the AnimSet editor: Mesh | Skeletal Mesh | Rot Origin. You'll probably need Yaw: -90' or whichever transform gives you the model facing along the X axis in the viewer. When you have set the correct rotation, close the AnimSet Editor window and save the asset.

- Now we have the model asset dealt with, let's handle the animations. Remember that if you import FBX you can import the animations at the same time you imported the model, but with ActorX this is done separately.
- Right-click in the content browser and choose New AnimSet and call it Yourfolder.Anims.Test_CharAnims. When the AnimSet asset appears, right-click on it and choose Edit Using AnimSet Viewer.
- Click on the Browser panel's Anim tab, and from the AnimSet roll-down list choose the entry Packt_TestCharAnims. This is there just to represent the name of the asset. At the moment it should be empty. Choose File | Import PSA.

- You need to import the .PSA you exported earlier from 3ds Max, (or use Packt_TestCharAnims.PSA) and then check that what has loaded is indeed what we expected to see, the PacktIdle clip with 220 frames. This is shown loaded in the above screenshot. There is a play button with a loop option at the bottom of the preview display.
Tip
If you don't plan to build a comprehensive set of animated moves, you can Create A Copy of the CH_AnimHuman.Anims.K_AnimHuman_BaseMale set and put it to YOURFOLDER.Anims.YOURSET, and then simply open it and choose File | Import PSA to load any additional or replacement animations into it. Likewise, if you don't want to make an AnimTree, you can edit the default human AnimTree so your animations are swapped in place of the existing ones.
Skeletal Mesh Simplygon LOD generation vs ProOptimiser and SkinWrap in 3ds Max
In this recipe we imported our model. Part of setting up the model is controlling how it performs in game, including creating LODs (Level of Detail variants which show lighter models further away and the detailed model only close up).
For automatic SkeletalMesh polygon reduction an option added to UDK betas starting from July 2011, is Simplygon , a third-party utility that efficiently decimates the mesh into lower polygon counts. Doing this is useful for getting quick Level Of Detail variants. It works with both StaticMesh and SkeletalMesh assets.
Starting with a StaticMesh, highlight an asset in the browser and double-click it to open the Static Mesh Editor. Below the Properties panel there's a Mesh Simplification panel and you can generate an LOD with a distance setting from the camera and a percentage to reduce the model by. The changes you make remain open for further tweaking. It would make sense to assign new LODs before starting to actually reduce the polygons using the slider. Do so through the Mesh | Generate LOD menu command at the top of the Mesh Editor.

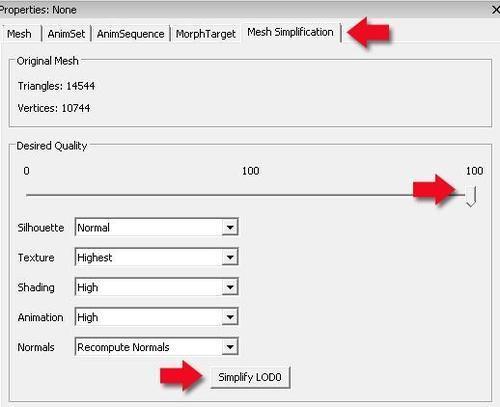
For a SkeletalMesh, generating new LODs is the same, through the Mesh | Generate menu command at the top of the AnimSet Editor. For polygon reduction the control process is found in the Properties panel, under the tab Mesh Simplification shown next.
Tip
Simplygon works similarly to ProOptimiser, a 3ds Max modifier. For a SkeletalMesh, it may prove best to use ProOptimiser (with Keep Textures and Keep UV Boundaries turned on) and then use the Skin Wrap modifier to carry the original model's skin weights across, because you can then further tweak the skinning if needed. Once done, export it as FBX and then in UDK use the AnimSet Editor's tool File | Import LOD.