
Since the UI components that come with Flash are not optimized to run in GFX, UDK users should not use those, and instead base their UI on the Scaleform Common Lightweight Interface Kit (CLIK
) components. This kit ships with UDK, and can be found in the folder C:UDK~DevelopmentFlashCLIKcomponents. The end of the previous recipe details setting that up. However, those components are merely functional, and in most cases designers will want to adapt them, or 'skin' them, to their own taste. In this recipe this is what we'll do, using the standard Button component as an example because almost every game requires one at some point or another, and because its user interaction is amongst the first steps one usually takes when learning Flash too. A key point to note is that the 2D components in a CLIK object are converted by UDK at render time into 3D Draw Primitives
, so in the artwork, there are several issues of control of these. For instance, drawing text on the screen requires a Draw Primitive (DP) and if you add a background behind the text that requires another. Autodesk provides a Best Practices PDF guide which addresses such concerns at: http://www.scaleform.com/udkusers, along with video guides and CLIK documentation, which is undoubtedly the logical place to go when getting started.
Assuming you have finished the previous recipe, but are otherwise starting from scratch, in Flash open: C:UDK~DevelopmentFlashCLIKcomponentsCLIK_Components.FLA.
Creating simple button art
- In the Library, highlight the Button type and right-click on it. Choose Copy.
- Press Ctrl + N to open a new Flash file, and in this one's Library right-click and choose Paste. Select the Button, and drag it to the middle of the stage.

- The button looks pretty uninspiring, and we're going to dress it up, but let's first consider its layer structure. On the stage, right-click on the button instance and choose Edit. Above the stage, on the left-hand side of the timeline you should see the layers actions, labels, textField, and button. These can be renamed or rearranged; however, note that the button will not work as intended if the ActionScript in the actions layer and labeled keyframes of the labels layer are not present in their proper positions. Also, each state of the button must be included at the proper positions relative to the labels keyframes on the timeline.
- So, what is a state? The button we're using only has four, which are up, over, down, and disabled. More advanced buttons, such as Toggles, include selected_up, selected_over, selected_down, and selected_disabled. An Animated Button adds four more states: release, out, kb_down, and kb_release. These have to do with user cursor and mouse action, and in the case of animations, when the end of the animation occurs. Script can be driven by the state changes just as triggers are used in Kismet in UDK.
- For each state, a different graphic is interposed for the button's look. Often it is just a change of tint or brightness, or size, but sometimes entirely different artwork is called for, particularly in the case of games. In the example given next, the artwork remains largely the same (at a pixel level) and the borders are what are altered for each state: inactive, over, down, and active. There is a different look for the button when the game mode it represents is available or not.

- With that in mind, a UI artist has to know how the content will be deployed. Generally differences are systematic and restrained. Ours will have a different image per state. We'll make it in Photoshop then import it to the Library.
-
In Photoshop, create a document which is 128x128. Press Ctrl + Shift + N to create a New Layer. Set the Marquee selection tool to Ellipse [
 ] and make sure it has Fixed Ratio set in its control bar at the top of the screen.
-
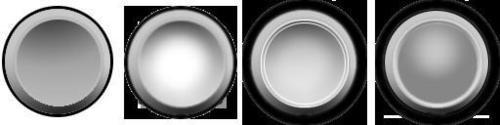
Make a circle within the frame, and fill it with black. Select the filled area and choose Select | Modify | Contract and enter 3. Fill the next area with medium gray, then, with the area still selected, drag a gradient [
 ] from black to transparent upwards. Drag the gradient creation line from bottom upwards because that will make the ring appear shadowed on the bottom. Make a smaller circular selection and fill it with a bright gray. Contract it by 3 pixels, as before. This time, fill the selection with a downwards black to transparent gradient, to create the appearance of a shadowed recess. Finally, clear the background layer to make sure our layer is showing against transparency. Save this as Mybutton_up.PNG. .PNG format must be used.

- Now simply effect the button in four different ways to give you four different states. Save each variant respectively as Mybutton_over.PNG, Mybutton_down.PNG, and Mybutton_disabled.PNG. If you prefer, you can use the ones from the provided content. They were made by using gradients and the Stroke selection command (right-click on a selection after defining the brush setting and color of your choice).
Importing the artwork to Flash and setting the art in place:
- Your PNG files should be placed in a structure like:
C:UDK~UDKGameFlashYourfolderUIMyButtonafter you've completed them. YourfolderUI is a subfolder you create for all your Flash, possibly named for your project or game. The folder MyButton refers to the name of the particular .FLA scene you are making, or going to make, where its content will be stored. Each scene would need a different name. In this case, I called mineC:UDK~UDKGameFlashPacktUIMyButton. - In Flash, choose the menu item File | Import | Import to Library, and choose your artworks. Symbols for the images are also automatically generated, named Symbol #. If you like, rename the symbols by right-clicking on them and choosing Rename.

- You next need to set a Linkage ID for each imported asset, which serves the purpose of letting UDK know where to find the original artwork. To do so, right-click the button images you've added to the Library (one at a time) and choose Properties. For each one, set the identifier which is just the name of the file, excluding the suffix. It is advised to also turn on Allow Smoothing in the same dialog and set the compression as Lossless (PNG/GIF). It is also possible to turn on Export for runtime sharing if you want the images contained in the SWF (that will result from the whole process) as a resource to be called on by other SWFMovies as well as by UDK packages. If you want to try it, see
udn.epicgames.com/ScaleformImport.html#Resource sharingfor more information on that, but in this case it isn't required. - The whole point of this is that the button provided in the CLIK resources from UDK is already scripted for us, and we are now just going to replace its art with ours. On the Timeline, in the button layer, highlight the first keyframe, which should highlight the button content on the stage. Delete that, then pull in your imported artwork. The first keyframe is the Up state, so bring in MyButton_up's symbol and place it more or less where the old button image was. If you want to line things up nicely, adjust the rulers so they line up with the edge of your imagery. Then shift to the next keyframe, clear the CLIK button image for the over state, and drag in your MyButton_over symbol. Repeat this for down and disabled, using the respective imagery. Check the content is nicely aligned.

- Save your .FLA at
C:UDK~UDKGameFlashYourfolderUIand call it MyButton.FLA. Your PNG folder would beC:UDK~UDKGameFlashYourfolderUIMyButton.